
เนื้อหาในบทความนี้เกี่ยวกับการ Install database postgresql ในแบบ HA mode ที่ใช้ Patroni ซึ่งเป็น package ที่ช่วยในการ replicate data และ fail over ระหว่าง node รวมถึงการจัดการ configuration ของ Postgresql หลาย node ไว้ที่เดียว โดยใช้ etcd เพื่อเป็น distributed configuration store (ใช้ sotfware ตัวอื่นได้ เช่น consul หรือ zookeeper) และมีการใช้ pgbackrest สำหรับ solution การ back up และ restore database
Requirements:
- จำนวน Host ทั้งหมด 4 Host โดยจะมีการ set Postgresql node จำนวน 3 host และ 1 Host สำหรับ haproxy
- S3 storage สำหรับเก็บ backup ของ Postgresql
- Network connectivity ระหว่าง Host
- Root access
- Internet access สำหรับ system update และ download 3rd party packages
Installation Diagram

ทำการ tuning OS เพื่อให้มี config ที่เหมาะสำหรับ run database ตามคำแนะนำ Configuring your systems สรุปเป็น script ได้ดังนี้
# check selinux status
sestatus

#disable selinux
/etc/selinux/config
SELINUX=disabled

/etc/sssd/sssd.conf
selinux_provider=none

# check firewall and stop firewall
/sbin/chkconfig --list iptables
/sbin/chkconfig iptables off
# systemctl stop firewalld.service
# systemctl disable firewalld.service

#tuning OS parameter
/etc/sysctl.conf
kernel.shmall = echo $(expr $(getconf _PHYS_PAGES) / 2)
kernel.shmmax = echo $(expr $(getconf _PHYS_PAGES) / 2 \* $(getconf PAGE_SIZE))
kernel.shmmni = 4096
vm.overcommit_memory = 2
vm.overcommit_ratio = 95
net.ipv4.ip_local_port_range = 10000 65535 # See Port Settings
kernel.sem = 500 2048000 200 4096
kernel.sysrq = 1
kernel.core_uses_pid = 1
kernel.msgmnb = 65536
kernel.msgmax = 65536
kernel.msgmni = 2048
net.ipv4.tcp_syncookies = 1
net.ipv4.conf.default.accept_source_route = 0
net.ipv4.tcp_max_syn_backlog = 4096
net.ipv4.conf.all.arp_filter = 1
net.core.netdev_max_backlog = 10000
net.core.rmem_max = 2097152
net.core.wmem_max = 2097152
vm.swappiness = 10
vm.zone_reclaim_mode = 0
vm.dirty_expire_centisecs = 500
vm.dirty_writeback_centisecs = 100
vm.dirty_background_bytes = 1610612736
vm.dirty_bytes = 4294967296

vm.dirty_background_ratio = 3
vm.dirty_ratio = 10

$ awk 'BEGIN {OFMT = "%.0f";} /MemTotal/ {print "vm.min_free_kbytes =", $2 * .03;}'
               /proc/meminfo >> /etc/sysctl.conf

#tuning process and file open
# /etc/security/limits.conf
* soft nofile 524288
* hard nofile 524288
* soft nproc 131072
* hard nproc 131072

# check /etc/security/limits.d/20-nproc.conf
# same as above or nothing

#create disk for postgres seperate from OS, this is for performance improvement
# XFS Mount Options
rw,nodev,noatime,nobarrier,inode64

#CHECK
# /sbin/blockdev --getra devname
# chmod +x /etc/rc.d/rc.local
# /sbin/blockdev --setra 16384 /dev/sdb

# CHECK
# cat /sys/block/devname/queue/scheduler
# check for deadline

# CHECK
$ cat /sys/kernel/mm/*transparent_hugepage/enabled
always [never]

#CHECK
/etc/systemd/logind.conf
RemoveIPC=no
ถ้าไม่ disable firewall จะต้อง manual open port ของแต่ละ components เช่น
$ sudo ufw allow 2379 && sudo ufw allow 2380&& sudo ufw allow 5432 && sudo ufw allow 8008
setup host file เพื่อให้ host สามารถเรียกผ่านชื่อได้ หรืออาจจะใช้ DNS แต่กรณีนี้เพื่อให้ง่ายจึงเพิ่ม host file ในทุกเครื่อง หลักการตั้งชื่อจะใช้ชื่อ host ตามด้วยตัวเลขลำดับของ host และ “-” แล้วตามด้วยลำดับ postgres instance กรณีถ้าต้องการมี postgresql มากกว่าหนึ่ง instance ใน เครื่องเดียวกัน
เพิ่ม ip และ host name ใน file /etc/hosts โดยทำทุกเครื่อง pg1-1, pg2-1 , pg3-1
[ec2-user@ip-172-31-47-229 ~]$ sudo vim /etc/hosts
172.31.47.229 pg1-1 pg1-1.example.com
172.31.34.169 pg2-1 pg2-1.example.com
172.31.39.118 pg3-1 pg3-1.example.com
Download VMware Postgres RPM package จาก VMware Tanzu Network ซึ่ง version ที่ใช้จะเป็น version 16.2.0 ข้อดีของการใช้ package จาก VMware เพราะ tools ที่ต้องใช้ในการ setup ได้ถูก pack มาครบแล้วไม่ต้อง download module เพิ่มเติม รวมถึงเป็น package ที่ได้มีการ verify จาก vendor และแหล่งที่มาที่ปลอดภัยในการนำไปใช้จริงบน Production
file format ที่ download ได้จะอยู่ในรูปแบบ vmware-postgres<version>-<vmware-version>.<platform>.<architecture>.zip ตัวอย่างที่ download ได้คือ vmware-postgres-16.2.0.el9.x86_64.zip โดยที่ RPM จะอยู่ใน zip file ให้ unzip แล้ว install postgres ด้วย yum command
yum install ./vmware-postgres16-16.2-1.el9.x86_64.rpmcommand yum install จะสร้าง user postgres และ set environment path ไว้ที่ user path ~postgres/.bash_profile พร้อมทั้งสร้าง dir /var/lib/pgsql/data สำหรับ user postgres ให้ด้วย ขั้นตอนต่อไป ทำการ login ไปที่ user postgres และเรียกใช้ path
su --login postgres
source ~/.bash_profile
ติดตั้ง patroni เพื่อให้ patroni สร้าง และจัดการ postgres instance
yum install ./vmware-postgres16-patroni-3.2.2-1.el9.x86_64.rpmเป็นการเสร็จขั้นตอนการ install postgresql และ patroni ก่อนที่จะเริ่มใช้งาน postgresql จะต้องติดตั้ง etcd ก่อน เพื่อเป็นที่เก็บ state และ config ที่ patroni ต้องใช้ และ dir /var/lib/pgsql/data ต้องถูกสร้างและไม่มีข้อมูลใดๆ เนื่องจากเมื่อ patroni start ขึ้นมาแล้วไม่เจอข้อมูลใน dir /var/lib/pgsql/data จะทำการเรียก initdb เพื่อสร้าง database และ start database ขึ้นมาให้ แต่ถ้ามีข้อมูล patroni จะไม่สร้าง database
Download etcd version ล่าสุดจาก repository โดยใช้ script
ETCD_RELEASE=$(curl -s https://api.github.com/repos/etcd-io/etcd/releases/latest|grep tag_name | cut -d '"' -f 4)
echo $ETCD_RELEASE
wget https://github.com/etcd-io/etcd/releases/download/${ETCD_RELEASE}/etcd-${ETCD_RELEASE}-linux-amd64.tar.gz
unzip และย้าย binary file ไปยัง bin directory
tar xvf etcd-${ETCD_RELEASE}-linux-amd64.tar.gz
cd etcd-${ETCD_RELEASE}-linux-amd64
sudo mv etcd* /usr/local/bin
ตรวจสอบว่า file etcd etcdctl และ etcdutl ถูกย้ายไปที่ /usr/local/bin ตรวจเช็ค version ของ etcd binary file
[ec2-user@ip-172-31-47-229 ~]$ etcd --version
etcd Version: 3.5.12
Git SHA: e7b3bb6cc
Go Version: go1.20.13
Go OS/Arch: linux/amd64

[ec2-user@ip-172-31-47-229 ~]$ etcdctl version
etcdctl version: 3.5.12
API version: 3.5

[ec2-user@ip-172-31-47-229 ~]$ etcdutl version
etcdutl version: 3.5.12
API version: 3.5
เพื่อให้ง่ายในการจัดการ etcd service เราจะ config systemd เพื่อจัดการ etcd service ตาม script ดังนี้
#create data directory for etcd.
$ sudo mkdir -p /var/lib/etcd/
$ sudo mkdir /etc/etcd

#Create etcd system user
$ sudo groupadd --system etcd
$ sudo useradd -s /sbin/nologin --system -g etcd etcd

#Set /var/lib/etcd/ directory ownership to etcd user.
$ sudo chown -R etcd:etcd /var/lib/etcd/
$ sudo chmod 0775 /var/lib/etcd/

#Create a new config file for etcd.

[ec2-user@ip-172-31-47-229 ~]$ sudo vim /etc/etcd/etcd.conf
ETCD_NAME=pg1-1.example.com
ETCD_LISTEN_PEER_URLS=http://172.31.47.229:2380
ETCD_LISTEN_CLIENT_URLS=http://172.31.47.229:2379,http://127.0.0.1:2379
ETCD_INITIAL_ADVERTISE_PEER_URLS=http://172.31.47.229:2380
ETCD_ADVERTISE_CLIENT_URLS=http://172.31.47.229:2379
ETCD_INITIAL_CLUSTER=pg1-1.example.com=http://172.31.47.229:2380,pg2-1.example.com=http://172.31.34.169:2380,pg3-1.example.com=http://172.31.3
9.118:2380
ETCD_INITIAL_CLUSTER_STATE=new
ETCD_INITIAL_CLUSTER_TOKEN=etcd-cluster

#Create a new systemd service file for etcd
[ec2-user@ip-172-31-47-229 ~]$ sudo vim /etc/systemd/system/etcd.service
[Unit]
Description=etcd key-value store
Documentation=https://github.com/etcd-io/etcd
After=network.target

[Service]
User=etcd
Type=notify
Environment=ETCD_DATA_DIR=/var/lib/etcd
EnvironmentFile=/etc/etcd/etcd.conf
ExecStart=/usr/local/bin/etcd --enable-v2=true
Restart=always
RestartSec=10s
LimitNOFILE=40000

[Install]
WantedBy=multi-user.target
ทำการ reload config และ start etcd service ทุกครั้งที่ start host
#Reload systemd service and start etcd
$ sudo systemctl daemon-reload
$ sudo systemctl start etcd.service

#Enable service to start when system is rebooted
$ sudo systemctl enable etcd.service
Created symlink /etc/systemd/system/multi-user.target.wants/etcd.service → /etc/systemd/system/etcd.servic

#Check service status to confirm it is running.
[ec2-user@ip-172-31-47-229 ~]$ systemctl status etcd
● etcd.service - etcd key-value store
     Loaded: loaded (/etc/systemd/system/etcd.service; enabled; preset: disabled)
     Active: active (running) since Tue 2024-03-26 04:52:56 UTC; 1h 38min ago
       Docs: https://github.com/etcd-io/etcd
   Main PID: 673 (etcd)
      Tasks: 7 (limit: 4329)
     Memory: 182.2M
        CPU: 38.828s
     CGroup: /system.slice/etcd.service
             └─673 /usr/local/bin/etcd --enable-v2=true

#The service will start on localhost address port 2379
[ec2-user@ip-172-31-47-229 ~]$ ss -tunelp | grep 2379
tcp   LISTEN 0      4096       127.0.0.1:2379      0.0.0.0:*    uid:990 ino:20857 sk:3 cgroup:/system.slice/etcd.service <->
tcp   LISTEN 0      4096   172.31.47.229:2379      0.0.0.0:*    uid:990 ino:20858 sk:7 cgroup:/system.slice/etcd.service <->

[ec2-user@ip-172-31-47-229 ~]$ etcdctl -w table member list
+------------------+---------+-------------------+---------------------------+---------------------------+------------+
|        ID        | STATUS  |       NAME        |        PEER ADDRS         |       CLIENT ADDRS        | IS LEARNER |
+------------------+---------+-------------------+---------------------------+---------------------------+------------+
| 380e452f5fdbe4c2 | started | pg2-1.example.com | http://172.31.34.169:2380 | http://172.31.34.169:2379 |      false |
| 7fe19ee2a7299906 | started | pg3-1.example.com | http://172.31.39.118:2380 | http://172.31.39.118:2379 |      false |
| 8787d70676a8fc71 | started | pg1-1.example.com | http://172.31.47.229:2380 | http://172.31.47.229:2379 |      false |
+------------------+---------+-------------------+---------------------------+---------------------------+------------+

#Checking health status of the etcd node:
[ec2-user@ip-172-31-47-229 ~]$ etcdctl -w table endpoint health
+----------------+--------+------------+-------+
|    ENDPOINT    | HEALTH |    TOOK    | ERROR |
+----------------+--------+------------+-------+
| 127.0.0.1:2379 |   true | 4.518605ms |       |
+----------------+--------+------------+-------+

[ec2-user@ip-172-31-47-229 ~]$ etcdctl -w table endpoint status
+----------------+------------------+---------+---------+-----------+------------+-----------+------------+--------------------+--------+
|    ENDPOINT    |        ID        | VERSION | DB SIZE | IS LEADER | IS LEARNER | RAFT TERM | RAFT INDEX | RAFT APPLIED INDEX | ERRORS |
+----------------+------------------+---------+---------+-----------+------------+-----------+------------+--------------------+--------+
| 127.0.0.1:2379 | 8787d70676a8fc71 |  3.5.12 |   33 kB |     false |      false |        29 |     434175 |             434175 |        |
+----------------+------------------+---------+---------+-----------+------------+-----------+------------+--------------------+--------+

[ec2-user@ip-172-31-47-229 ~]$ ETCDCTL_API=3 etcdctl endpoint status --cluster -w table
+---------------------------+------------------+---------+---------+-----------+------------+-----------+------------+--------------------+--------+
|         ENDPOINT          |        ID        | VERSION | DB SIZE | IS LEADER | IS LEARNER | RAFT TERM | RAFT INDEX | RAFT APPLIED INDEX | ERRORS |
+---------------------------+------------------+---------+---------+-----------+------------+-----------+------------+--------------------+--------+
| http://172.31.34.169:2379 | 380e452f5fdbe4c2 |  3.5.12 |   37 kB |     false |      false |        29 |     434341 |             434341 |        |
| http://172.31.39.118:2379 | 7fe19ee2a7299906 |  3.5.12 |   25 kB |      true |      false |        29 |     434341 |             434341 |        |
| http://172.31.47.229:2379 | 8787d70676a8fc71 |  3.5.12 |   33 kB |     false |      false |        29 |     434341 |             434341 |        |
+---------------------------+------------------+---------+---------+-----------+------------+-----------+------------+--------------------+--------+

#check log
journalctl -xeu etcd.service -l --no-pager|less
ทดสอบใช้งาน etcd service
$ etcdctl put welcome "Hello World"
OK
Read the value of message back:

$ etcdctl get welcome
welcome
Hello World
To delete the key run:

$ etcdctl del welcome
1

$ etcdctl get welcome
Empty-output
เนื่องจากต้องทำที่ทุกเครื่อง เพื่อลดขึ้นตอนการพิมพ์ สามารถทำเป็น script โดยแก้ variable instance_hostname, instance_address ก่อนหน้าบรรทัด cat – <<HEREDOC > etcd.conf ให้ตรงตามเครื่องที่จะ generate อ่านข้อมูลเพิ่มเติมได้จาก Setup and Run etcd
instance_hostname=pg3-1.example.com
instance_address=172.31.39.118
etcd_hostname_a=pg2-1.example.com
etcd_address_a=172.31.34.169
etcd_hostname_b=pg1-1.example.com
etcd_address_b=172.31.47.229
cat - <<HEREDOC > etcd.conf
ETCD_DATA_DIR=/var/lib/etcd
ETCD_NAME=$instance_hostname
ETCD_LISTEN_PEER_URLS=http://$instance_address:2380
ETCD_LISTEN_CLIENT_URLS=http://$instance_address:2379,http://127.0.0.1:2379
ETCD_INITIAL_ADVERTISE_PEER_URLS=http://$instance_address:2380
ETCD_ADVERTISE_CLIENT_URLS=http://$instance_address:2379
ETCD_INITIAL_CLUSTER=$instance_hostname=http://$instance_address:2380,$etcd_hostname_a=http://$etcd_address_a:2380,$etcd_hostname_b=http://$etcd_address_b:2380
ETCD_INITIAL_CLUSTER_STATE=new
ETCD_INITIAL_CLUSTER_TOKEN=etcd-cluster
HEREDOC
sudo mv etcd.conf /etc/etcd/etcd.conf
หลังจากที่ etcd ทำงานได้แล้ว ต่อไปคือการ setup Patroni และ pgbackrest สำหรับ backup solution ทำการติดตั้งตาม script นี้ของทุกเครื่อง
$ yum install -y python3 python3-devel gcc
$ su - postgres
$ cat - <<HEREDOC > requirements.txt
PyYAML
click>=4.1
prettytable>=0.7
psutil>=2.0.0
python-dateutil
python-etcd>=0.4.3,<0.5
requests
six >= 1.7
urllib3>=1.19.1,!=1.21
ydiff>=1.2.0
HEREDOC

#install an extra package required to connect etcd
$ pip3 install --user -r requirements.txt
สร้าง patroni.yml file โดยแก้ ip ให้ตรงตามเครื่องที่ติดตั้ง ทั้งสามเครื่อง
[postgres@ip-172-31-47-229 ~]$ vim patroni.yml
scope: pg_cluster
name: pg1-1
restapi:
  listen: '172.31.47.229:8008'
  connect_address: '172.31.47.229:8008'
etcd:
  hosts: 'pg1-1.example.com:2379,pg2-1.example.com:2379,pg3-1.example.com:2379'
bootstrap:
  dcs:
    ttl: 30
    loop_wait: 10
    retry_timeout: 10
    maximum_lag_on_failover: 1048576
    postgresql:
      use_pg_rewind: true
      use_slots: true
      parameters:
        hot_standby: 'on'
        wal_keep_segments: 20
        max_wal_senders: 8
        max_replication_slots: 8
        archive_command: pgbackrest --stanza=pg_cluster archive-push "%p"
        archive_mode: 'on'
      recovery_conf:
        recovery_target_timeline: latest
        restore_command: pgbackrest --stanza=pg_cluster archive-get %f "%p"
    slots:
      patroni_standby_leader:
        type: physical
  initdb:
    - encoding: UTF8
    - locale: en_US.UTF-8
    - data-checksums
  pg_hba:
    - local all all trust
    - host all postgres 0.0.0.0/0 trust
    - host replication replicator 172.31.47.229/32 md5
    - host replication replicator 172.31.34.169/32 md5
    - host replication replicator 172.31.39.118/32 md5
    - host all all 0.0.0.0/0 md5
  users:
    admin:
      password: admin
      options:
        - createrole
        - createdb
postgresql:
  listen: '172.31.47.229:5432'
  connect_address: '172.31.47.229:5432'
  data_dir: /var/lib/pgsql/data
  pgpass: /tmp/pgpass0
  authentication:
    replication:
      username: replicator
      password: rep-pass
    superuser:
      username: postgres
      password: postgres
    rewind:
      username: rewind_user
      password: rewind_password
  create_replica_methods:
    - pgbackrest
    - basebackup
  pgbackrest:
    command: pgbackrest --stanza=pg_cluster --delta restore
    keep_data: true
    no_params: true
  basebackup:
    checkpoint: 'fast'
tags:
  nofailover: false
  noloadbalance: false
  clonefrom: false
  nosync: false
สร้าง config file สำหรับ pgbackrest ตาม script
$ sudo mkdir -p /var/log/pgbackrest
$ sudo mkdir -p /etc/pgbackrest
$ sudo mkdir -p /var/lib/pgbackrest

$ sudo chmod 0750 /var/lib/pgbackrest
$ sudo chmod 770 /var/log/pgbackrest

$ sudo touch /etc/pgbackrest/pgbackrest.conf
$ sudo chmod 640 /etc/pgbackrest/pgbackrest.conf

$ sudo chown -R postgres:postgres /var/lib/pgbackrest
$ sudo chown -R postgres:postgres /var/log/pgbackrest
$ sudo chown postgres:postgres /etc/pgbackrest/pgbackrest.conf
ตัวอย่าง configuration สำหรับ pgbackrest โดยตัวอย่างนี้จะใช้ s3 สำหรับเก็บ backup file ของ postgres ถ้าไม่มี s3 สามารถใช้ minio ทดแทนได้
[postgres@ip-172-31-47-229 ~]$ more /etc/pgbackrest/pgbackrest.conf
[pg_cluster]
pg1-path=/var/lib/pgsql/data
pg1-port=5432
pg1-user=postgres

[global]
start-fast=y
process-max=4
archive-timeout=300

repo1-type=s3
repo1-s3-uri-style=path
repo1-path=/var/lib/pgbackrest
repo1-retention-full=4
repo1-s3-bucket=pgbackrest1
repo1-s3-endpoint=s3.ap-southeast-1.amazonaws.com
repo1-s3-key=xxx
repo1-s3-key-secret=xxxx
repo1-s3-region=ap-southeast-1
log-level-console=info
log-level-file=debug
log-path=/var/log/pgbackrest

[global:archive-push]
compress-level=3
สร้างไฟล์ systemd service สำหรับจัดการ patroni service
[postgres@ip-172-31-47-229 ~]$ vim /etc/systemd/system/patroni.service
[Unit]
Description=Runners to orchestrate a high-availability PostgreSQL
After=syslog.target network.target

[Service]
Type=simple
User=postgres
Group=postgres
Environment=PATH=/opt/vmware/postgres/16/bin:/sbin:/bin:/usr/sbin:/usr/bin:/usr/X11R6/bin
Environment=PGDATA=/var/lib/pgsql/data
ExecStart=/opt/vmware/postgres/16/bin/patroni /var/lib/pgsql/patroni.yml
KillMode=process
TimeoutSec=30
Restart=no

[Install]
WantedBy=multi-user.target
Start Patroni service และกำหนดให้เริ่มทำงานเมื่อ start host
#Reload systemd service and start patroni
sudo systemctl daemon-reload
sudo systemctl start patroni.service

#Enable service to start when system is rebooted
$ sudo systemctl enable patroni.service
Created symlink /etc/systemd/system/multi-user.target.wants/etcd.service → /etc/systemd/system/etcd.service.

#check patroni log
sudo journalctl -xeu patroni -f
check patroni service status
[ec2-user@ip-172-31-47-229 etcd]$ sudo systemctl status patroni
● patroni.service - Runners to orchestrate a high-availability PostgreSQL
     Loaded: loaded (/etc/systemd/system/patroni.service; enabled; preset: disabled)
     Active: active (running) since Wed 2024-03-27 03:30:50 UTC; 1h 22min ago
   Main PID: 678 (patroni)
      Tasks: 12 (limit: 4329)
     Memory: 158.2M
        CPU: 4.086s
     CGroup: /system.slice/patroni.service
             ├─ 678 /opt/vmware/postgres/16/python/bin/python3 /opt/vmware/postgres/16/bin/patroni /var/lib/pgsql/patroni.yml
             ├─1834 postgres -D /var/lib/pgsql/data --config-file=/var/lib/pgsql/data/postgresql.conf --listen_addresses=172.31.47.229 --port=5432 --cluster_n>
             ├─1835 "postgres: pg_cluster: checkpointer "
             ├─1836 "postgres: pg_cluster: background writer "
             ├─1837 "postgres: pg_cluster: startup recovering 000000020000000000000007"
             ├─1853 "postgres: pg_cluster: postgres postgres 172.31.47.229(46466) idle"
             └─1858 "postgres: pg_cluster: walreceiver streaming 0/7009CD0"
[postgres@ip-172-31-47-229 ~]$ patronictl -c patroni.yml list
+ Cluster: pg_cluster (7350532227659130439) ---+----+-----------+
| Member | Host | Role | State | TL | Lag in MB |
+--------+---------------+---------+-----------+----+-----------+
| pg1-1 | 172.31.47.229 | Replica | streaming | 2 | 0 |
| pg2-1 | 172.31.34.169 | Leader | running | 2 | |
| pg3-1 | 172.31.39.118 | Replica | streaming | 2 | 0 |
+--------+---------------+---------+-----------+----+-----------+ทำการทดสอบ WAL replication ด้วยการสร้าง database และ insert test data ที่ primary node และเรียกดู query ที่ replica node
[postgres@ip-172-31-47-229 ~]$ psql -c 'create database test;'
CREATE DATABASE

postgres=# \c test
You are now connected to database "test" as user "postgres".
test=# create table test(name varchar(50));
CREATE TABLE
test=# insert into test (name) values ('tao');
INSERT 0 1
test=# select * from test;
 name
------
 tao
(1 row)

#for each ost
$ psql -U postgres -d test -c "select * from test;"
ทดสอบ switch over ด้วยการย้าย primary node ไปยัง replica node
patronictl -c patroni.yml switchoverเนื่องจาก patroni จะเป็นตัวจัดการ postgres ดังนั้นข้อมูล config ต่างๆ จะถูกเก็บใน etcd แล้ว apply ไปยัง postgres ที่อยู่ใน member ดังนั้นการ manual แก้ไข postgres.conf จึงไม่ส่งผลต่อระบบ ถ้าต้องการแก้ไข config ต้องแก้ผ่าน patronictl
#change postgres config parameter
$ patronictl -c patroni.yml edit-config

#reload the change
patronictl -c patroni.yml reload pg_cluster
ตัวอย่าง edit config เพื่อให้การ replicate ข้อมูลระหว่าง primary กับ replica เป็นแบบ synchronize กรณีถ้ามีการแยกการอ่านข้อมูลที่ replica แต่เขียนที่ primary แล้ว mode การ replicate เป็น asynchronize จะทำให้ข้อมูลที่ได้จาก replica ไม่เป็นข้อมูล update ล่าสุดได้
patronictl -c patroni.yml edit-config --apply - --force <<'JSON'
{
 synchronous_mode: "on",
 synchronous_mode_strict: "on",
 "postgresql":
   {
   "parameters":{
     "synchronous_commit": "on",
     "synchronous_standby_names": "*"
   }
  }
}
JSON
วิธีการ Manual backup database โดยใช้ pgbackrest
[postgres@ip-172-31-47-229 ~]$ pgbackrest --stanza=pg_cluster stanza-create
2024-03-26 05:03:30.425 P00   INFO: stanza-create command begin 2.50: --exec-id=1747-6d3c27b2 --log-level-console=info --log-level-file=debug --log-path=/var/log/pgbackrest --pg1-path=/var/lib/pgsql/data --pg1-port=5432 --pg1-user=postgres --repo1-path=/var/lib/pgbackrest --repo1-s3-bucket=pgbackrest1 --repo1-s3-endpoint=s3.ap-southeast-1.amazonaws.com --repo1-s3-key=<redacted> --repo1-s3-key-secret=<redacted> --repo1-s3-region=ap-southeast-1 --repo1-s3-uri-style=path --repo1-type=s3 --stanza=pg_cluster
2024-03-26 05:03:31.029 P00   INFO: stanza-create for stanza 'pg_cluster' on repo1
2024-03-26 05:03:31.297 P00   INFO: stanza-create command end: completed successfully (875ms)

[postgres@ip-172-31-47-229 ~]$ pgbackrest --stanza=pg_cluster backup
2024-03-26 05:09:06.384 P00   INFO: backup command begin 2.50: --archive-timeout=300 --exec-id=1779-d07de746 --log-level-console=info --log-level-file=debug --log-path=/var/log/pgbackrest --pg1-path=/var/lib/pgsql/data --pg1-port=5432 --pg1-user=postgres --process-max=4 --repo1-path=/var/lib/pgbackrest --repo1-retention-full=4 --repo1-s3-bucket=pgbackrest1 --repo1-s3-endpoint=s3.ap-southeast-1.amazonaws.com --repo1-s3-key=<redacted> --repo1-s3-key-secret=<redacted> --repo1-s3-region=ap-southeast-1 --repo1-s3-uri-style=path --repo1-type=s3 --stanza=pg_cluster --start-fast
WARN: no prior backup exists, incr backup has been changed to full
2024-03-26 05:09:07.209 P00   INFO: execute non-exclusive backup start: backup begins after the requested immediate checkpoint completes
2024-03-26 05:09:07.911 P00   INFO: backup start archive = 000000010000000000000005, lsn = 0/5000028
2024-03-26 05:09:07.911 P00   INFO: check archive for prior segment 000000010000000000000004
2024-03-26 05:09:14.194 P00   INFO: execute non-exclusive backup stop and wait for all WAL segments to archive
2024-03-26 05:09:14.399 P00   INFO: backup stop archive = 000000010000000000000005, lsn = 0/5000138
2024-03-26 05:09:14.544 P00   INFO: check archive for segment(s) 000000010000000000000005:000000010000000000000005
2024-03-26 05:09:14.734 P00   INFO: new backup label = 20240326-050907F
2024-03-26 05:09:15.072 P00   INFO: full backup size = 22.3MB, file total = 972
2024-03-26 05:09:15.073 P00   INFO: backup command end: completed successfully (8692ms)
2024-03-26 05:09:15.073 P00   INFO: expire command begin 2.50: --exec-id=1779-d07de746 --log-level-console=info --log-level-file=debug --log-path=/var/log/pgbackrest --repo1-path=/var/lib/pgbackrest --repo1-retention-full=4 --repo1-s3-bucket=pgbackrest1 --repo1-s3-endpoint=s3.ap-southeast-1.amazonaws.com --repo1-s3-key=<redacted> --repo1-s3-key-secret=<redacted> --repo1-s3-region=ap-southeast-1 --repo1-s3-uri-style=path --repo1-type=s3 --stanza=pg_cluster
2024-03-26 05:09:15.171 P00   INFO: expire command end: completed successfully (98ms)


[postgres@ip-172-31-47-229 ~]$ pgbackrest info
stanza: pg_cluster
    status: ok
    cipher: none

    db (current)
        wal archive min/max (16): 000000010000000000000001/000000010000000000000005

        full backup: 20240326-050907F
            timestamp start/stop: 2024-03-26 05:09:07+00 / 2024-03-26 05:09:14+00
            wal start/stop: 000000010000000000000005 / 000000010000000000000005
            database size: 22.3MB, database backup size: 22.3MB
            repo1: backup set size: 3.0MB, backup size: 3.0MB
ถ้าต้องการตั้ง schedule backup สามารถใช้ crontab ได้ตามตัวอย่าง
00 01 * * 0 sudo -u postgres --type=full --stanza=pg_cluster backup &> /dev/null
00 01 * * 1-6 sudo -u postgres --type=diff --stanza=pg_cluster backup &> /dev/null
0 */4 * * * sudo -u postgres --type=incr --stanza=pg_cluster backup &> /dev/null
กรณีที่ต้องการ reinit postgres node ใหม่ ด้วย pgbackrest ทำได้จาก command reinit หลังจากนั้นระบบจะให้เลือก node ที่ต้องการ reinit
$ patronictl -c patroni.yml reinit pg_clusterกรณีที่ต้องการสร้าง replica node ใหม่ด้วย pgbackrest จะต้องเพิ่ม bootstrap method เข้าไปใน patroni.yml เพื่อให้ patroni เลือกใช้ pgbackrest แทน pgbasebackup ซึ่งจะทำให้การสร้าง replica ใช้เวลาน้อยกว่า
bootstrap:
  method: pgbackrest
  pgbackrest:
      command: /var/lib/pgsql/custom_bootstrap.sh
      keep_existing_recovery_conf: True
      no_params: False
      recovery_conf:
          recovery_target_timeline: latest
          recovery_target_action: promote
          restore_command: pgbackrest --stanza=pg_cluster --pg1-path=/var/lib/pgbackrest archive-get %f %p

#Create /var/lib/pgsql/custom_bootstrap.sh:

#!/bin/sh
mkdir -p /var/lib/pgbackrest
pgbackrest --stanza=pg_cluster --pg1-path=/var/lib/pgbackrest --log-level-console=info --delta restore
Note: You only have to add --pg1-path if your new PGDATA does not match the path from the old path

#Add execution permission to the script:
chmod +x /var/lib/pgsql/custom_bootstrap.sh
HAProxy
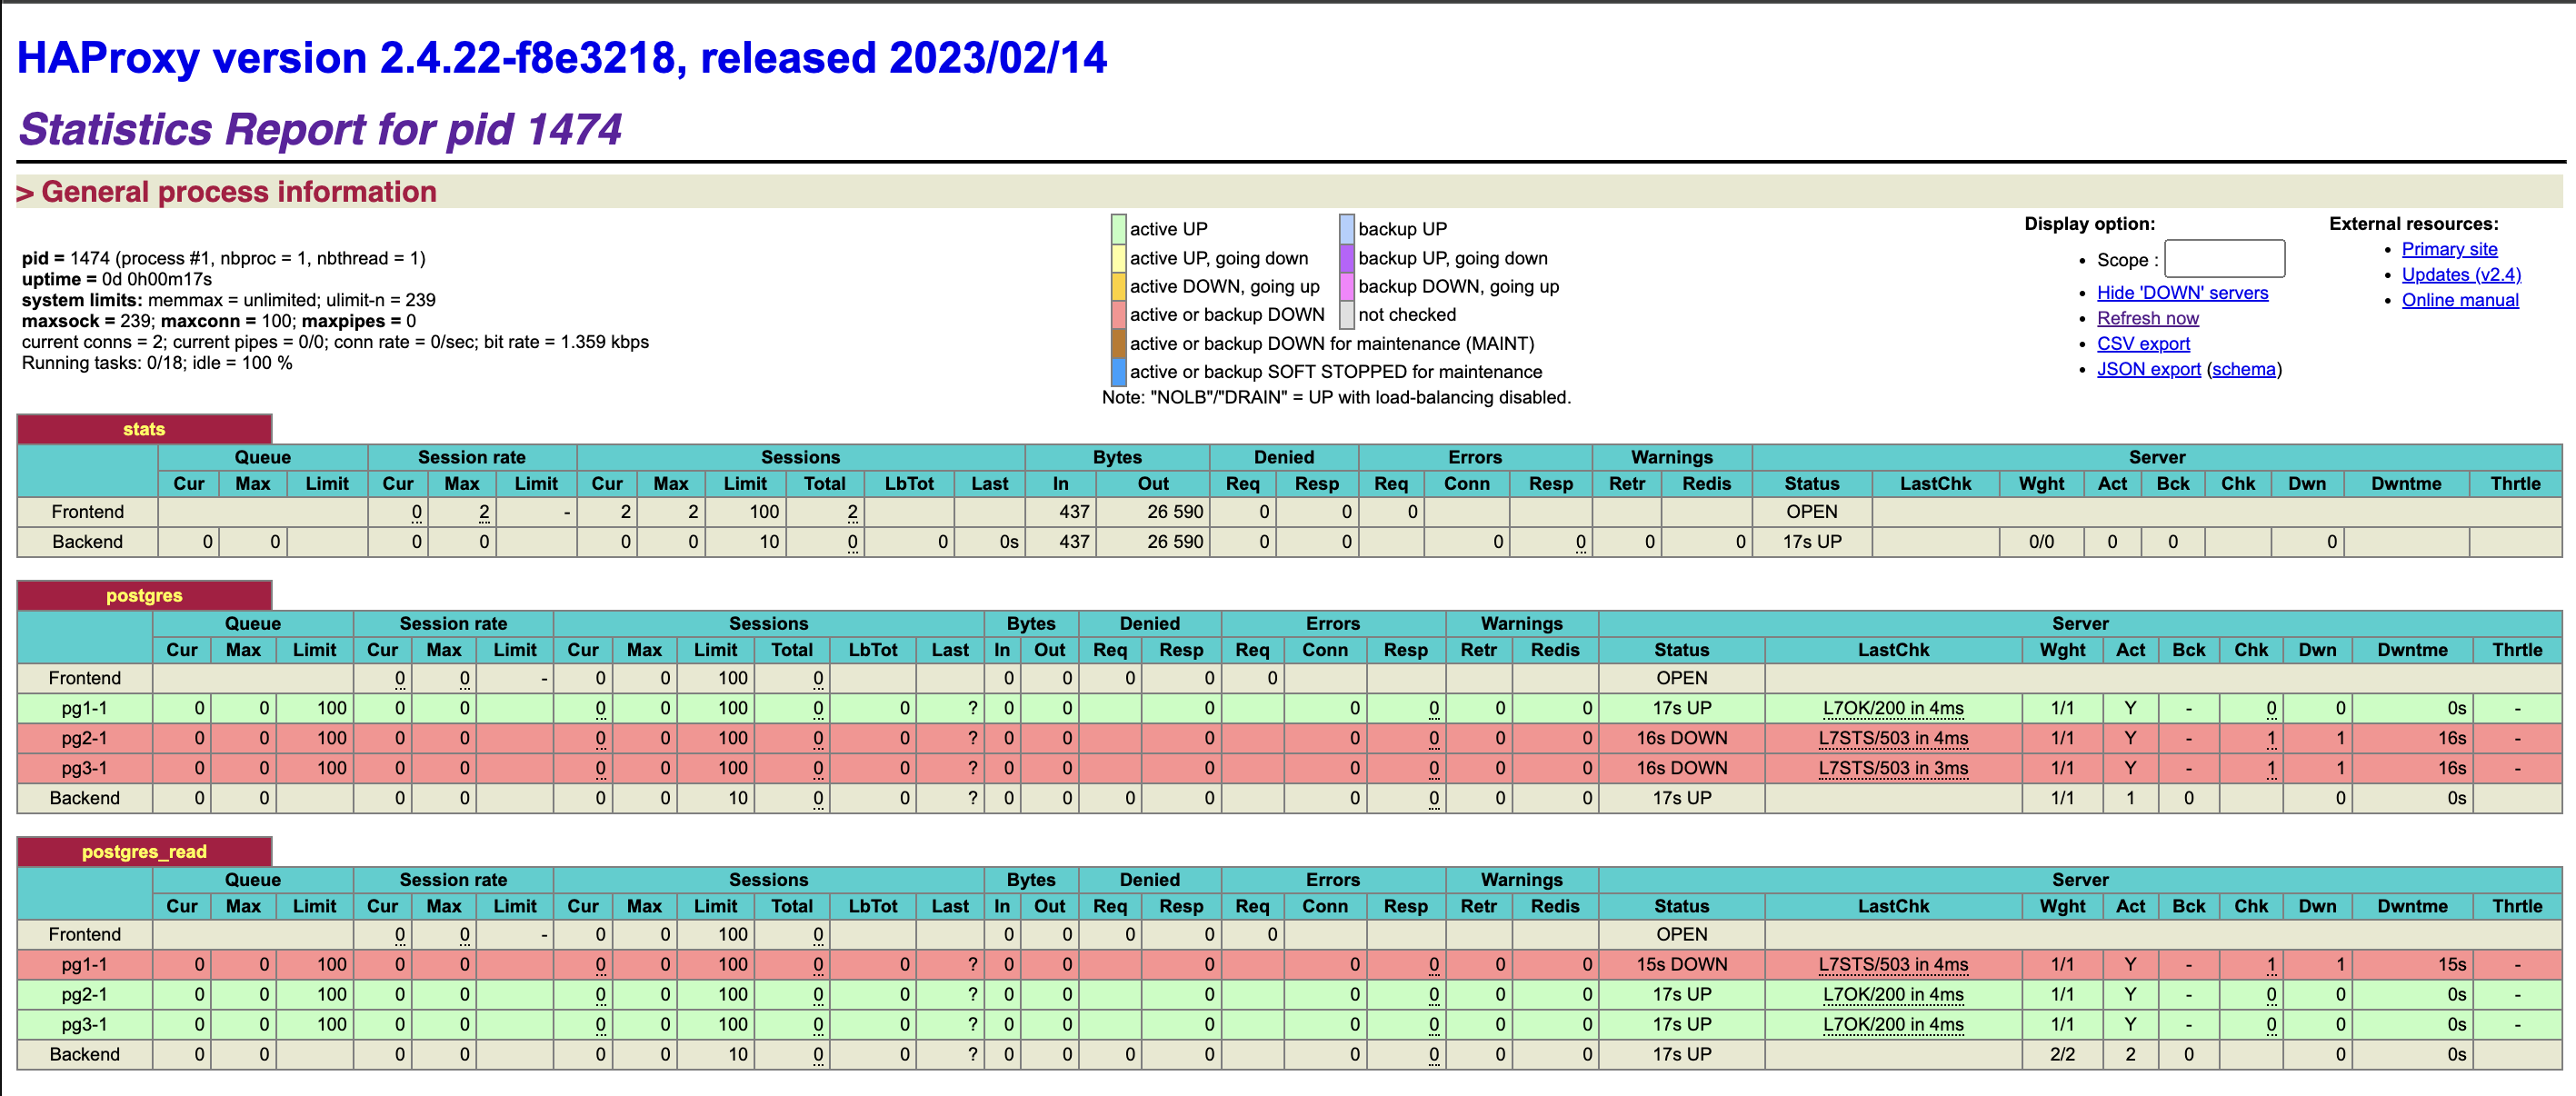
Install haproxy สำหรับเป็น loadbalancer ของ postgresql โดยที่สามารถแยก request ให้การเขียนทำงานอยู่บน primary node ส่วนการอ่านทำงานที่ replica node ทั้งนี้เพื่อให้ทุก node สามารถช่วยกันทำงานได้ การเลือกว่าเป็น primary หรือ replica haproxy จะ call Patroni REST API ของทุก node เพื่ออ่าน status
อีกทั้งการมี HAProxy จะทำให้ง่ายในการทำ migrate (switch ระหว่าง postgres version เดิม กับ version ใหม่) หรือ mantenance database ด้วยการให้ proxy เป็นตัว forward request ไปยัง Postgresql โดยการแยก port ตามตัวอย่างนี้ User สามารถเรียกเข้ามา ที่ port 5000 สำหรับการเขียน และ 5001 สำหรับการอ่าน การติดตั้งสามารถติดตั้ง haproxy ได้มากกว่าหนึ่ง host ทั้งแบบ active/standby หรือ active/active
ทำการติดตั้งที่เครื่อง haproxy
#install haproxy package
$ yum install -y epel-release
$ yum install -y haproxy

#config haproxy
[ec2-user@ip-172-31-21-208 ~]$ sudo vim /etc/haproxy/haproxy.cfg
global
    maxconn 100
defaults
    log global
    mode tcp
    retries 2
    timeout client 30m
    timeout connect 4s
    timeout server 30m
    timeout check 5s
listen stats
    mode http
    bind *:7000
    stats enable
    stats uri /
listen postgres
    bind *:5000
    option httpchk OPTIONS/master
    http-check expect status 200
    default-server inter 3s fall 3 rise 2 on-marked-down shutdown-sessions
    server pg1-1 172.31.47.229:5432 maxconn 100 maxqueue 100 check port 8008
    server pg2-1 172.31.34.169:5432 maxconn 100 maxqueue 100 check port 8008
    server pg3-1 172.31.39.118:5432 maxconn 100 maxqueue 100 check port 8008
listen postgres_read
    bind *:5001
    balance leastconn
    option httpchk OPTIONS/replica  #/read-only
    http-check expect status 200
    default-server inter 3s fall 3 rise 2 on-marked-down shutdown-sessions
    server pg1-1 172.31.47.229:5432 maxconn 100 maxqueue 100 check port 8008
    server pg2-1 172.31.34.169:5432 maxconn 100 maxqueue 100 check port 8008
    server pg3-1 172.31.39.118:5432 maxconn 100 maxqueue 100 check port 8008
start systemd haproxy service และตรวจสอบ status
systemctl start haproxyเรียกไปยัง url ของเครื่อง haproxy, http://haproxyip:7000 เพื่อดู status ของ enpoint สำหรับเขียนและอ่านข้อมูล postgresql
ข้อมูลอ้างอิง
VMware Postgres High Availability with Patroni
How to configure a Patroni Cluster to use pgbackrest
How to use pgbackrest to bootstrap or add replica to HA Patroni
Create a High-Availability PostgreSQL Cluster with Patroni, Vultr Load Balancer, and Object Storage
