ขั้นตอนการติดตั้ง NKP ระบบจะสร้าง kubernetes ชั่วคราวสำหรับการติดตั้งเฉพาะ (bootstrap cluster) โดยจะ load package ที่จำเป็นคือ cluster-api ทำงานใน kubernetes ชั่วคราว อยู่ภายใต้ package ที่ชื่อว่า convoy โดย cluster-api จะสร้าง nkp management cluster ที่ infra platform ปลายทางจากข้อมูลที่ได้จาก NKP cli
cluster-api เป็น controller ที่ทำงานบน kubernetes ทำ infra auto provisioning ไปยัง platform ต่างๆ เนื่องจากการ provision kubernetes บน platform ที่แตกต่างกันจะต้องอาศัย api ที่แตกต่างกัน การใช้ kubernetes api จึงเป็นวิธีการที่ทำให้ไม่ว่า platform อะไรก็สามารถเรียกใช้ได้ด้วย api เดียวกัน cluster-api จึงเป็น standard ในการสร้าง kubernetes บน platform ที่แตกต่างกันได้ โดยมี vendor จากค่ายต่างๆ เข้าร่วมพัฒนาการเชื่อมต่อไปยัง platform ตัวเองจำนวนมาก เช่น nutanix, vmware, aws, google, azure เป็นต้น ทำให้ทำการสร้าง kubernetes เป็นเรื่องง่าย โดยไม่ต้องพัฒนาส่วนการเชื่อมต่อกับ platform ปลายทางเอง เพียงแค่ระบุรูปแบบ kubernetes cluster (yaml) จากนั้น cluster-api จะสร้าง kubernetes บน platform ปลายทางให้

การติดตั้ง Nutanix NKP จะต้องเตรียม docker และ kubectl ที่เครื่อง jumphost หรือเครื่องที่จะใช้ในการติดตั้ง ตัวอย่างนี้จะเป็นการติดตั้งโดยไม่ access internet และใช้ Rocky Linux
ตรวจสอบ docker ที่เครื่องที่ใช้ในการติดตั้ง สามารถทำได้ตามขั้นตอน Harbor Container Registry Installation
[nutanix@harbor nkp]$ docker version
Client: Docker Engine - Community
 Version:           28.3.0
 API version:       1.51
 Go version:        go1.24.4
 Git commit:        38b7060
 Built:             Tue Jun 24 15:45:22 2025
 OS/Arch:           linux/amd64
 Context:           default

Server: Docker Engine - Community
 Engine:
  Version:          28.3.0
  API version:      1.51 (minimum version 1.24)
  Go version:       go1.24.4
  Git commit:       265f709
  Built:            Tue Jun 24 15:43:38 2025
  OS/Arch:          linux/amd64
  Experimental:     false
 containerd:
  Version:          1.7.27
  GitCommit:        05044ec0a9a75232cad458027ca83437aae3f4da
 runc:
  Version:          1.2.5
  GitCommit:        v1.2.5-0-g59923ef
 docker-init:
  Version:          0.19.0
  GitCommit:        de40ad0
การติดตั้งจำเป็นต้องมี Container Registry ที่มี package bundle ของ nkp ขั้นตอนนี้ทำการทดสอบ login จากเครื่องที่ใช้ในการติดตั้ง
[nutanix@harbor nkp]$ docker login 10.38.252.79
Username: admin
Password:

WARNING! Your credentials are stored unencrypted in '/home/nutanix/.docker/config.json'.
Configure a credential helper to remove this warning. See
https://docs.docker.com/go/credential-store/

Login Succeeded
ติดตั้ง kubectl สำหรับเข้าถึง kubernetes
[nutanix@harbor nkp-v2.17.0]$ sudo curl -Lo /usr/local/bin/kubectl https://storage.googleapis.com/kubernetes-release/release/$(curl -s https://storage.googleapis.com/kubernetes-release/release/stable.txt)/bin/linux/amd64/kubectl
  % Total    % Received % Xferd  Average Speed   Time    Time     Time  Current
                                 Dload  Upload   Total   Spent    Left  Speed
100 53.7M  100 53.7M    0     0  74.2M      0 --:--:-- --:--:-- --:--:-- 74.3M
[nutanix@harbor nkp-v2.17.0]$ sudo chmod +x /usr/local/bin/kubectl
ติดตั้ง nkp cliโดย copy Download Link จาก nutanix portal จากหน้า download software

ขั้นตอนการติดตั้ง nkp cli
curl -fsSL https://raw.githubusercontent.com/nutanixdev/nkp-quickstart/main/get-nkp-cli | bash

#When prompted, enter the copy Downloadd Link

[nutanix@harbor ~]$ curl -fsSL https://raw.githubusercontent.com/nutanixdev/nkp-quickstart/main/get-nkp-cli | bash
open browser to site : https://portal.nutanix.com/page/downloads?product=nkp and find "NKP for Linux"
Enter 'NKP for Linux' download link: https://download.nutanix.com/downloads/nkp/v2.17.0/nkp_v2.17.0_linux_amd64.tar.gz?Expires=1768401776&Key-Pair-Id=APKAJTTNCWPEI42QKMSA&Signature=SiSx9R9vPquHatjI8NMUWCavIS1y~xYrzQHIIGd~ZBsphTBVk6HmB--Yqc82lPe2T5hUlBhFG~~jD75nNRYECvpKhumxqzZM9~WzqIDPxo16NDSX9eLokqe9dL9Oe8LBEDz-tC6BdMb0iOLv3nnxO-4sxyXg8pM0BHsvEat305nNAuZTQpO0d9DHxE2pF69FxCHxJ0KOebNOgArYiS63bl2tQHVAe0iWYtkLkm6rBvVNRlFSQokjCVw5u1aBoxpKSOMp4RAGo5iNHHf3hlwLL25yK7LI~glLKhMOD2KJ55Kkyc4pqfV053oHtmJurnGHkb87T36-7E1N3lNbx2AoAg__
NKP CLI installed successfully!
checking version
catalog: v0.8.1
diagnose: v0.12.0
imagebuilder: v2.17.0
kommander: v2.17.0
konvoy: v2.17.0
konvoybundlepusher: v2.17.0
mindthegap: v1.24.0
nkp: v2.17.0
Download NKP Airgapped Bundle สำหรับการติดตั้ง โดยการ copy Download Link จากหน้า nutanix portal

ขั้นตอนการ Download ผ่าน curl cli
[nutanix@harbor ~]$ curl -o nkp-air-gapped-bundle_v2.17.0_linux_amd64.tar.gz "https://download.nutanix.com/downloads/nkp/v2.17.0/nkp-air-gapped-bundle_v2.17.0_linux_amd64.tar.gz?Expires=1768402002&Key-Pair-Id=APKAJTTNCWPEI42QKMSA&Signature=DINg8wm1mGZR8fgXilavLmDe81UR126bHPdhLddcLuz8BQrXOPWSzHW29kVrNNUXP~CMS-cLArguoPGDwljnmBDaFACTsA9n~ooyA~Ff~9TEyjHiaWaNjez9gVawoyvHszti7Mfad7Bj4btFIsK9xGVYhJSuWAOryx2ieltb3GOEKrjjgZY4ykw7i3EzZrd9hXRga0DjbE3Lfy-YX~2h0~uhH~XiF08tvOI~LfTMi7AZDt2hJyZYgcXPqeVDJuFjureFdb4J4NNRu-lwbbrqipAQoMIYIOwUPLdV0oRFad4MAOUqqMhZIikSQSoYznkLb5WiFeVGxaagjcPFjflS1w__"
  % Total    % Received % Xferd  Average Speed   Time    Time     Time  Current
                                 Dload  Upload   Total   Spent    Left  Speed
100 20.8G  100 20.8G    0     0   135M      0  0:02:37  0:02:37 --:--:--  139M
ทำการ unzip file nkp-air-gapped-bunndle และทำการ load docker image เข้าไปยังระบบ docker ของเครื่อง จากนั้นทำการ upload image ไปยัง docker registry ที่เตรียมไว้ด้วย nkp cli
[nutanix@harbor ~]$ tar -xvf nkp-air-gapped-bundle_v2.17.0_linux_amd64.tar.gz

[nutanix@harbor nkp]$ cd nkp-v2.17.0/
[nutanix@harbor nkp-v2.17.0]$ docker load -i konvoy-bootstrap-image-v2.17.0.tar

[nutanix@harbor nkp-v2.17.0]$ docker image ls | grep konvoy-bootstrap
WARNING: This output is designed for human readability. For machine-readable output, please use --format.
mesosphere/konvoy-bootstrap:v2.17.0     9f13ef224cd1       5.86GB         2.92GB

[nutanix@harbor nkp-v2.17.0]$ nkp push bundle --bundle ./container-images/konvoy-image-bundle-v2.17.0.tar --to-registry=10.38.252.79/nkp --to-registry-username=admin --to-registry-password=Harbor12345 --to-registry-insecure-skip-tls-verify

[nutanix@harbor nkp-v2.17.0]$ nkp push bundle --bundle ./container-images/kommander-image-bundle-v2.17.0.tar --to-registry=10.38.252.79/nkp --to-registry-username=admin --to-registry-password=Harbor12345 --to-registry-insecure-skip-tls-verify
สร้าง ssh key สำหรับ access VM ที่สร้างขึ้นโดยระบบ
[nutanix@harbor ~]$ ssh-keygen -t ed25519
Generating public/private ed25519 key pair.
Enter file in which to save the key (/home/nutanix/.ssh/id_ed25519):
Enter passphrase (empty for no passphrase):
Enter same passphrase again:
Your identification has been saved in /home/nutanix/.ssh/id_ed25519
Your public key has been saved in /home/nutanix/.ssh/id_ed25519.pub
The key fingerprint is:
SHA256://XGZ4k3rrFq2BC+QWmPk3NJNt972vQ5vHrnSuOyTm0 nutanix@harbor.local
The key's randomart image is:
+--[ED25519 256]--+
|                 |
|                 |
|          .      |
|         = +     |
|        S B + .  |
|         X + o . |
|          @ ..E.+|
|         o =.*o&X|
|          .o=*XX%|
+----[SHA256]-----+
ตัวอย่างนี้ใช้ ed25519 สำหรับการสร้าง key ซึ่งมีข้อดีดังนี้
Ed25519 offers several key advantages over RSA:
Performance: Ed25519 is significantly faster for both signing and verification operations. It uses elliptic curve cryptography which requires less computational overhead than RSA’s integer factorization approach.
Key size: Ed25519 uses 256-bit keys that provide security equivalent to 3072-bit RSA keys. This means much smaller key sizes for the same security level, reducing storage and transmission overhead.
Security design: Ed25519 was designed from the ground up to avoid many implementation pitfalls that have plagued RSA. It’s resistant to timing attacks, doesn’t require careful random number generation during signing (unlike RSA), and uses deterministic signatures.
Simplicity: The algorithm has fewer parameters and configuration options, reducing the chance of implementation errors. RSA requires choosing padding schemes, key sizes, and other parameters that can introduce vulnerabilities if done incorrectly.
Side-channel resistance: Ed25519 is designed to be resistant to side-channel attacks like timing and power analysis attacks, whereas RSA implementations often leak information through timing variations.
Future-proofing: While both are considered secure today, Ed25519’s elliptic curve foundation generally scales better as security requirements increase over time.
The main trade-off is that RSA is more widely supported in legacy systems, but for new applications, Ed25519 is generally the better choice due to its superior performance and security characteristics.
ติดตั้ง NKP ด้วย cli โดยจะต้อง export user และ password variable ก่อนจะ run nkp command
[nutanix@harbor nkp-v2.14.0]$ export NUTANIX_USER="admin"
export NUTANIX_PASSWORD='nx2Tech581!'

[nutanix@harbor ~]$ nkp create cluster nutanix --cluster-name nkp-mgmt \
--control-plane-prism-element-cluster PHX-POC252 \
--worker-prism-element-cluster PHX-POC252 \
--control-plane-subnets primary-PHX-POC252 \
--worker-subnets primary-PHX-POC252 \
--control-plane-endpoint-ip 10.38.252.10 \
--csi-storage-container default \
--endpoint https://10.38.252.7:9440 \
--control-plane-vm-image nkp-rocky-9.6-release-cis-1.34.1-20251206060914.qcow2 \
--worker-vm-image nkp-rocky-9.6-release-cis-1.34.1-20251206060914.qcow2 \
--kubernetes-service-load-balancer-ip-range 10.38.252.11-10.38.252.13 \
--registry-mirror-url https://10.38.252.79/nkp \
--registry-mirror-username admin \
--registry-mirror-password Harbor12345 \
--registry-mirror-cacert /home/nutanix/harbor/certs/harbor.local.crt \
--ssh-public-key-file /home/nutanix/id_ed25519.pub \
--ssh-username nutanix \
--airgapped \
--insecure \
--verbose 5 \
--timeout 0 \
--self-managed
กรณี airgap ต้องระบุ registry mirror เพื่อใช้ในการติดตั้ง ตามขั้นตอน upload konvoy และ kommander image ในขั้นตอนก่อนหน้า
ข้อมูล harbor.crt ได้มาจากขั้นตอนการสร้าง harbor หรือ สามารถ export ได้ด้วย cli
openssl s_client -connect 10.38.252.79:443 -showcerts </dev/null 2>/dev/null | openssl x509 -outform PEM > /home/nutanix/harbor.crtกรณีที่การติดตั้งสามารถ access internet ได้ไม่จำเป็นต้องใช้ option –airgapped และระบบจะทำการติดตั้งโดยใช้ค่า default ถ้าไม่ระบุใน cli เช่น ขนาดของ VM และจำนวน VM เช่น Control plane จำนวน 3 VMs และ Worker จำนวน 4 VMs ดังตัวอย่าง options อื่นๆ ดังนี้
𝗘𝗡𝗩𝗜𝗥𝗢𝗡𝗠𝗘𝗡𝗧 𝗩𝗔𝗥𝗜𝗔𝗕𝗟𝗘𝗦
export CLUSTER_NAME="wskn-mgmt-ag" # Name of the Kubernetes cluster
export NUTANIX_PC_FQDN_ENDPOINT_WITH_PORT="https://10.168.100.4:9440" # Nutanix Prism Central endpoint URL with port
export CONTROL_PLANE_IP="10.168.102.30" # IP address for the Kubernetes control plane
export IMAGE_NAME="nkp-rocky-9.4-release-1.29.6-20240816215147" # Name of the VM image to use for cluster nodes
export PRISM_ELEMENT_CLUSTER_NAME="wskn-nongpu" # Name of the Nutanix Prism Element cluster
export SUBNET_NAME="non-gpu-airgap" # Name of the subnet to use for cluster nodes
export PROJECT_NAME="default" # Name of the Nutanix project
export CONTROL_PLANE_REPLICAS="3" # Number of control plane replicas
export CONTROL_PLANE_VCPUS="4" # Number of vCPUs for control plane nodes
export CONTROL_PLANE_CORES_PER_VCPU="1" # Number of cores per vCPU for control plane nodes
export CONTROL_PLANE_MEMORY_GIB="16" # Memory in GiB for control plane nodes
export WORKER_REPLICAS="3" # Number of worker node replicas
export WORKER_VCPUS="8" # Number of vCPUs for worker nodes
export WORKER_CORES_PER_VCPU="1" # Number of cores per vCPU for worker nodes
export WORKER_MEMORY_GIB="32" # Memory in GiB for worker nodes
export NUTANIX_STORAGE_CONTAINER_NAME="default-container-xxx" # Name of the Nutanix storage container
export CSI_FILESYSTEM="ext4" # Filesystem type for CSI volumes
export CSI_HYPERVISOR_ATTACHED="true" # Whether to use hypervisor-attached volumes for CSI
export LB_IP_RANGE="10.168.102.31-10.168.102.31" # IP range for load balancer services
export SSH_KEY_FILE="/root/.ssh/id_rsa.pub" # Path to the SSH public key file
export NUTANIX_USER="admin" # Nutanix PrismCentral username (left blank for security)
export NUTANIX_PASSWORD="" # Nutanix PrismCentral password (left blank for security)
export REGISTRY_URL="https://registry.wskn-ag.local/library" # URL for the private container registry
export REGISTRY_USERNAME="admin" # Username for authenticating with the private registry (left blank for security)
export REGISTRY_PASSWORD="" # Password for authenticating with the private registry (left blank for security)
export REGISTRY_CA="/root/wskn-ag-certs/server.crt" # Path to the CA certificate for the private registry

𝗜𝗡𝗦𝗧𝗔𝗟𝗟𝗔𝗧𝗜𝗢𝗡 𝗖𝗢𝗠𝗠𝗔𝗡𝗗
nkp create cluster nutanix --cluster-name $CLUSTER_NAME \
    --endpoint $NUTANIX_PC_FQDN_ENDPOINT_WITH_PORT\
    --control-plane-endpoint-ip $CONTROL_PLANE_IP \
    --control-plane-vm-image $IMAGE_NAME \
    --control-plane-prism-element-cluster $PRISM_ELEMENT_CLUSTER_NAME \
    --control-plane-subnets $SUBNET_NAME \
    --control-plane-pc-project $PROJECT_NAME \
    --control-plane-replicas $CONTROL_PLANE_REPLICAS \
    --control-plane-vcpus $CONTROL_PLANE_VCPUS \
    --control-plane-cores-per-vcpu $CONTROL_PLANE_CORES_PER_VCPU \
    --control-plane-memory $CONTROL_PLANE_MEMORY_GIB \
    --worker-vm-image $IMAGE_NAME \
    --worker-prism-element-cluster $PRISM_ELEMENT_CLUSTER_NAME \
    --worker-subnets $SUBNET_NAME \
    --worker-pc-project $PROJECT_NAME \
    --worker-replicas $WORKER_REPLICAS \
    --worker-vcpus $WORKER_VCPUS \
    --worker-cores-per-vcpu $WORKER_CORES_PER_VCPU \
    --worker-memory $WORKER_MEMORY_GIB \
    --ssh-public-key-file $SSH_KEY_FILE \
    --csi-storage-container $NUTANIX_STORAGE_CONTAINER_NAME \
    --csi-file-system $CSI_FILESYSTEM \
    --csi-hypervisor-attached-volumes=$CSI_HYPERVISOR_ATTACHED \
    --kubernetes-service-load-balancer-ip-range $LB_IP_RANGE \
    --insecure \
    --self-managed \
    --airgapped \
    --registry-mirror-url $REGISTRY_URL \
    --registry-mirror-cacert $REGISTRY_CA \
    --registry-mirror-username=$REGISTRY_USERNAME \
    --registry-mirror-password=$REGISTRY_PASSWORD
หลังจาก nkp cli ทำงาน ระบบจะสร้าง kubernetes ชั่วคราวโดยใช้ KIND (kubernetes in docker) โดย load package ที่ได้จาก konvoy-bootstrap-image ระบบจะสร้าง kubeconfig ตาม format ชื่อ cluster สามารถใช้ access KIND cluster เพื่อตรวจสอบสถานะการทำงานได้ดังนี้
[nutanix@harbor nkp-v2.17.0]$ export KUBECONFIG=nkp-mgmt-bootstrap.confทำการ list logs ระหว่างการติดตั้งได้จาก container capx-controller-manager สำหรับ nutanix platform สำหรับ platform อื่นๆ สังเกตุจาก digit ที่ 4 คือ x = nutanix, a=aws, g=google, pp = preprovision, v=vmware, vcd=vmware cloud director, z=azure
[nutanix@harbor nkp-v2.17.0]$ kubectl logs -f capx-controller-manager-745948468d-dkjf5 -n capx-systemตรวจสอบว่ามี container อะไรบ้างที่ถูกใช้ในการติดตั้ง
[nutanix@harbor nkp-v2.17.0]$ kubectl get pods -A -o yaml | grep image: | sort -h | uniqรอจนกว่าระบบจะติดตั้งสมบูรณ์ โดยขั้นตอนการติดตั้งระบบจะลบ KIND และย้าย configuration ไปยัง cluster ปลายทาง โดยจะสร้าง kubeconfig ไว้ให้เพื่อ access ไปยัง cluster ที่สร้างขึ้นใหม่ ใช้เวลาประมาณ 10-20 นาที
Cluster default/nkp-mgmt kubeconfig was written to to the filesystem.
You can now view resources in the new cluster by using the --kubeconfig flag with kubectl.
For example: kubectl --kubeconfig="/home/nutanix/nkp-mgmt.conf" get nodes
Starting Kommander installation
✓ Deploying Flux
✓ Deploying Ingress certificate
✓ Creating kommander-overrides ConfigMap
✓ Deploying Git Operator
✓ Creating GitClaim for management GitRepository
✓ Creating GitClaimUser for accessing management GitRepository
✓ Deploying Flux configuration
✓ Deploying Kommander Operator
✓ Creating KommanderCore resource
✓ Cleaning up Kommander bootstrap resources
✓ Deploying Gatekeeper
✓ Creating PlatformVersionArtifact
✓ Deploying Kommander AppManagement
✓ 4 out of 14 core applications have been installed (waiting for dex, dex-k8s-authenticator and 8 more)
✓ 5 out of 14 core applications have been installed (waiting for dex, dex-k8s-authenticator and 7 more)
✓ 10 out of 14 core applications have been installed (waiting for dex-k8s-authenticator, kommander and 2 more)
✓ 11 out of 14 core applications have been installed (waiting for dex-k8s-authenticator, kommander-ui and 1 more)
✓ 13 out of 14 core applications have been installed (waiting for traefik-forward-auth-mgmt)
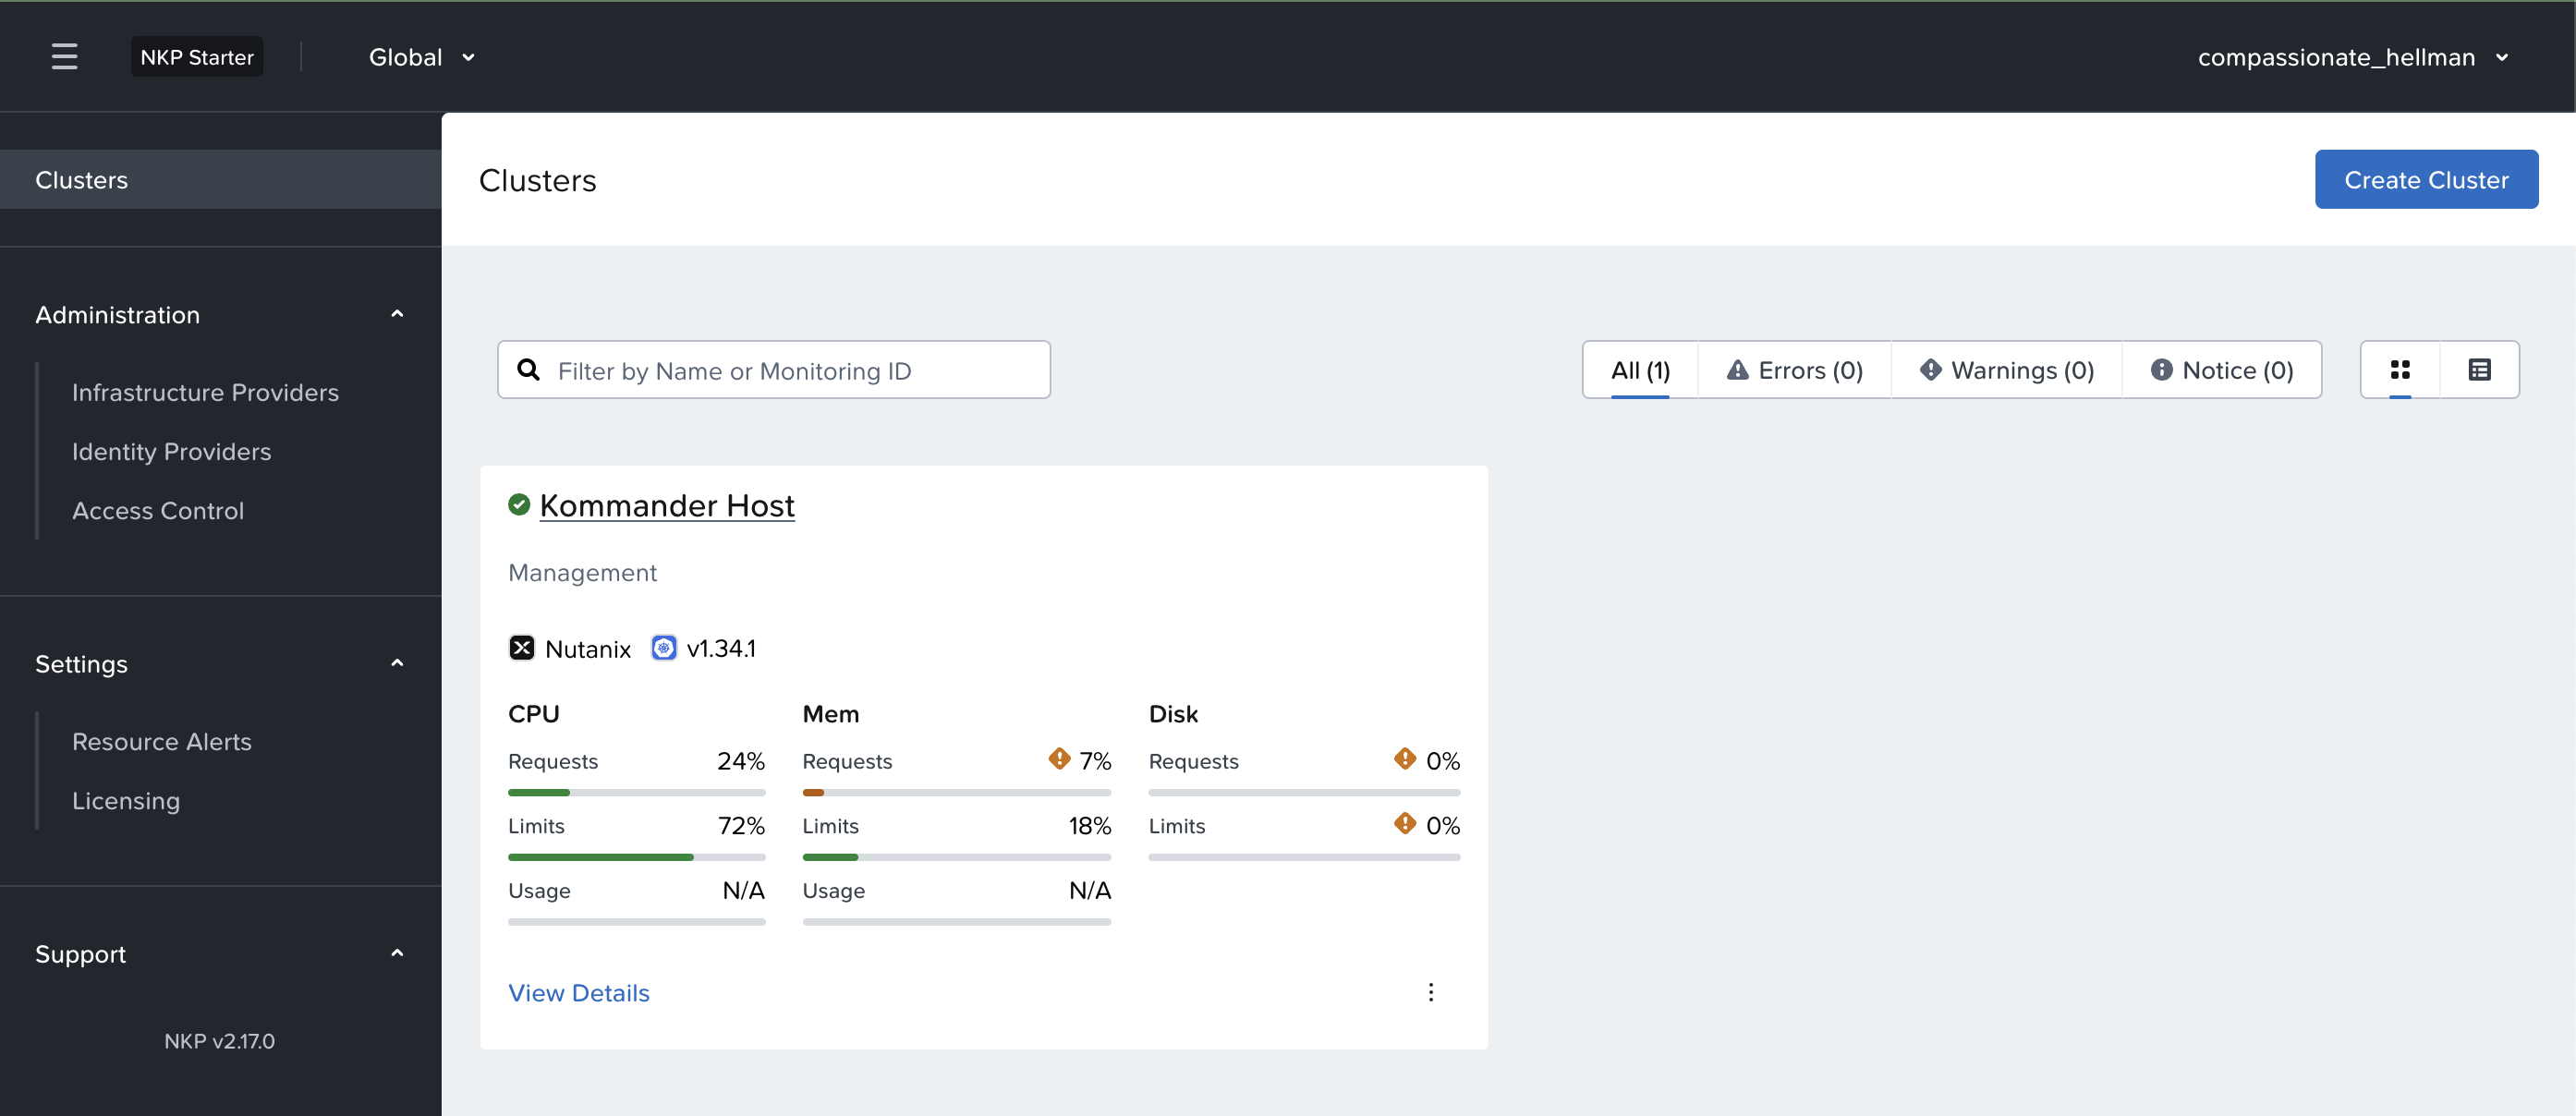
Cluster was created successfully! Get the dashboard details with:
nkp get dashboard --kubeconfig="/home/nutanix/nkp-mgmt.conf"login ไปยัง nkp management platform โดยใช้ nkp cli เพื่อ generate user และ password รวมถึง dashboard url
[nutanix@harbor ~]$ nkp get dashboard --kubeconfig="/home/nutanix/nkp-mgmt.conf"
Username: compassionate_hellman
Password: CJey2OWLtc5nXwFXhDfDWC7tPsJlPu5gNiS2tKLl93J7avxCGvxYqKaPZ3zs3HJQ
URL: https://10.38.252.11/dkp/kommander/dashboard
Access dashboard ตามข้อมูลที่ได้