Monthly Archives: July 2025

Install NDK with NKP

Nutanix Data Service for Kubernetes (NDK) เป็น service ที่ติดตั้งบน Kubernetes Cluster เพื่อทำการ backup application และ replicate ข้อมูลที่ถูก backup ไปยัง Kubernetes cluster ปลายทาง เพื่อให้สามารถ recovery ทั้ง application และข้อมูลได้ โดยใช้กับ use case เช่นการทำ DR โดยการ replicate ข้อมูลไปยังปลายทางมากกว่าหนึ่งปลายทาง การย้าย Application (Application migration) หรือ rebalancing application ไปยัง cluster ที่มี resource ที่เหมาะสม การ snapshots และ restore ภายใน cluster โดยสามารสร้าง schedule และรองรับการ replication ในแบบ near realtime ได้

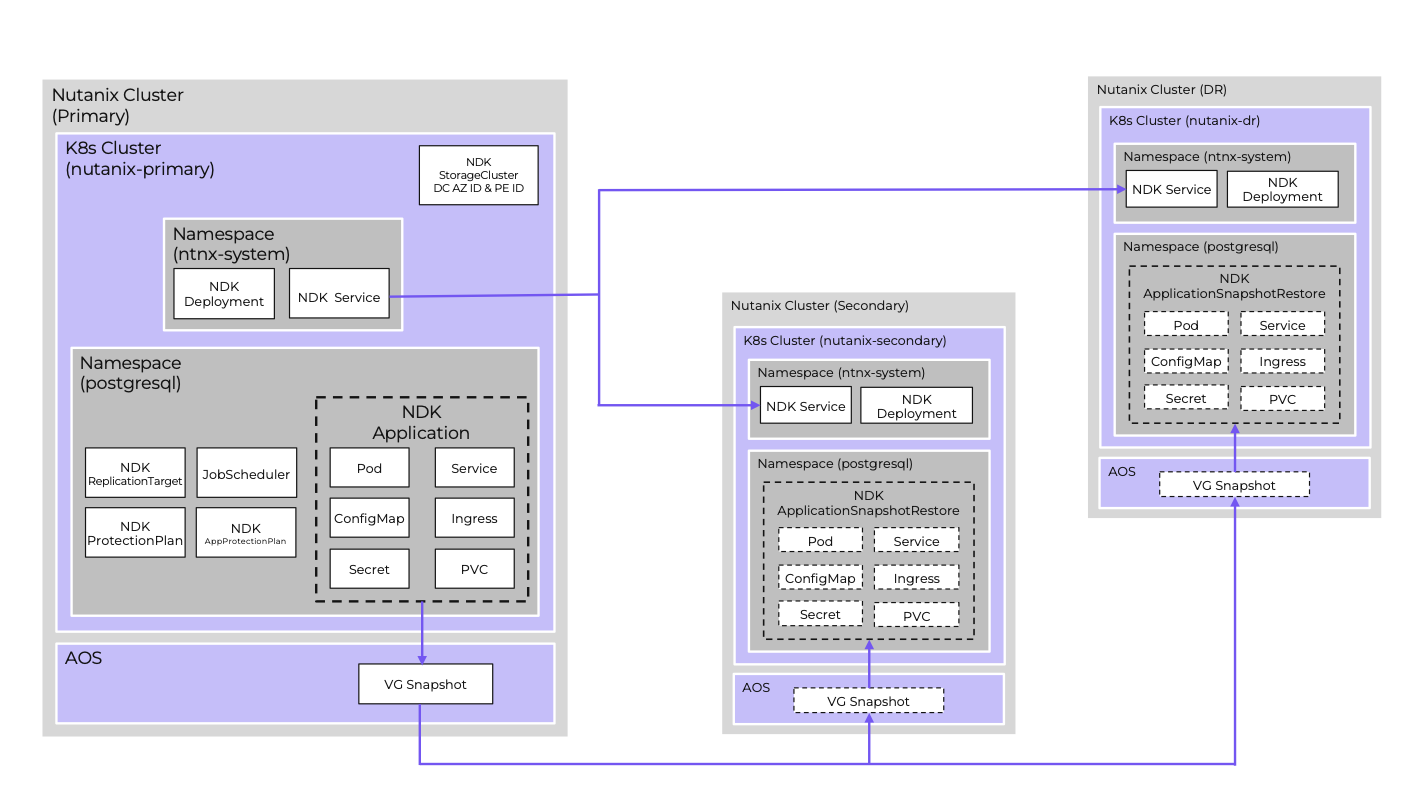
CRD ที่มาด้วยกับ NDK

Application สำหรับกำหนดกลุ่มของ resource ที่จะทำการ snapshot หรือ replicate
ApplicationSnapshot สร้าง application snapshot สำหรับ source ที่ระบุ (application)
Remote จับคู่ของ NKP instance ระหว่างสอง cluster
ReplicationTarget กำหนด cluster และ namespace ของ cluster ปลายทาง
ApplicationSnapshotReplication ทำการ replicate snapshot ระหร่วง cluster
ApplicationSnapshotRestore ทำการ restore snapshot ที่ local cluster หรือ remote cluster
JobScheduler, ProtectionPlan กำหนด snapshot policy และการจัดเก็บ (retention)
StorageCluster กำหนด Infrastructure ที่จะ support การทำ snapshot และ replication ระหว่าง cluster หรือภายใน cluster

การติดตั้ง NDK โดยต้องติดตั้งทั้ง Kuberntes Cluster ต้นทาง และ Kubernetes Cluster ปลายทาง

ขั้นตอนการติดตั้ง NDK ที่ Kubernetes ต้นทาง

เข้าไปที่ Nutanix Portal เพื่อ copy Download Link เพื่อทำการ download install package และทำการจัดเก็บไว้ใน private registry ภายในสำหรับใช้ในการการติดตั้ง

[nutanix@harbor ~]$ curl -o ndk-1.2.0.tar "https://download.nutanix.com/downloads/ndk/1.2.0/ndk-1.2.0.tar?Expires=1752582997&Key-Pair-Id=APKAJTTNCWPEI42QKMSA&Signature=CGOEgIDQHcJ1fTI8nIMbB5mcrM~5jPFcfS~5PyKDFGQyeNGlfBHyookKrzTTearX6L1aLLyEL6psYlkYIZdDlGIghHQuyb5qQBcxVGqiJ2ENuJD2MZKJkBFb6gnJ5s0JynyfkReAwPU5Ls4Vwb9yZXhzROm25Adezn-noLnkQUpLYQkyNl3~3n3X6xWR7qQQhHbo~QH3GEmYylmfsAcfx78WrH6-t9q3AV-2vhOGFNFz8k4gueqbRAjcLiKJBe7pJ-MlQ1KCo2ZYQMg3OACgqx7epi-2t0ImmpKs0I3rGa0lBqccOggX3n0tfaSED1cwTyjFRRpgFGYWZRX0qdrCvQ__"
  % Total    % Received % Xferd  Average Speed   Time    Time     Time  Current
                                 Dload  Upload   Total   Spent    Left  Speed
100  526M  100  526M    0     0  22.5M      0  0:00:23  0:00:23 --:--:-- 30.1M

unzip file ที่ทำการ download มา

[nutanix@harbor ~]$ tar -xvf ndk-1.2.0.tar

Load container เข้าไปยังระบบของ docker

[nutanix@harbor ~]$ docker image load -i ndk-1.2.0/ndk-1.2.0.tar

ทำการ tag container ที่ load เข้าไปในระบบและ push เข้าไปยัง container private registry ที่เตรียมไว้

[nutanix@harbor ~]$ docker image tag ndk/manager:1.2.0 10.38.53.107/ndk/manager:1.2.0
[nutanix@harbor ~]$ docker image tag ndk/infra-manager:1.2.0 10.38.53.107/ndk/infra-manager:1.2.0
[nutanix@harbor ~]$ docker image tag ndk/job-scheduler:1.2.0 10.38.53.107/ndk/job-scheduler:1.2.0
[nutanix@harbor ~]$ docker image tag ndk/kube-rbac-proxy:v0.17.0 10.38.53.107/ndk/kube-rbac-proxy:v0.17.0
[nutanix@harbor ~]$ docker image tag ndk/bitnami-kubectl:1.30.3 

[nutanix@harbor ~]$ docker push 10.38.53.107/ndk/manager:1.2.0
[nutanix@harbor ~]$ docker push 10.38.53.107/ndk/infra-manager:1.2.0
[nutanix@harbor ~]$ docker push 10.38.53.107/ndk/job-scheduler:1.2.0
[nutanix@harbor ~]$ docker push 10.38.53.107/ndk/kube-rbac-proxy:v0.17.0
[nutanix@harbor ~]$ docker push 10.38.53.107/ndk/bitnami-kubectl:1.30.3

ทำการ set environment variable เพื่อ install ndk

[nutanix@harbor ~]$ cd ~/ndk-1.2.0
[nutanix@harbor ~]$ export CLUSTER_NAME=<<NKP cluster to install NDK on>>
[nutanix@harbor ~]$ export KUBECONFIG=~/nkp-v2.15.0/cli/${CLUSTER_NAME}.conf
[nutanix@harbor ~]$ export LOCAL_REG=<<registry hostname/IP>>:<<port>>

ตรวจสอบว่ามี Nutanix CSI credentials secret ในระบบแล้ว ทั้งนี้ nutanix-csi-credentials จะมีอยู่แล้วถ้า NKP ถูกติดตั้งใช้งานกับ Nutanix Infra Provider

kubectl get secret -n ntnx-system

ถ้าไม่มีต้องสร้างด้วย yaml โดยที่ key คือ base64 encoding ของ “<<PC hostname/IP>>:9440:<<PC userid>>:<<PC userid password>>”

apiVersion: v1
data:
  key: <<encoded creds>>
kind: Secret
metadata:
  name: nutanix-csi-credentials
  namespace: ntnx-system
type: Opaque

ติดตั้ง ndk ด้วย helm cli

helm install ndk -n ntnx-system chart/ \
--set manager.repository=${LOCAL_REG}/ndk/manager \
--set manager.tag=1.2.0 \
--set infraManager.repository=${LOCAL_REG}/ndk/infra-manager \
--set infraManager.tag=1.2.0 \
--set kubeRbacProxy.repository=${LOCAL_REG}/ndk/kube-rbac-proxy \ 
--set kubeRbacProxy.tag=v0.17.0 \
--set bitnamiKubectl.repository=${LOCAL_REG}/ndk/bitnami-kubectl \ 
--set bitnamiKubectl.tag=1.30.3 \
--set jobScheduler.repository=${LOCAL_REG}/ndk/job-scheduler \
--set jobScheduler.tag=1.2.0 \
--set tls.server.clusterName=${CLUSTER_NAME} \
--set config.secret.name=nutanix-csi-credentials

ตัวอย่างค่าที่ใช้ในการติดตั้งครั้งนี้

[nutanix@harbor ndk-1.2.0]$ helm install ndk -n ntnx-system chart/ \
--set manager.repository=10.38.53.107/ndk/manager \
--set manager.tag=1.2.0 \
--set infraManager.repository=10.38.53.107/ndk/infra-manager \
--set infraManager.tag=1.2.0 \
--set kubeRbacProxy.repository=10.38.53.107/ndk/kube-rbac-proxy \
--set kubeRbacProxy.tag=v0.17.0 \
--set bitnamiKubectl.repository=10.38.53.107/ndk/bitnami-kubectl \
--set bitnamiKubectl.tag=1.30.3 \
--set jobScheduler.repository=10.38.53.107/ndk/job-scheduler \
--set jobScheduler.tag=1.2.0 \
--set tls.server.clusterName=nkp-at-next \
--set config.secret.name=nutanix-csi-credentials

ตรวจสอบการติดตั้งด้วยการ get pod ndk-controller-manager ว่าทำงานได้ปกติหรือไม่

[nutanix@harbor ndk-1.2.0]$ kubectl get pod -n ntnx-system
NAME                                      READY   STATUS    RESTARTS   AGE
ndk-controller-manager-79687849d5-8vxdh   4/4     Running   0          22s

สร้าง StorageCluster ของทั้งสอง Kubernetes Cluster ที่ต้องการทำ replication ระหว่างกัน โดย Kubernetes Cluster ที่สองจะต้องติดตั้ง NDK ให้สมบูรณ์ตามตัวอย่างข้างต้น

cd ~/nkp-v2.15.0/cli
export CLUSTER_NAME=<<NKP cluster name>>
export KUBECONFIG=~/nkp-v2.15.0/cli/${CLUSTER_NAME}.conf
export PE_UUID=<<PE UUID>>
export PC_UUID=<<PC UUID>>

cat << EOF >  ${CLUSTER_NAME}-storagecluster.yaml
apiVersion: dataservices.nutanix.com/v1alpha1
kind: StorageCluster
metadata:
 name: ${CLUSTER_NAME}
spec:
 storageServerUuid: ${PE_UUID}
 managementServerUuid: ${PC_UUID}
EOF

ตัวอย่างการสร้าง storage cluster

[nutanix@harbor ~]$ export KUBECONFIG=/home/nutanix/nkp-at-next.conf

[nutanix@harbor ~]$ cat << EOF >  nkp-at-next-storagecluster.yaml
apiVersion: dataservices.nutanix.com/v1alpha1
kind: StorageCluster
metadata:
 name: nkp-at-next
spec:
 storageServerUuid: 0006391e-0ad0-299a-70dd-ac1f6b3fddde
 managementServerUuid: f2b78299-aa10-43b9-94d5-faa3527e3897
EOF

[nutanix@harbor ~]$ k apply -f nkp-at-next-storagecluster.yaml
storagecluster.dataservices.nutanix.com/nkp-at-next created
[nutanix@harbor ~]$ k get storagecluster
NAME          AVAILABLE
nkp-at-next   true

สร้าง Storage Cluster ที่ Kubernetes Cluster ที่สอง

[nutanix@harbor ~]$ export KUBECONFIG=cluster2-kubeconfig.yaml

[nutanix@harbor ~]$ cat << EOF >  cluster2-storagecluster.yaml
apiVersion: dataservices.nutanix.com/v1alpha1
kind: StorageCluster
metadata:
 name: cluster2
spec:
 storageServerUuid: 0006391e-0ad0-299a-70dd-ac1f6b3fddde
 managementServerUuid: f2b78299-aa10-43b9-94d5-faa3527e3897
EOF

[nutanix@harbor ~]$ k apply -f cluster2-storagecluster.yaml
storagecluster.dataservices.nutanix.com/cluster2 created
[nutanix@harbor ~]$ k get storagecluster
NAME       AVAILABLE
cluster2   true

สร้าง application resource ที่ต้องการ snapshot หรือ replication โดยตัวอย่างนี้จะ backup resource ทั้งหมดที่อยู่ภายใต้ namespace แต่ถ้าต้องการ filter เฉพาะบาง resource สามารถกำหนดเพิ่มเติมได้ตามตัวอย่างที่ https://portal.nutanix.com/page/documents/details?targetId=Nutanix-Data-Services-for-Kubernetes-v1_2:top-app-cr-manual-create-cli-k8s-t.html

[nutanix@harbor ~]$ cat << EOF >  wordpress-app-cr.yaml
apiVersion: dataservices.nutanix.com/v1alpha1
kind: Application
metadata:
  name: wordpress-app-cr
  namespace: application
spec:
  applicationSelector:
EOF

[nutanix@harbor ~]$ k apply -f wordpress-app-cr.yaml
application.dataservices.nutanix.com/wordpress-app-cr created

[nutanix@harbor ~]$ k get application -A
NAMESPACE     NAME               AGE   ACTIVE   LAST-STATUS-UPDATE
application   wordpress-app-cr   20s            20s

สร้าง application snapshot ที่ cluster ต้นทาง

cd ~/nkp-v2.15.0/cli
export CLUSTER_NAME=<<NKP cluster name>>
export KUBECONFIG=~/nkp-v2.15.0/cli/${CLUSTER_NAME}.conf
export APP_NAME=<<application name>>
export APP_NAMESPACE=<<application namespace>>

cat << EOF >  ${APP_NAME}-snap.yaml
apiVersion: dataservices.nutanix.com/v1alpha1
kind: ApplicationSnapshot
metadata:
  name: ${APP_NAME}-snap
  namespace: ${APP_NAMESPACE}
spec:
  source:
    applicationRef:
     name: ${APP_NAME}-app-cr 
  expiresAfter: <<#>>m
EOF

ตัวอย่างค่าที่ใช้ในตัวอย่างนี้

[nutanix@harbor ~]$ cat << EOF >  wordpress-snap.yaml
apiVersion: dataservices.nutanix.com/v1alpha1
kind: ApplicationSnapshot
metadata:
  name: wordpress-snap
  namespace: application
spec:
  source:
    applicationRef:
     name: wordpress-app-cr
  expiresAfter: 120m
EOF
[nutanix@harbor ~]$ k apply -f wordpress-snap.yaml
applicationsnapshot.dataservices.nutanix.com/wordpress-snap created

[nutanix@harbor ~]$ kubectl get applicationsnapshot -n application
NAME             AGE   READY-TO-USE   BOUND-SNAPSHOTCONTENT                      SNAPSHOT-AGE   CONSISTENCY-TYPE
wordpress-snap   69s   true           asc-531ae7ca-7afb-40a6-a4f6-403c8e732cfa   36s

ตรวจสอบสถานะของการ snapshot

[nutanix@harbor ~]$ kubectl get applicationsnapshotcontent
NAME                                       READY-TO-USE   AGE    APPLICATIONSNAPSHOT   SNAPSHOTCONTENT-AGE   CONSISTENCYTYPE
asc-531ae7ca-7afb-40a6-a4f6-403c8e732cfa   true           110s   wordpress-snap        77s

ทดสอบ restore application จาก snapshot ที่สร้างขึ้นภายใน cluster เดียวกัน แต่ต่าง namspace ตามตัวอย่างนี้ โดยต้องสร้าง reference grant

export APP_NAME=<<application name>>
export APP_NAMESPACE=<<application namespace>>
export TGT_NAMESPACE=<<target namespace>>
***NOTE: target namespace must exist on target cluster (create if necessary)***
~~~~~~~~~~~~~~~~~~~~~~~~~~~~~~~~~~~~~~~~~~~~~~~~~~~~~~~~~~~~~~~~~~~~~~~~~~~~
cat << EOF >  ${APP_NAME}-snap-rg.yaml
apiVersion: gateway.networking.k8s.io/v1beta1
kind: ReferenceGrant
metadata:
 name: ${APP_NAME}-snap-rg
 namespace: ${APP_NAMESPACE}
spec:
 from:
 - group: dataservices.nutanix.com
   kind: ApplicationSnapshotRestore
   namespace: ${TGT_NAMESPACE}
 to:
 - group: dataservices.nutanix.com
   kind: ApplicationSnapshot
   name: ${APP_NAME}-snap
EOF

~~~~~~~~~~~~~~~~~~~~~~~~~~~~~~~~~~~~~~~~~~~~~~~~~~~~~~~~~~~~~~~~~~~~~~~~~~~~ 
kubectl apply -f ${APP_NAME}-snap-rg.yaml
- verify reference grant exists:
kubectl get referencegrant -n ${APP_NAMESPACE}
--> ${APP_NAME}-snap-rg is in the list of reference grants

ตัวอย่างค่าที่ใช้ในการสร้าง reference grant

[nutanix@harbor ~]$ k create ns newapplication
namespace/newapplication created

[nutanix@harbor ~]$ cat << EOF >  wordpress-snap-rg.yaml
apiVersion: gateway.networking.k8s.io/v1beta1
kind: ReferenceGrant
metadata:
 name: wordpress-snap-rg
 namespace: application
spec:
 from:
 - group: dataservices.nutanix.com
   kind: ApplicationSnapshotRestore
   namespace: newapplication
 to:
 - group: dataservices.nutanix.com
   kind: ApplicationSnapshot
   name: wordpress-snap
EOF

[nutanix@harbor ~]$ k apply -f wordpress-snap-rg.yaml
referencegrant.gateway.networking.k8s.io/wordpress-snap-rg created

[nutanix@harbor ~]$ kubectl get referencegrant -n application
NAME                AGE
wordpress-snap-rg   35s

สร้าง application restore

cat << EOF >  ${APP_NAME}-rg-restore.yaml
apiVersion: dataservices.nutanix.com/v1alpha1
kind: ApplicationSnapshotRestore
metadata:
  name: ${APP_NAME}-rg-restore
  namespace: ${TGT_NAMESPACE}
spec:
  applicationSnapshotName: ${APP_NAME}-snap
  applicationSnapshotNamespace: ${APP_NAMESPACE}
EOF
~~~~~~~~~~~~~~~~~~~~~~~~~~~~~~~~~~~~~~~~~~~~~~~~~~~~~~~~~~~~~~~~~~~~~~~~~~~~
kubectl apply -f ${APP_NAME}-rg-restore.yaml
- verify restore operation completes successfully (can take a few minutes)
kubectl get applicationsnapshotrestore -n ${TGT_NAMESPACE}
--> ${APP_NAME}-rg-restore shows a COMPLETED status of 'true'
- verify all artifacts referenced in snapshot describe operation have been restored on the target namespace:
***For example***
kubectl get all -n ${TGT_NAMESPACE}
kubectcl get pvc -n ${TGT_NAMESPACE}

ตัวอย่างการ restore application

[nutanix@harbor ~]$ cat << EOF >  wordpress-rg-restore.yaml
apiVersion: dataservices.nutanix.com/v1alpha1
kind: ApplicationSnapshotRestore
metadata:
  name: wordpress-rg-restore
  namespace: newapplication
spec:
  applicationSnapshotName: wordpress-snap
  applicationSnapshotNamespace: application
EOF
[nutanix@harbor ~]$ k apply -f wordpress-rg-restore.yaml
applicationsnapshotrestore.dataservices.nutanix.com/wordpress-rg-restore created

[nutanix@harbor ~]$ kubectl get applicationsnapshotrestore -n newapplication
NAME                   SNAPSHOT-NAME    COMPLETED
wordpress-rg-restore   wordpress-snap   false

[nutanix@harbor ~]$ kubectl get applicationsnapshotrestore -n newapplication
NAME                   SNAPSHOT-NAME    COMPLETED
wordpress-rg-restore   wordpress-snap   true

[nutanix@harbor ~]$ k get all -n newapplication
NAME                                   READY   STATUS    RESTARTS   AGE
pod/wordpress-84f858d9fd-8mjdp         1/1     Running   0          2m24s
pod/wordpress-mysql-556f6f65cc-bjd8q   1/1     Running   0          2m24s

NAME                      TYPE        CLUSTER-IP     EXTERNAL-IP   PORT(S)    AGE
service/wordpress         ClusterIP   10.99.164.74   <none>        80/TCP     2m24s
service/wordpress-mysql   ClusterIP   None           <none>        3306/TCP   2m24s

NAME                              READY   UP-TO-DATE   AVAILABLE   AGE
deployment.apps/wordpress         1/1     1            1           2m24s
deployment.apps/wordpress-mysql   1/1     1            1           2m24s

NAME                                         DESIRED   CURRENT   READY   AGE
replicaset.apps/wordpress-84f858d9fd         1         1         1       2m24s
replicaset.apps/wordpress-mysql-556f6f65cc   1         1         1       2m24s

ตัวอย่างการ restore application snapshot ไปยัง kubernetes cluster ปลายทาง โดยต้องสร้าง Remote cluster ที่ cluster ต้นทางก่อน

- verify ndk intercom service is working on both source & target clusters:
cd ~/nkp-v2.15.0/cli
export SOURCE_NAME=<<NKP source cluster name>>
export TARGET_NAME=<<target cluster name>>
export APP_NAME=<<application name>>
export APP_NAMESPACE=<<application namespace>>
export KUBECONFIG=~/nkp-v2.15.0/cli/${SOURCE_NAME}.conf
kubectl get svc -n ntnx-system
--> load balancer service 'ndk-intercom-service' should exist and have an assigned external IP
kubectl get svc -n ntnx-system --kubeconfig ${TARGET_NAME}.conf
--> load balancer service 'ndk-intercom-service' should exist and have an assigned external IP	
--> cache external IP (needed for the remote cr)
- verify an application snapshot exists and is ready:
kubectl get applicationsnapshot -n ${APP_NAMESPACE}
--> snapshot status for <<app name>>-snap should be "true"
- create remote custom resource:
~~~~~~~~~~~~~~~~~~~~~~~~~~~~~~~~~~~~~~~~~~~~~~~~~~~~~~~~~~~~~~~~~~~~~~~~~~~~
cat << EOF >  ndk-${TARGET_NAME}-remote.yaml
apiVersion: dataservices.nutanix.com/v1alpha1
kind: Remote
metadata:
  name: ndk-${TARGET_NAME}-remote
spec:
  clusterName: ${TARGET_NAME} 
  ndkServiceIp: <<EXTERNAL IP of target cluster's 'ndk-intercom-service' LB service>> 
  ndkServicePort: 2021
  tlsConfig:
    skipTLSVerify: true
EOF
~~~~~~~~~~~~~~~~~~~~~~~~~~~~~~~~~~~~~~~~~~~~~~~~~~~~~~~~~~~~~~~~~~~~~~~~~~~~
--> 'tlsConfig' section may not be needed or may need modified based on how NDK was installed, see following link: https://portal.nutanix.com/page/documents/details?targetId=Nutanix-Data-Services-for-Kubernetes-v1_2:top-remote-cr-create-cli-k8s.html
kubectl apply -f ndk-${TARGET_NAME}-remote.yaml
- verify remote cr is ready:
kubectl get remote
--> ndk-${TARGET_NAME}-remote should be listed and AVAILABLE status set to 'True'

ตัวอย่างการสร้าง Remote cluster

[nutanix@harbor ~]$ cat << EOF >  ndk-cluster2-remote.yaml
apiVersion: dataservices.nutanix.com/v1alpha1
kind: Remote
metadata:
  name: ndk-cluster2-remote
spec:
  clusterName: cluster2
  ndkServiceIp: 10.38.53.17
  ndkServicePort: 2021
  tlsConfig:
    skipTLSVerify: true
EOF
[nutanix@harbor ~]$ k apply -f ndk-cluster2-remote.yaml
remote.dataservices.nutanix.com/ndk-cluster2-remote created
[nutanix@harbor ~]$ k get remote
NAME                  ADDRESS       PORT   AVAILABLE
ndk-cluster2-remote   10.38.53.17   2021   True

สร้าง replication target ที่ต้องการให้ snapshot ทำการ replicate ไป

cat << EOF >  ${APP_NAME}-replicate-target.yaml
apiVersion: dataservices.nutanix.com/v1alpha1
kind: ReplicationTarget
metadata:
  name: ${TARGET_NAME}
  namespace: ${APP_NAMESPACE}
spec:
  namespaceName: ntnx-system
  remoteName: ndk-${TARGET_NAME}-remote
  serviceAccountName: default
EOF

ตัวอย่างการสร้าง Replication Target

[nutanix@harbor ~]$ cat << EOF >  wordpress-replicate-target.yaml
apiVersion: dataservices.nutanix.com/v1alpha1
kind: ReplicationTarget
metadata:
  name: cluster2
  namespace: application
spec:
  namespaceName: ntnx-system
  remoteName: ndk-cluster2-remote
  serviceAccountName: default
EOF
[nutanix@harbor ~]$ k apply -f wordpress-replicate-target.yaml
replicationtarget.dataservices.nutanix.com/cluster2 created
[nutanix@harbor ~]$ k get replicationtarget -A
NAMESPACE     NAME       REMOTE-NAME           REMOTE-NAMESPACE   AVAILABLE
application   cluster2   ndk-cluster2-remote   ntnx-system        True

สร้าง application snapshot replication ไปยัง cluster ปลายทาง

cat << EOF >  ${APP_NAME}-replicate.yaml
apiVersion: dataservices.nutanix.com/v1alpha1
kind: ApplicationSnapshotReplication
metadata:
  name: ${APP_NAME}-replicate
  namespace: ${APP_NAMESPACE}
spec:
  applicationSnapshotName: ${APP_NAME}-snap
  replicationTargetName: ${TARGET_NAME}
EOF

~~~~~~~~~~~~~~~~~~~~~~~~~~~~~~~~~~~~~~~~~~~~~~~~~~~~~~~~~~~~~~~~~~~~~~~~~~~~
kubectl apply -f ${APP_NAME}-replicate.yaml
- monitor an application snapshot replication:
kubectl get applicationsnapshotreplication -n ${APP_NAMESPACE}
--> within a few minutes AVAILABLE status for <<app name>>-snap should be "True"
kubectl get applicationsnapshot -n ntnx-system ${APP_NAME}-snap --kubeconfig ${TARGET_NAME}.conf
--> should list snapshot on target cluster with a READY-TO-USE status of "true"

ตัวอย่างการสร้าง application snapshot replication

***NOTE: This enables application snapshots saved in one cluster to be restored to their original namespace on another cluster***
- verify the NDK reference grant CRD exists on the 'target' cluster:
cd ~/nkp-v2.15.0/cli
export TARGET_NAME=<<NKP target cluster name>>
export KUBECONFIG=~/nkp-v2.15.0/cli/${TARGET_NAME}.conf
kubectl get crd | grep 'referencegrants'
--> the 'referencegrants.gateway.networking.k8s.io' cred should be listed
- create a reference grant:
export APP_NAME=<<application name>>
export TGT_NAMESPACE=<<application's namespace on source cluster>>
***NOTE: target namespace must exist on target cluster (create if necessary)***
~~~~~~~~~~~~~~~~~~~~~~~~~~~~~~~~~~~~~~~~~~~~~~~~~~~~~~~~~~~~~~~~~~~~~~~~~~~~
cat << EOF >  ${APP_NAME}-snap-rg-${TARGET_NAME}.yaml
apiVersion: gateway.networking.k8s.io/v1beta1
kind: ReferenceGrant
metadata:
 name: ${APP_NAME}-snap-rg-${TARGET_NAME}
 namespace: ntnx-system
spec:
 from:
 - group: dataservices.nutanix.com
   kind: ApplicationSnapshotRestore
   namespace: ${TGT_NAMESPACE}
 to:
 - group: dataservices.nutanix.com
   kind: ApplicationSnapshot
   name: ${APP_NAME}-snap
EOF

ตัวอย่างการสร้าง application snapshot replication

[nutanix@harbor ~]$ cat << EOF >  wordpress-replicate.yaml
apiVersion: dataservices.nutanix.com/v1alpha1
kind: ApplicationSnapshotReplication
metadata:
  name: wordpress-replicate
  namespace: application
spec:
  applicationSnapshotName: wordpress-snap
  replicationTargetName: cluster2
EOF
[nutanix@harbor ~]$ k apply -f wordpress-replicate.yaml
applicationsnapshotreplication.dataservices.nutanix.com/wordpress-replicate created
[nutanix@harbor ~]$ k get applicationsnapshotreplication -A
NAMESPACE     NAME                  AVAILABLE   APPLICATIONSNAPSHOT   REPLICATIONTARGET   AGE
application   wordpress-replicate   False       wordpress-snap        cluster2            12s

[nutanix@harbor ~]$ k get applicationsnapshotreplication -A
NAMESPACE     NAME                  AVAILABLE   APPLICATIONSNAPSHOT   REPLICATIONTARGET   AGE
application   wordpress-replicate   True        wordpress-snap        cluster2            6m57s

[nutanix@harbor ~]$ kubectl get applicationsnapshot -n ntnx-system
NAME             AGE     READY-TO-USE   BOUND-SNAPSHOTCONTENT                                  SNAPSHOT-AGE
wordpress-snap   9m46s   true           asc-531ae7ca-7afb-40a6-a4f6-403c8e732cfa-1980ca1b120   6m58s

สร้าง reference grant สำหรับการ restore โดยต้องสร้างที่ cluster ปลายทาง

- create a reference grant:
export APP_NAME=<<application name>>
export TGT_NAMESPACE=<<application's namespace on source cluster>>
***NOTE: target namespace must exist on target cluster (create if necessary)***
~~~~~~~~~~~~~~~~~~~~~~~~~~~~~~~~~~~~~~~~~~~~~~~~~~~~~~~~~~~~~~~~~~~~~~~~~~~~
cat << EOF >  ${APP_NAME}-snap-rg-${TARGET_NAME}.yaml
apiVersion: gateway.networking.k8s.io/v1beta1
kind: ReferenceGrant
metadata:
 name: ${APP_NAME}-snap-rg-${TARGET_NAME}
 namespace: ntnx-system
spec:
 from:
 - group: dataservices.nutanix.com
   kind: ApplicationSnapshotRestore
   namespace: ${TGT_NAMESPACE}
 to:
 - group: dataservices.nutanix.com
   kind: ApplicationSnapshot
   name: ${APP_NAME}-snap
EOF

~~~~~~~~~~~~~~~~~~~~~~~~~~~~~~~~~~~~~~~~~~~~~~~~~~~~~~~~~~~~~~~~~~~~~~~~~~~~
kubectl apply -f ${APP_NAME}-snap-rg-${TARGET_NAME}.yaml
- verify reference grant exists:
kubectl get referencegrant -n ntnx-system
--> ${APP_NAME}-snap-rg-${TARGET_NAME} is in the list of reference grants

ตัวอย่างการสร้าง reference grant

[nutanix@harbor ~]$ cat << EOF >  wordpress-snap-rg-cluster2.yaml
apiVersion: gateway.networking.k8s.io/v1beta1
kind: ReferenceGrant
metadata:
 name: wordpress-snap-rg-cluster2
 namespace: ntnx-system
spec:
 from:
 - group: dataservices.nutanix.com
   kind: ApplicationSnapshotRestore
   namespace: application
 to:
 - group: dataservices.nutanix.com
   kind: ApplicationSnapshot
   name: wordpress-snap
EOF
[nutanix@harbor ~]$ k apply -f wordpress-snap-rg-cluster2.yaml
referencegrant.gateway.networking.k8s.io/wordpress-snap-rg-cluster2 created
[nutanix@harbor ~]$ k get referencegrant -A
NAMESPACE     NAME                         AGE
ntnx-system   wordpress-snap-rg-cluster2   9s

ทำการ restore application ที่ cluster ปลายทาง

cat << EOF >  ${APP_NAME}-rg-restore-${TARGET_NAME}.yaml
apiVersion: dataservices.nutanix.com/v1alpha1
kind: ApplicationSnapshotRestore
metadata:
  name: ${APP_NAME}-rg-restore-${TARGET_NAME}
  namespace: ${TGT_NAMESPACE}
spec:
  applicationSnapshotName: ${APP_NAME}-snap
  applicationSnapshotNamespace: ntnx-system
EOF

~~~~~~~~~~~~~~~~~~~~~~~~~~~~~~~~~~~~~~~~~~~~~~~~~~~~~~~~~~~~~~~~~~~~~~~~~~~~
kubectl apply -f ${APP_NAME}-rg-restore-${TARGET_NAME}.yaml
- verify restore operation completes successfully (can take a few minutes)
kubectl get applicationsnapshotrestore -n ${TGT_NAMESPACE}
--> ${APP_NAME}-rg-restore-${TARGET_NAME} shows a COMPLETED status of 'true'
- verify all artifacts referenced in snapshot describe operation have been restored on the target namespace:
***For example***
kubectl get all -n ${TGT_NAMESPACE}
kubectcl get pvc -n ${TGT_NAMESPACE}

ตัวอย่างการ restore application

[nutanix@harbor ~]$ cat << EOF >  wordpress-rg-restore-cluster2.yaml
apiVersion: dataservices.nutanix.com/v1alpha1
kind: ApplicationSnapshotRestore
metadata:
  name: wordpress-rg-restore-cluster2
  namespace: application
spec:
  applicationSnapshotName: wordpress-snap
  applicationSnapshotNamespace: ntnx-system
EOF
[nutanix@harbor ~]$ k apply -f wordpress-rg-restore-cluster2.yaml
applicationsnapshotrestore.dataservices.nutanix.com/wordpress-rg-restore-cluster2 created
[nutanix@harbor ~]$ k get applicationsnapshotrestore -A
NAMESPACE     NAME                            SNAPSHOT-NAME    COMPLETED
application   wordpress-rg-restore-cluster2   wordpress-snap   false

[nutanix@harbor ~]$ k get applicationsnapshotrestore -A
NAMESPACE     NAME                            SNAPSHOT-NAME    COMPLETED
application   wordpress-rg-restore-cluster2   wordpress-snap   true
[nutanix@harbor ~]$ k get pod -n application
NAME                               READY   STATUS    RESTARTS   AGE
wordpress-84f858d9fd-zqtrt         1/1     Running   0          78s
wordpress-mysql-556f6f65cc-s2h8m   1/1     Running   0          78s
[nutanix@harbor ~]$

Update NKP using NKP cli

ในการ upgrade นี้จะใช้วิธีแบบ air gapped โดยต้อง download bundle จาก nutanix portal ด้วยการ copy Download link ของ NKP Airgapped Bundle (Version v2.15.0)

ใช้ curl ในการ download หรือ tools อื่น หรือจะ click download ก็ได้ ตัวอย่างนี้จะใช้ curl

[nutanix@harbor ~]$ curl -o nkp-air-gapped-bundle_v2.15.0_linux_amd64.tar.gz "https://download.nutanix.com/downloads/nkp/v2.15.0/nkp-air-gapped-bundle_v2.15.0_linux_amd64.tar.gz?Expires=1751840997&Key-Pair-Id=APKAJTTNCWPEI42QKMSA&Signature=MWumafkGQqAazC31HnaDyHlqfjAggj8q7c5~viJDgbJ1vb2-Xv1bHJwshl4m2gILPcf8emPtZU4VKk0sOMJ-t7lc9PopCKGhd~T1LPTt6wSJx29MEEdcvE7p3jDQZI1uuI5qflzmwaljOiwXThgiIgnIw3WcVa97a7GT3BH1O~fmg0sbiSFh1LG6lUKMCZayDwlbbSfBQA1feE8WfTolwgXNu6WMtZBn2Rl4l0bffuWVcGDGFn2ywBJSt5V5iPTU4bgjzLOqSB6E3ZkvtBZvIHqNwhrUEPJpKyTTvUZh7wbP56gU~hThlJZBOs6BkC5n6h~E0H2aohDUjUjos396XA__"
% Total % Received % Xferd Average Speed Time Time Time Current
Dload Upload Total Spent Left Speed
100 16.2G 100 16.2G 0 0 41.8M 0 0:06:36 0:06:36 --:--:-- 40.9M

ทำการ unzip file ที่ download มา

[nutanix@harbor ~]$ tar -xvf nkp-air-gapped-bundle_v2.15.0_linux_amd64.tar.gz
[nutanix@harbor ~]$ cd nkp-v2.15.0
[nutanix@harbor nkp-v2.15.0]$ ls
application-charts cli kib kubectl NOTICES
application-repositories container-images konvoy-bootstrap-image-v2.15.0.tar nkp-image-builder-image-v2.15.0.tar

push kommander container ซึ่งเป็นระบบจัดการ (nkp management) การใช้งานต่างๆ ของ NKP ไปยัง harbor internal registry

[nutanix@harbor nkp-v2.15.0]$ nkp push bundle --bundle ./container-images/kommander-image-bundle-v2.15.0.tar \
--to-registry=https://10.38.16.169/mirror \
--to-registry-username=admin \
--to-registry-password=Harbor12345 \
--to-registry-insecure-skip-tls-verify
✓ Creating temporary directory
✓ Unarchiving image bundle "./container-images/kommander-image-bundle-v2.15.0.tar"
✓ Parsing image bundle config
✓ Starting temporary Docker registry
✓ Pushing bundled images [================================>135/135] (time elapsed 53s)

push nkp convoy ซึ่งเป็น cluster life cycle management ของ nkp

[nutanix@harbor nkp-v2.15.0]$ nkp push bundle --bundle ./container-images/konvoy-image-bundle-v2.15.0.tar \
--to-registry=https://10.38.16.169/mirror \
--to-registry-username=admin \
--to-registry-password=Harbor12345 \
--to-registry-insecure-skip-tls-verify
✓ Creating temporary directory
✓ Unarchiving image bundle "./container-images/konvoy-image-bundle-v2.15.0.tar"
✓ Parsing image bundle config
✓ Starting temporary Docker registry
✓ Pushing bundled images [================================>110/110] (time elapsed 52s)

update nkp cli เป็น version 2.15 โดยการ copy workdload link และ install cli

curl -fsSL https://raw.githubusercontent.com/nutanixdev/nkp-quickstart/main/get-nkp-cli | bash

run nkp update command เพื่อ update kommander

*** ต้อง upgrade kommander ก่อนเสมอ เพราะการ upgrade nkp management cluster ด้วย version ใหม่ก่อน อาจจะส่งผลให้ kommander ทำงานมีปัญหาได้จากการเปลี่ยนแปลง version ของ kubernetes โดยที่ยังใช้ kommander version เก่าอยู่

[nutanix@harbor nkp-v2.15.0]$ nkp upgrade kommander --charts-bundle ./application-charts/nkp-kommander-charts-bundle-v2.15.0.tar.gz \
--kommander-applications-repository ./application-repositories/kommander-applications-v2.15.0.tar.gz \
--kubeconfig /home/nutanix/nkp-at-next.conf \
--request-timeout 0 \
-v 5

หลังจาก install kommander เสร็จแล้วทำการ update nkp management cluster โดยการ list cluster ทั้งหมด และใช้ nkp cli ตามตัวอย่าง

[nutanix@harbor ~]$ k get cluster -A
NAMESPACE NAME CLUSTERCLASS PHASE AGE VERSION
default nkp-at-next nkp-nutanix-v2.14.0 Provisioned 42h v1.31.4
kommander-default-workspace cluster2 nkp-nutanix-v2.14.0 Provisioned 38h v1.31.4
nkp upgrade cluster nutanix \
--cluster-name nkp-at-next \
--vm-image nkp-rocky-9.5-release-1.32.3-20250430150550.qcow2 \
--kubeconfig /home/nutanix/nkp-at-next.conf \
--timeout 0 -v 5

หลังจาก upgrade management cluster เสร็จแล้ว สามารถ upgrade workload cluster ตามด้วย nkp cli ตามตัวอย่าง

[nutanix@harbor ~]$ nkp upgrade cluster nutanix \
--cluster-name cluster2 \
--namespace kommander-default-workspace \
--vm-image nkp-rocky-9.5-release-1.32.3-20250430150550.qcow2 \
--kubeconfig /home/nutanix/nkp-at-next.conf \
--timeout 0 -v 6

ตรวจสอบว่า cluster ถูก upgrade ไปยัง version ใหม่แล้วด้วย cli

[nutanix@harbor ~]$ k get cluster -A
NAMESPACE NAME CLUSTERCLASS PHASE AGE VERSION
default nkp-at-next nkp-nutanix-v2.15.0 Provisioned 43h v1.32.3
kommander-default-workspace cluster2 nkp-nutanix-v2.15.0 Provisioned 39h v1.32.3

Create Self-Sign for Kubernetes Ingress (TLS)

การออกกใบรับรอง Digital Certificate จะออกโดย Certificate Authority (CA) ซึ่งเป็นหน่วยงานกลางที่ได้รับความน่าเชื่อถือ เช่น GlobalSign, DigiCert, GoDaddy, Let’s Encrypt หรือถ้าหน่วยงานที่มี Certificate Server ภายในไว้ออก digital certificate โดยมี Certificate Server เช่น Microsoft Certificate Services (Windows Server), Hashicorp Vault เป็นต้น

รูปแบบของ Certificate จะแบ่งเป็นลำดับชั้น (Chain) ดังนี้

Root CA
├── Intermediate CA 1 (signed by Root CA)
│ ├── End-entity certificate (signed by Intermediate CA 1)
│ └── End-entity certificate (signed by Intermediate CA 1)
└── Intermediate CA 2 (signed by Root CA)
└── End-entity certificate (signed by Intermediate CA 2)

Root CA เป็น Top-level ของ Certificate hierarchy สำหรับ Public Key Infrastructure (PKI) มีความน่าเชื่อถือสูง และมักถูกเก็บไว้แบบ offline เพื่อความปลอดภัย เช่น trust store ของเบราว์เซอร์ต่างๆ และใช้เพื่อออก intermediate certificate หรือใบรับรองอื่นๆ

Intermediate CA เป็น CA ที่อยู่ระหว่าง root และ end-entity certificate ซึ่งใช้ในการออก certificate ให้กลับผู้ร้องขอของระบบย่อยลงไป หรือผู้ใช้งาน (end-entity certificate) เช่นเว็บไซต์ อีเมลล์​ ช่วยลดความเสี่ยงในการถูกโจมตี เพราะหาก intermediate certificate ถูกโจมตี จะสามารถเพิกถอนได้ง่ายกว่า Root Certificate

Root Certificate จึงเป็นรากฐานของความน่าเชื่อถือในระบบ PKI (public key infrastructure) ในขณะที่ Intermediate Certificate ทำหน้าที่เป็นสะพานเชื่อระหว่าง Root Certificate และใบรับรองอื่นๆ ที่ใช้งานจริง

ขั้นตอนสร้าง Self-Sign ฉertificate จาการสร้าง CA เองมีขั้นตอนดังนี้

สร้าง CA key

openssl genrsa -out ca.key 4096

สร้าง CA Certificate จาก CA key ที่สร้างก่อนหน้า

openssl req -x509 -new -nodes -sha512 -days 3650 \
-subj "/C=TH/ST=TH/L=BK/O=IT/OU=IT/CN=Corp-Internal-CA Root CA" \
-key ca.key \
-out ca.crt

สร้าง Server key หรือใบรับรองของผู้ร้องขอ Digital Certificate (end-entity certificate)

openssl genrsa -out app.key 4096

ทำการสร้าง CSR (Certificate Signing Requests) เพื่อส่งให้กับ CA ทำการ sign หรือออก Digital Certificate ให้

openssl req -sha512 -new \
-subj "/C=TH/ST=TH/L=BK/O=IT/OU=IT/CN=*.app.corp.com" \
-key app.key \
-out app.csr

กระบวนการออก certificate ของ CA จะสร้างส่วนของ SAN เพื่อที่จะมีข้อมูลของ server เช่น server fqdn หรือ ip ในการระบุตัวตนที่ออกโดย CA

[~/repos/lab/test-secret] cat v3.ext
authorityKeyIdentifier=keyid,issuer
basicConstraints=CA:FALSE
keyUsage = digitalSignature, nonRepudiation, keyEncipherment, dataEncipherment
extendedKeyUsage = serverAuth
subjectAltName = @alt_names
[alt_names]
DNS.0=app.corp.com
DNS.0=*.app.corp.com
IP.0=10.38.16.141

CA ทำการออก Digital Certificate โดยการ sign ด้วย Certificate ของ CA จาก Certificate Signing Request (CSR) ของผู้ร้องขอ Digital Certificate

openssl x509 -req -sha512 -days 3650 \
-extfile v3.ext \
-CA ca.crt -CAkey ca.key -CAcreateserial \
-in app.csr \
-out app.crt
Certificate request self-signature ok
subject=C=TH, ST=TH, L=BK, O=IT, OU=IT, CN=*.app.corp.com

จากนั้น CA จะส่ง Certificate ที่สร้างขึ้นส่งกลับไปยังผู้ร้องขอ ซึ่งก็คือ app.crt ตามตัวอย่างเพื่อใช้งานต่อไป เช่นไปใช้กับ kubernetes Ingress หรือ Application Server เป็นต้น

Nutanix NKP Backup With Velero

ทำการ enable velero ที่ nkp dashboard เนื่องจาก velero ต้องการ s3 storage เพื่อเก็บข้อมูล backup จึงต้อง enable rookceph และ rookceph cluster โดยจะต้องรอจนกว่าจะ running สมบูรณ์ก่อนจะ enable velero

ขั้นตอน enable จะต้อง set ค่า configuration เพิ่มเติม โดยต้องสร้าง secret สำหรับให้ velero ใช้งาน S3 Storage โดยสร้าง secret key ได้ตามตัวอย่างดังนี้

apiVersion: v1
kind: Secret
metadata:
name: pongsak-velero-ceph
namespace: kommander-default-workspace
type: Opaque
stringData:
aws: |
[default]
aws_access_key_id = HUD5Z1JPRDS8IQOA5U5G
aws_secret_access_key = ASvtTAAUPtcbEEpCnCuvczQgF3N4hiTIn9qUruzA

ทำการ enable Velero โดยใช้ configuration ตามตัวอย่างนี้

เพิ่ม custom config เพื่อให้ Velero สามารถ backup persistent volume ได้

configuration:
backupStorageLocation:
- bucket: backup
config:
region: dkp-object-store
s3Url: https://10.38.37.19:8085
s3ForcePathStyle: "true"
insecureSkipTLSVerify: true
profile: default
provider: aws
credential:
key: aws
name: pongsak-velero-ceph
features: EnableCSI
uploaderType: kopia
volumeSnapshotLocation:
- bucket: backup
config:
region: dkp-object-store
s3Url: https://10.38.37.19:8085
provider: aws
deployNodeAgent: true
initContainers:
- image: velero/velero-plugin-for-aws:v1.13.2
imagePullPolicy: IfNotPresent
name: velero-plugin-for-aws
volumeMounts:
- mountPath: /target
name: plugins
metrics:
enabled: true
serviceMonitor:
enabled: true
nodeAgent:
annotations:
secret.reloader.stakater.com/reload: pongsak-velero-ceph
priorityClassName: dkp-critical-priority
resources:
limits: null

หลังจาก enable แล้วตรวจสอบว่า velero pod ทำงานได้ปกติ รวมถึงตรวจสอบ backup location และ volume snapshot location

[nutanix@harbor ~]$ kubectl get pod -A | grep velero
kommander-default-workspace object-bucket-claims-check-dkp-velero-xmxsx 0/1 Completed 0 3h1m
kommander-default-workspace velero-858485b79-b9rdc 1/1 Running 0 72s
kommander-default-workspace velero-backup-storage-location-updater-d4d54cf6f-rhccm 1/1 Running 0 14s
kommander-default-workspace velero-pre-install-cr4rf 0/1 Completed 0 105s
[nutanix@harbor ~]$ kubectl get backupstoragelocations -A
NAMESPACE NAME PHASE LAST VALIDATED AGE DEFAULT
kommander-default-workspace default Available 42s 13m true
[nutanix@harbor ~]$ kubectl get volumesnapshotlocations -A
NAMESPACE NAME AGE
kommander-default-workspace default 14m

ติดตั้ง Velero cli สำหรับการใช้งาน

# For Apple Silicon Macs (M1/M2/M3) Download ARM64 version
curl -LO https://github.com/vmware-tanzu/velero/releases/latest/download/velero-darwin-arm64.tar.gz
# Extract and install
tar -xzf velero-darwin-arm64.tar.gz
sudo mv velero-*/velero /usr/local/bin/
chmod +x /usr/local/bin/velero
rm -rf velero-* velero-darwin-arm64.tar.gz
#Ubuntu/Debian (APT)
# Add Velero repository
curl -s https://packagecloud.io/install/repositories/vmware/velero/script.deb.sh | sudo bash
# Install Velero
sudo apt-get install velero
#CentOS/RHEL/Fedora (YUM/DNF)
# Add Velero repository
curl -s https://packagecloud.io/install/repositories/vmware/velero/script.rpm.sh | sudo bash
# Install Velero (CentOS/RHEL)
sudo yum install velero
# Or for Fedora
sudo dnf install velero

ตรวจสอบ version ของ Velero หลังจากติดตั้ง

[nutanix@harbor ~]$ velero version
Client:
Version: v1.17.2
Git commit: 7013a4097f17a97a0201c0ad3c9dd3f810d32bf6

Velero จะใช้ kubeconfig file เพื่อ connect ไปยัง kubernetes จึงต้อง export kubeconfig environment ก่อน จากนั้นตรวจสอบว่า velero เห็น backup location หรือไม่

[nutanix@harbor ~]$ export KUBECONFIG=/home/nutanix/dev2-kubeconfig.conf
[nutanix@harbor ~]$ velero get backup-location -n kommander-default-workspace
NAME PROVIDER BUCKET/PREFIX PHASE LAST VALIDATED ACCESS MODE DEFAULT
default aws backup Available 2026-01-30 11:25:11 +0000 UTC ReadWrite true
[nutanix@harbor ~]$ velero get snapshot-location -n kommander-default-workspace
NAME PROVIDER
default aws

ติดตั้ง wordpress เพื่อใช้ในการทดสอบ backup และ restore โดยติดตั้งที่ namespace application ตามตัวอย่าง yaml ดังนี้

apiVersion: v1
kind: Secret
metadata:
name: mysql-pass
type: Opaque
stringData:
password: nutanix
---
apiVersion: v1
kind: Service
metadata:
name: wordpress-mysql
labels:
app: wordpress
spec:
ports:
- port: 3306
selector:
app: wordpress
tier: mysql
clusterIP: None
---
apiVersion: v1
kind: PersistentVolumeClaim
metadata:
name: mysql-pv-claim
labels:
app: wordpress
spec:
accessModes:
- ReadWriteOnce
resources:
requests:
storage: 20Gi
---
apiVersion: apps/v1
kind: Deployment
metadata:
name: wordpress-mysql
labels:
app: wordpress
spec:
selector:
matchLabels:
app: wordpress
tier: mysql
strategy:
type: Recreate
template:
metadata:
labels:
app: wordpress
tier: mysql
spec:
containers:
- image: mysql:8.0
name: mysql
env:
- name: MYSQL_ROOT_PASSWORD
valueFrom:
secretKeyRef:
name: mysql-pass
key: password
- name: MYSQL_DATABASE
value: wordpress
- name: MYSQL_USER
value: wordpress
- name: MYSQL_PASSWORD
valueFrom:
secretKeyRef:
name: mysql-pass
key: password
ports:
- containerPort: 3306
name: mysql
volumeMounts:
- name: mysql-persistent-storage
mountPath: /var/lib/mysql
volumes:
- name: mysql-persistent-storage
persistentVolumeClaim:
claimName: mysql-pv-claim
---
apiVersion: v1
kind: Service
metadata:
name: wordpress
labels:
app: wordpress
spec:
ports:
- port: 80
selector:
app: wordpress
tier: frontend
type: ClusterIP
---
apiVersion: v1
kind: PersistentVolumeClaim
metadata:
name: wp-pv-claim
labels:
app: wordpress
spec:
accessModes:
- ReadWriteOnce
resources:
requests:
storage: 20Gi
---
apiVersion: apps/v1
kind: Deployment
metadata:
name: wordpress
labels:
app: wordpress
spec:
selector:
matchLabels:
app: wordpress
tier: frontend
strategy:
type: Recreate
template:
metadata:
labels:
app: wordpress
tier: frontend
spec:
containers:
- image: wordpress:6.4-apache
name: wordpress
env:
- name: WORDPRESS_DB_HOST
value: wordpress-mysql
- name: WORDPRESS_DB_PASSWORD
valueFrom:
secretKeyRef:
name: mysql-pass
key: password
- name: WORDPRESS_DB_USER
value: wordpress
- name: WORDPRESS_DB_NAME
value: wordpress
- name: WORDPRESS_DEBUG
value: "1"
ports:
- containerPort: 80
name: wordpress
volumeMounts:
- name: wordpress-persistent-storage
mountPath: /var/www/html
volumes:
- name: wordpress-persistent-storage
persistentVolumeClaim:
claimName: wp-pv-claim
---
apiVersion: networking.k8s.io/v1
kind: Ingress
metadata:
name: wordpress-ingress
spec:
ingressClassName: kommander-traefik
rules:
- host: wordpress.10.38.37.19.sslip.io
http:
paths:
- path: /
pathType: Prefix
backend:
service:
name: wordpress
port:
number: 80

หมายเหตุ – “10.38.37.19” คือ ingress ip

ตรวจสอบว่า wordpress ทำงานได้ปกติ และเพิ่ม page เข้าไปใน wordpress เพื่อใช้ในการตรวจสอบการ restore

~/repos/lab  k get pod -n application
NAME READY STATUS RESTARTS AGE
wordpress-57ff4b4485-6tl9g 1/1 Running 0 10h
wordpress-mysql-6dd978bc8b-jr2gq 1/1 Running 0 10h

เข้า wordpress ที่ ur https://wordpress.10.38.37.19.sslip.io/ และทำการสร้าง page เพื่อตรวจอสอบผลการ restore

ทำการ backup wordpress ด้วย velero cli โดย backup ทั้ง default namespace

[nutanix@harbor ~]$ velero backup create wordpress-backup-1 --include-namespaces default --snapshot-volumes=true -n kommander-default-workspace --wait
Backup request "wordpress-backup-1" submitted successfully.
Waiting for backup to complete. You may safely press ctrl-c to stop waiting - your backup will continue in the background.
...........
Backup completed with status: Completed. You may check for more information using the commands `velero backup describe wordpress-backup-1` and `velero backup logs wordpress-backup-1`.

ตรวจสอบข้อมูลที่ velero ทำการ backup ได้จาก cli ดังนี้

[nutanix@harbor ~]$ velero backup describe wordpress-backup-1 --insecure-skip-tls-verify -n kommander-default-workspace --details
Name: wordpress-backup-1
Namespace: kommander-default-workspace
Labels: velero.io/storage-location=default
Annotations: velero.io/resource-timeout=10m0s
velero.io/source-cluster-k8s-gitversion=v1.34.1
velero.io/source-cluster-k8s-major-version=1
velero.io/source-cluster-k8s-minor-version=34
Phase: Completed
Namespaces:
Included: default
Excluded: <none>
Resources:
Included cluster-scoped: <none>
Excluded cluster-scoped: volumesnapshotcontents.snapshot.storage.k8s.io
Included namespace-scoped: *
Excluded namespace-scoped: volumesnapshots.snapshot.storage.k8s.io
Label selector: <none>
Or label selector: <none>
Storage Location: default
Velero-Native Snapshot PVs: true
File System Backup (Default): false
Snapshot Move Data: false
Data Mover: velero
TTL: 720h0m0s
CSISnapshotTimeout: 10m0s
ItemOperationTimeout: 4h0m0s
Hooks: <none>
Backup Format Version: 1.1.0
Started: 2026-01-30 11:35:35 +0000 UTC
Completed: 2026-01-30 11:35:47 +0000 UTC
Expiration: 2026-03-01 11:35:35 +0000 UTC
Total items to be backed up: 56
Items backed up: 56
Backup Item Operations:
Operation for volumesnapshots.snapshot.storage.k8s.io default/velero-wp-pv-claim-skrl8:
Backup Item Action Plugin: velero.io/csi-volumesnapshot-backupper
Operation ID: default/velero-wp-pv-claim-skrl8/2026-01-30T11:35:41Z
Items to Update:
volumesnapshots.snapshot.storage.k8s.io default/velero-wp-pv-claim-skrl8
volumesnapshotcontents.snapshot.storage.k8s.io /snapcontent-305912d8-4ec2-484e-9273-c2ea65992c55
Phase: Completed
Created: 2026-01-30 11:35:41 +0000 UTC
Started: 2026-01-30 11:35:41 +0000 UTC
Updated: 2026-01-30 11:35:46 +0000 UTC
Operation for volumesnapshots.snapshot.storage.k8s.io default/velero-mysql-pv-claim-rbqkn:
Backup Item Action Plugin: velero.io/csi-volumesnapshot-backupper
Operation ID: default/velero-mysql-pv-claim-rbqkn/2026-01-30T11:35:46Z
Items to Update:
volumesnapshots.snapshot.storage.k8s.io default/velero-mysql-pv-claim-rbqkn
volumesnapshotcontents.snapshot.storage.k8s.io /snapcontent-9681ba15-76fd-4b98-8411-9c083793a14e
Phase: Completed
Created: 2026-01-30 11:35:46 +0000 UTC
Started: 2026-01-30 11:35:46 +0000 UTC
Updated: 2026-01-30 11:35:46 +0000 UTC
Resource List:
apiextensions.k8s.io/v1/CustomResourceDefinition:
- ciliumendpoints.cilium.io
apps/v1/Deployment:
- default/wordpress
- default/wordpress-mysql
apps/v1/ReplicaSet:
- default/wordpress-645b586f68
- default/wordpress-mysql-5ccb49cfb
cilium.io/v2/CiliumEndpoint:
- default/wordpress-645b586f68-dbwgz
- default/wordpress-mysql-5ccb49cfb-rxwtt
discovery.k8s.io/v1/EndpointSlice:
- default/kubernetes
- default/wordpress-dfcfz
- default/wordpress-mysql-jvhnt
networking.k8s.io/v1/Ingress:
- default/wordpress-ingress
snapshot.storage.k8s.io/v1/VolumeSnapshot:
- default/velero-mysql-pv-claim-rbqkn
- default/velero-wp-pv-claim-skrl8
snapshot.storage.k8s.io/v1/VolumeSnapshotClass:
- nutanix-snapshot-class
snapshot.storage.k8s.io/v1/VolumeSnapshotContent:
- snapcontent-305912d8-4ec2-484e-9273-c2ea65992c55
- snapcontent-9681ba15-76fd-4b98-8411-9c083793a14e
v1/ConfigMap:
- default/kube-root-ca.crt
v1/Endpoints:
- default/kubernetes
- default/wordpress
- default/wordpress-mysql
v1/Event:
- default/mysql-pv-claim.188f7ebeb41953b0
- default/mysql-pv-claim.188f7ebeb69531d4
- default/mysql-pv-claim.188f7ebeb6b8fdd8
- default/mysql-pv-claim.188f7ebfa2a36c2e
- default/wordpress-645b586f68-dbwgz.188f7ebfa7ff0ffd
- default/wordpress-645b586f68-dbwgz.188f7ec107862336
- default/wordpress-645b586f68-dbwgz.188f7ec1dd681605
- default/wordpress-645b586f68-dbwgz.188f7ec50eaead7b
- default/wordpress-645b586f68-dbwgz.188f7ec5112993aa
- default/wordpress-645b586f68-dbwgz.188f7ec5164380f9
- default/wordpress-645b586f68.188f7ebeb8bd04b2
- default/wordpress-mysql-5ccb49cfb-rxwtt.188f7ebfa5454bde
- default/wordpress-mysql-5ccb49cfb-rxwtt.188f7ec1009f740f
- default/wordpress-mysql-5ccb49cfb-rxwtt.188f7ec1c720235a
- default/wordpress-mysql-5ccb49cfb-rxwtt.188f7ec53b9f0b43
- default/wordpress-mysql-5ccb49cfb-rxwtt.188f7ec53d9cdaf2
- default/wordpress-mysql-5ccb49cfb-rxwtt.188f7ec542ec7a5e
- default/wordpress-mysql-5ccb49cfb.188f7ebeb5c2a7f3
- default/wordpress-mysql.188f7ebeb540f2c9
- default/wordpress.188f7ebeb782a76e
- default/wp-pv-claim.188f7ebeb60eb52f
- default/wp-pv-claim.188f7ebeb9ead9ae
- default/wp-pv-claim.188f7ebeba1102f5
- default/wp-pv-claim.188f7ebfa2bccfc7
v1/Namespace:
- default
v1/PersistentVolume:
- pvc-cdcf92fb-8b3e-4d6a-8751-4d6b7dc31cf3
- pvc-e3188791-445f-4789-8f6c-5bd7c7f82134
v1/PersistentVolumeClaim:
- default/mysql-pv-claim
- default/wp-pv-claim
v1/Pod:
- default/wordpress-645b586f68-dbwgz
- default/wordpress-mysql-5ccb49cfb-rxwtt
v1/Secret:
- default/mysql-pass
v1/Service:
- default/kubernetes
- default/wordpress
- default/wordpress-mysql
v1/ServiceAccount:
- default/default
Backup Volumes:
Velero-Native Snapshots: <none included>
CSI Snapshots:
default/mysql-pv-claim:
Snapshot:
Operation ID: default/velero-mysql-pv-claim-rbqkn/2026-01-30T11:35:46Z
Snapshot Content Name: snapcontent-9681ba15-76fd-4b98-8411-9c083793a14e
Storage Snapshot ID: NutanixVolumes-685b4989-23b6-4d8e-be83-8784ad5e7992:8e517250-1f33-4ee1-a9e1-0d523e8c442c
Snapshot Size (bytes): 21474836480
CSI Driver: csi.nutanix.com
Result: succeeded
default/wp-pv-claim:
Snapshot:
Operation ID: default/velero-wp-pv-claim-skrl8/2026-01-30T11:35:41Z
Snapshot Content Name: snapcontent-305912d8-4ec2-484e-9273-c2ea65992c55
Storage Snapshot ID: NutanixVolumes-86c441ab-529c-4966-bceb-c2856f18a94c:2456bb0f-8792-46f2-8366-8067d5305cde
Snapshot Size (bytes): 21474836480
CSI Driver: csi.nutanix.com
Result: succeeded
Pod Volume Backups: <none included>
HooksAttempted: 0
HooksFailed: 0

ตรวจสอบสถานะการ backup

[nutanix@harbor ~]$ velero get backup -n kommander-default-workspace
NAME STATUS ERRORS WARNINGS CREATED EXPIRES STORAGE LOCATION SELECTOR
wordpress-backup-1 Completed 0 0 2026-01-30 11:35:35 +0000 UTC 29d default <none>

ทำการ ลบ wordpress application

[nutanix@harbor ~]$ kubectl delete -f wordpress.yaml
secret "mysql-pass" deleted
service "wordpress-mysql" deleted
persistentvolumeclaim "mysql-pv-claim" deleted
deployment.apps "wordpress-mysql" deleted
service "wordpress" deleted
persistentvolumeclaim "wp-pv-claim" deleted
deployment.apps "wordpress" deleted
ingress.networking.k8s.io "wordpress-ingress" deleted

ทำการ restore wordpress application ทั้งนี้สามารถ restore จากอีก cluster ได้โดยทั้งสอง cluster จะต้องชี้ไปยัง S3 bucket เดียวกัน

[nutanix@harbor ~]$ velero restore create wordpress-restore-1 --from-backup wordpress-backup-1 --restore-volumes=true -n kommander-default-workspace --wait
Restore request "wordpress-restore-1" submitted successfully.
Waiting for restore to complete. You may safely press ctrl-c to stop waiting - your restore will continue in the background.
..
Restore completed with status: Completed. You may check for more information using the commands `velero restore describe wordpress-restore-1` and `velero restore logs wordpress-restore-1`.

เรียกใช้ wordpress เพื่อตรวจสอบว่าข้อมูลมีการ restore กลับมาครบถ้วน