Kafka รองรับ KRaft mode (Kafka Raft) ตั้งแต่ version 3.3+ ทำให้ไม่ต้องใช้ Zookeeper เหมือนแต่ก่อน สิ่งที่แตกต่างคือ
- No Zookeeper – Kafka สามารจัดการ Metadata ได้เองด้วย Raft consensus
- KAFKA_PROCESS_ROLES: broker, controller – สามารถจัดการ broker และ controller ด้วย node เดียว
- KAFKA_CONTROLLER_QUORUM_VOTERS – ทนแทนการทำ Leader election ผ่าน Zookeeper
- จำนวน pod น้อยลง จำนวน resource ที่ใช้น้อยลง และ architecture โดยรวมง่ายขึ้น
ตัวอย่างนี้เราจะ setup Kafka จำนวน 3 replicas เพื่อใช้งานสำหรับ prouction ด้วยมี configuration ดังนี้
- 3 Kafka replicas – ใช้ podManagementPolicy: Parallel ทำให้ startup ได้เร็ว
- Dynamic NODE_ID – ใช้ค่าจาก hostname (kafka-0 -> 0, kafka-1 -> 1, kafka-2 -> 2)
- Dynamic ADVERTISED_LISTENERS – แต่ละ pod จะ advertises hostname ของตัวเอง
- 3 controller votes : 0@kafka-0.kafka:9093, 1@kafka-1.kafka:9093,2@kafka-2.kafka:9093
- Replication factor: 3 และ min.insync.replicas:2 สำหรับ fault tolerance (Quorum + fault tolerance)
- Proper Cluster ID: สร้าง cluster id จาก kafka-storage random-uuid
- Schema Registry: 2 Replicas สำหรับ leader election ที่จะทำให้มี Active และ Standby สำหรับกรณี failover (active/standby failover)
- Control Center: 1 Replica สำหรับ monitor UI เนื่องจากเป็น component ที่ไม่ critical และไม่เกี่ยวข้องกับการทำงานของระบบจึงไม่จำเป็นต้องมีหลาย replicas
Shell
#===============================================================================# install-kafka-kraft.sh# Deploy Confluent Kafka Stack on Kubernetes (KRaft mode - No Zookeeper)# Components: Kafka 3-node cluster, Schema Registry, Control Center#===============================================================================set -euo pipefailNAMESPACE="kafka"GREEN='\033[0;32m'NC='\033[0m'info() { echo -e "${GREEN}[INFO]${NC} $*"; }#===============================================================================# Step 1: Create Namespace#===============================================================================info "Creating namespace '${NAMESPACE}'..."kubectl create namespace ${NAMESPACE} --dry-run=client -o yaml | kubectl apply -f -#===============================================================================# Step 2: Generate Cluster ID#===============================================================================CLUSTER_ID=$(docker run --rm confluentinc/cp-kafka:7.6.0 kafka-storage random-uuid 2>/dev/null || cat /proc/sys/kernel/random/uuid | base64 | head -c 22)info "Generated Kafka Cluster ID: ${CLUSTER_ID}"#===============================================================================# Step 3: Deploy Kafka 3-node cluster in KRaft Mode#===============================================================================info "Deploying Kafka 3-node cluster (KRaft mode - no Zookeeper)..."cat > /tmp/kafka.yaml <<OUTER---apiVersion: v1kind: Servicemetadata: name: kafka labels: app: kafkaspec: ports: - port: 9092 name: internal - port: 29092 name: external - port: 9093 name: controller clusterIP: None selector: app: kafka---apiVersion: v1kind: Servicemetadata: name: kafka-external labels: app: kafkaspec: type: LoadBalancer ports: - port: 9092 targetPort: 9092 name: external selector: app: kafka---apiVersion: apps/v1kind: StatefulSetmetadata: name: kafkaspec: serviceName: kafka replicas: 3 podManagementPolicy: Parallel selector: matchLabels: app: kafka template: metadata: labels: app: kafka spec: securityContext: fsGroup: 1000 initContainers: - name: fix-permissions image: busybox:1.35 command: ["sh", "-c", "rm -rf /var/lib/kafka/data/lost+found && chown -R 1000:1000 /var/lib/kafka/data"] volumeMounts: - name: kafka-data mountPath: /var/lib/kafka/data containers: - name: kafka image: confluentinc/cp-kafka:7.6.0 ports: - containerPort: 9092 - containerPort: 29092 - containerPort: 9093 env: - name: CLUSTER_ID value: "${CLUSTER_ID}" - name: KAFKA_PROCESS_ROLES value: "broker,controller" - name: KAFKA_CONTROLLER_QUORUM_VOTERS value: "0@kafka-0.kafka:9093,1@kafka-1.kafka:9093,2@kafka-2.kafka:9093" - name: KAFKA_LISTENER_SECURITY_PROTOCOL_MAP value: "PLAINTEXT:PLAINTEXT,CONTROLLER:PLAINTEXT,PLAINTEXT_HOST:PLAINTEXT" - name: KAFKA_CONTROLLER_LISTENER_NAMES value: "CONTROLLER" - name: KAFKA_INTER_BROKER_LISTENER_NAME value: "PLAINTEXT" - name: KAFKA_OFFSETS_TOPIC_REPLICATION_FACTOR value: "3" - name: KAFKA_TRANSACTION_STATE_LOG_MIN_ISR value: "2" - name: KAFKA_TRANSACTION_STATE_LOG_REPLICATION_FACTOR value: "3" - name: KAFKA_DEFAULT_REPLICATION_FACTOR value: "3" - name: KAFKA_MIN_INSYNC_REPLICAS value: "2" - name: KAFKA_GROUP_INITIAL_REBALANCE_DELAY_MS value: "0" - name: KAFKA_AUTO_CREATE_TOPICS_ENABLE value: "true" - name: KAFKA_LOG_RETENTION_HOURS value: "168" - name: KAFKA_LOG_DIRS value: "/var/lib/kafka/data" command: - /bin/bash - -c - | # Derive NODE_ID from hostname (kafka-0 -> 0, kafka-1 -> 1, kafka-2 -> 2) export KAFKA_NODE_ID=\${HOSTNAME##*-} export KAFKA_LISTENERS="PLAINTEXT://0.0.0.0:9092,CONTROLLER://0.0.0.0:9093,PLAINTEXT_HOST://0.0.0.0:29092" export KAFKA_ADVERTISED_LISTENERS="PLAINTEXT://\${HOSTNAME}.kafka:9092,PLAINTEXT_HOST://\${HOSTNAME}.kafka:29092" exec /etc/confluent/docker/run resources: requests: memory: "1Gi" cpu: "500m" limits: memory: "2Gi" cpu: "1000m" volumeMounts: - name: kafka-data mountPath: /var/lib/kafka/data volumeClaimTemplates: - metadata: name: kafka-data spec: accessModes: ["ReadWriteOnce"] resources: requests: storage: 5GiOUTERkubectl apply -n ${NAMESPACE} -f /tmp/kafka.yamlinfo "Waiting for Kafka to be ready..."kubectl rollout status statefulset/kafka -n ${NAMESPACE} --timeout=300s#===============================================================================# Step 4: Deploy Schema Registry#===============================================================================info "Deploying Schema Registry..."cat > /tmp/schema-registry.yaml <<'EOF'---apiVersion: v1kind: Servicemetadata: name: schema-registry labels: app: schema-registryspec: ports: - port: 8081 name: http selector: app: schema-registry---apiVersion: apps/v1kind: Deploymentmetadata: name: schema-registryspec: replicas: 2 selector: matchLabels: app: schema-registry template: metadata: labels: app: schema-registry spec: enableServiceLinks: false containers: - name: schema-registry image: confluentinc/cp-schema-registry:7.6.0 ports: - containerPort: 8081 env: - name: PORT value: "8081" - name: SCHEMA_REGISTRY_HOST_NAME value: "schema-registry" - name: SCHEMA_REGISTRY_KAFKASTORE_BOOTSTRAP_SERVERS value: "kafka-0.kafka:9092,kafka-1.kafka:9092,kafka-2.kafka:9092" - name: SCHEMA_REGISTRY_LISTENERS value: "http://0.0.0.0:8081" - name: SCHEMA_REGISTRY_KAFKASTORE_TOPIC value: "_schemas" - name: SCHEMA_REGISTRY_DEBUG value: "true" resources: requests: memory: "512Mi" cpu: "250m" limits: memory: "1Gi" cpu: "500m" readinessProbe: httpGet: path: / port: 8081 initialDelaySeconds: 60 periodSeconds: 10 failureThreshold: 10 livenessProbe: httpGet: path: / port: 8081 initialDelaySeconds: 120 periodSeconds: 15 failureThreshold: 10EOFkubectl apply -n ${NAMESPACE} -f /tmp/schema-registry.yamlinfo "Waiting for Schema Registry to be ready..."kubectl rollout status deployment/schema-registry -n ${NAMESPACE} --timeout=120s#===============================================================================# Step 5: Deploy Control Center#===============================================================================info "Deploying Control Center..."cat > /tmp/control-center.yaml <<'EOF'---apiVersion: v1kind: Servicemetadata: name: control-center labels: app: control-centerspec: type: LoadBalancer ports: - port: 9021 targetPort: 9021 name: http selector: app: control-center---apiVersion: apps/v1kind: Deploymentmetadata: name: control-centerspec: replicas: 1 selector: matchLabels: app: control-center template: metadata: labels: app: control-center spec: enableServiceLinks: false containers: - name: control-center image: confluentinc/cp-enterprise-control-center:7.6.0 ports: - containerPort: 9021 env: - name: CONTROL_CENTER_BOOTSTRAP_SERVERS value: "kafka-0.kafka:9092,kafka-1.kafka:9092,kafka-2.kafka:9092" - name: CONTROL_CENTER_SCHEMA_REGISTRY_URL value: "http://schema-registry:8081" - name: CONTROL_CENTER_REPLICATION_FACTOR value: "3" - name: CONTROL_CENTER_INTERNAL_TOPICS_PARTITIONS value: "3" - name: CONTROL_CENTER_MONITORING_INTERCEPTOR_TOPIC_PARTITIONS value: "3" - name: CONFLUENT_METRICS_TOPIC_REPLICATION value: "3" - name: PORT value: "9021" resources: requests: memory: "2Gi" cpu: "1000m" limits: memory: "4Gi" cpu: "2000m" readinessProbe: httpGet: path: / port: 9021 initialDelaySeconds: 60 periodSeconds: 10 failureThreshold: 10 livenessProbe: httpGet: path: / port: 9021 initialDelaySeconds: 120 periodSeconds: 15 failureThreshold: 10EOFkubectl apply -n ${NAMESPACE} -f /tmp/control-center.yamlinfo "Waiting for Control Center to be ready..."kubectl rollout status deployment/control-center -n ${NAMESPACE} --timeout=300s#===============================================================================# Step 6: Cleanup temp files#===============================================================================rm -f /tmp/kafka.yaml /tmp/schema-registry.yaml /tmp/control-center.yaml#===============================================================================# Step 7: Summary#===============================================================================info "============================================"info "Kafka Stack (KRaft) Deployed Successfully!"info "============================================"echo ""echo " Mode: KRaft (No Zookeeper)"echo " Cluster ID: ${CLUSTER_ID}"echo " Replicas: 3"echo " Namespace: ${NAMESPACE}"echo " Kafka Brokers: kafka-0.kafka:9092, kafka-1.kafka:9092, kafka-2.kafka:9092"echo " Schema Registry: schema-registry.${NAMESPACE}:8081"echo ""info "Get external IPs:"echo " kubectl get svc -n ${NAMESPACE}"echo ""info "Check all pods:"echo " kubectl get pods -n ${NAMESPACE}"echo ""info "Test Kafka:"echo " kubectl exec -n ${NAMESPACE} kafka-0 -- kafka-topics --bootstrap-server localhost:9092 --list"echo " kubectl exec -n ${NAMESPACE} kafka-0 -- kafka-topics --bootstrap-server localhost:9092 --create --topic test --partitions 3 --replication-factor 3"echo " kubectl exec -n ${NAMESPACE} kafka-0 -- kafka-metadata --snapshot /var/lib/kafka/data/__cluster_metadata-0/00000000000000000000.log --cluster-id ${CLUSTER_ID}"
ผลลัพธ์จากการ run script
deployment "control-center" successfully rolled out[INFO] ============================================[INFO] Kafka Stack (KRaft) Deployed Successfully![INFO] ============================================ Mode: KRaft (No Zookeeper) Cluster ID: FF-0MIbaQDmDQuAZoEI9kQ Replicas: 3 Namespace: kafka Kafka Brokers: kafka-0.kafka:9092, kafka-1.kafka:9092, kafka-2.kafka:9092 Schema Registry: schema-registry.kafka:8081[INFO] Get external IPs: kubectl get svc -n kafka[INFO] Check all pods: kubectl get pods -n kafka[INFO] Test Kafka:# Check topic details and replicationkubectl exec -n kafka kafka-0 -- kafka-topics --bootstrap-server localhost:9092 --describe --topic test# Test producing a messagekubectl exec -n kafka kafka-0 -- bash -c 'echo "hello kafka" | kafka-console-producer --bootstrap-server localhost:9092 --topic test'# Test consuming the messagekubectl exec -n kafka kafka-0 -- kafka-console-consumer --bootstrap-server localhost:9092 --topic test --from-beginning --max-messages 1
ทดสอบการใช้งานตามตัวอย่าง
[nutanix@nkp-boot ~]$ kubectl get svc -n kafkaNAME TYPE CLUSTER-IP EXTERNAL-IP PORT(S) AGEcontrol-center LoadBalancer 10.96.18.27 10.55.39.63 9021:30541/TCP 4m51skafka ClusterIP None <none> 9092/TCP,29092/TCP,9093/TCP 25mkafka-external LoadBalancer 10.103.153.22 10.55.39.62 9092:31267/TCP 25mschema-registry ClusterIP 10.102.209.166 <none> 8081/TCP 24m[nutanix@nkp-boot ~]$ kubectl get pods -n kafkaNAME READY STATUS RESTARTS AGEcontrol-center-6969748bd5-kpkzq 1/1 Running 0 4m56skafka-0 1/1 Running 0 6m13skafka-1 1/1 Running 0 6m26skafka-2 1/1 Running 0 6m36sschema-registry-6fb4f4b8b8-btmcz 1/1 Running 0 5m59sschema-registry-6fb4f4b8b8-dwqhg 1/1 Running 0 18m[nutanix@nkp-boot ~]$ kubectl exec -n kafka kafka-0 -- kafka-topics --bootstrap-server localhost:9092 --describe --topic testDefaulted container "kafka" out of: kafka, fix-permissions (init)Topic: test TopicId: SwmGm8XkQf6XRsZp5Gkobg PartitionCount: 3 ReplicationFactor: 3 Configs: min.insync.replicas=2 Topic: test Partition: 0 Leader: 0 Replicas: 0,1,2 Isr: 0,1,2 Topic: test Partition: 1 Leader: 1 Replicas: 1,2,0 Isr: 1,2,0 Topic: test Partition: 2 Leader: 2 Replicas: 2,0,1 Isr: 2,0,1[nutanix@nkp-boot ~]$ kubectl exec -n kafka kafka-0 -- bash -c 'echo "hello kafka" | kafka-console-producer --bootstrap-server localhost:9092 --topic test'Defaulted container "kafka" out of: kafka, fix-permissions (init)[nutanix@nkp-boot ~]$ kubectl exec -n kafka kafka-0 -- kafka-console-consumer --bootstrap-server localhost:9092 --topic test --from-beginning --max-messages 1Defaulted container "kafka" out of: kafka, fix-permissions (init)hello kafkaProcessed a total of 1 messages
รายการ access url
| kafka (3 brokers) | 10.55.39.62:9092 |
| Schema Registry (2 replicas) | Internal schema-registry:8081 |
| Control Center | http://10.55.39.63:9021 |
เข้าหน้าจอ Control Center UI, http://10.55.39.63:9021

ทดสอบใช้งานผ่าน app ที่เขียนด้วย react โดยดูตัวอย่าง code ได้จาก repo https://github.com/pkhamdee/kafka-test-app.git
ทำการ pull code และ deploy container ไปยัง kubernetes เพื่อทดสอบ kafka
[nutanix@nkp-boot ~]$ git clone https://github.com/pkhamdee/kafka-test-app.gitCloning into 'kafka-test-app'...remote: Enumerating objects: 12, done.remote: Counting objects: 100% (12/12), done.remote: Compressing objects: 100% (10/10), done.remote: Total 12 (delta 1), reused 12 (delta 1), pack-reused 0 (from 0)Receiving objects: 100% (12/12), 8.24 KiB | 1.18 MiB/s, done.Resolving deltas: 100% (1/1), done.[nutanix@nkp-boot kafka-test-app]$ lsDockerfile build-and-deploy.sh k8s-deployment.yaml package.json public server.js[nutanix@nkp-boot kafka-test-app]$ kubectl apply -f k8s-deployment.yamldeployment.apps/kafka-test-app createdservice/kafka-test-app created[nutanix@nkp-boot kafka-test-app]$ kubectl get pod -n kafka -l app=kafka-test-appNAME READY STATUS RESTARTS AGEkafka-test-app-58645c546b-tz2jq 1/1 Running 0 24s[nutanix@nkp-boot kafka-test-app]$ kubectl get svc -n kafkaNAME TYPE CLUSTER-IP EXTERNAL-IP PORT(S) AGEkafka-test-app LoadBalancer 10.108.213.166 10.55.39.64 80:32485/TCP 11m
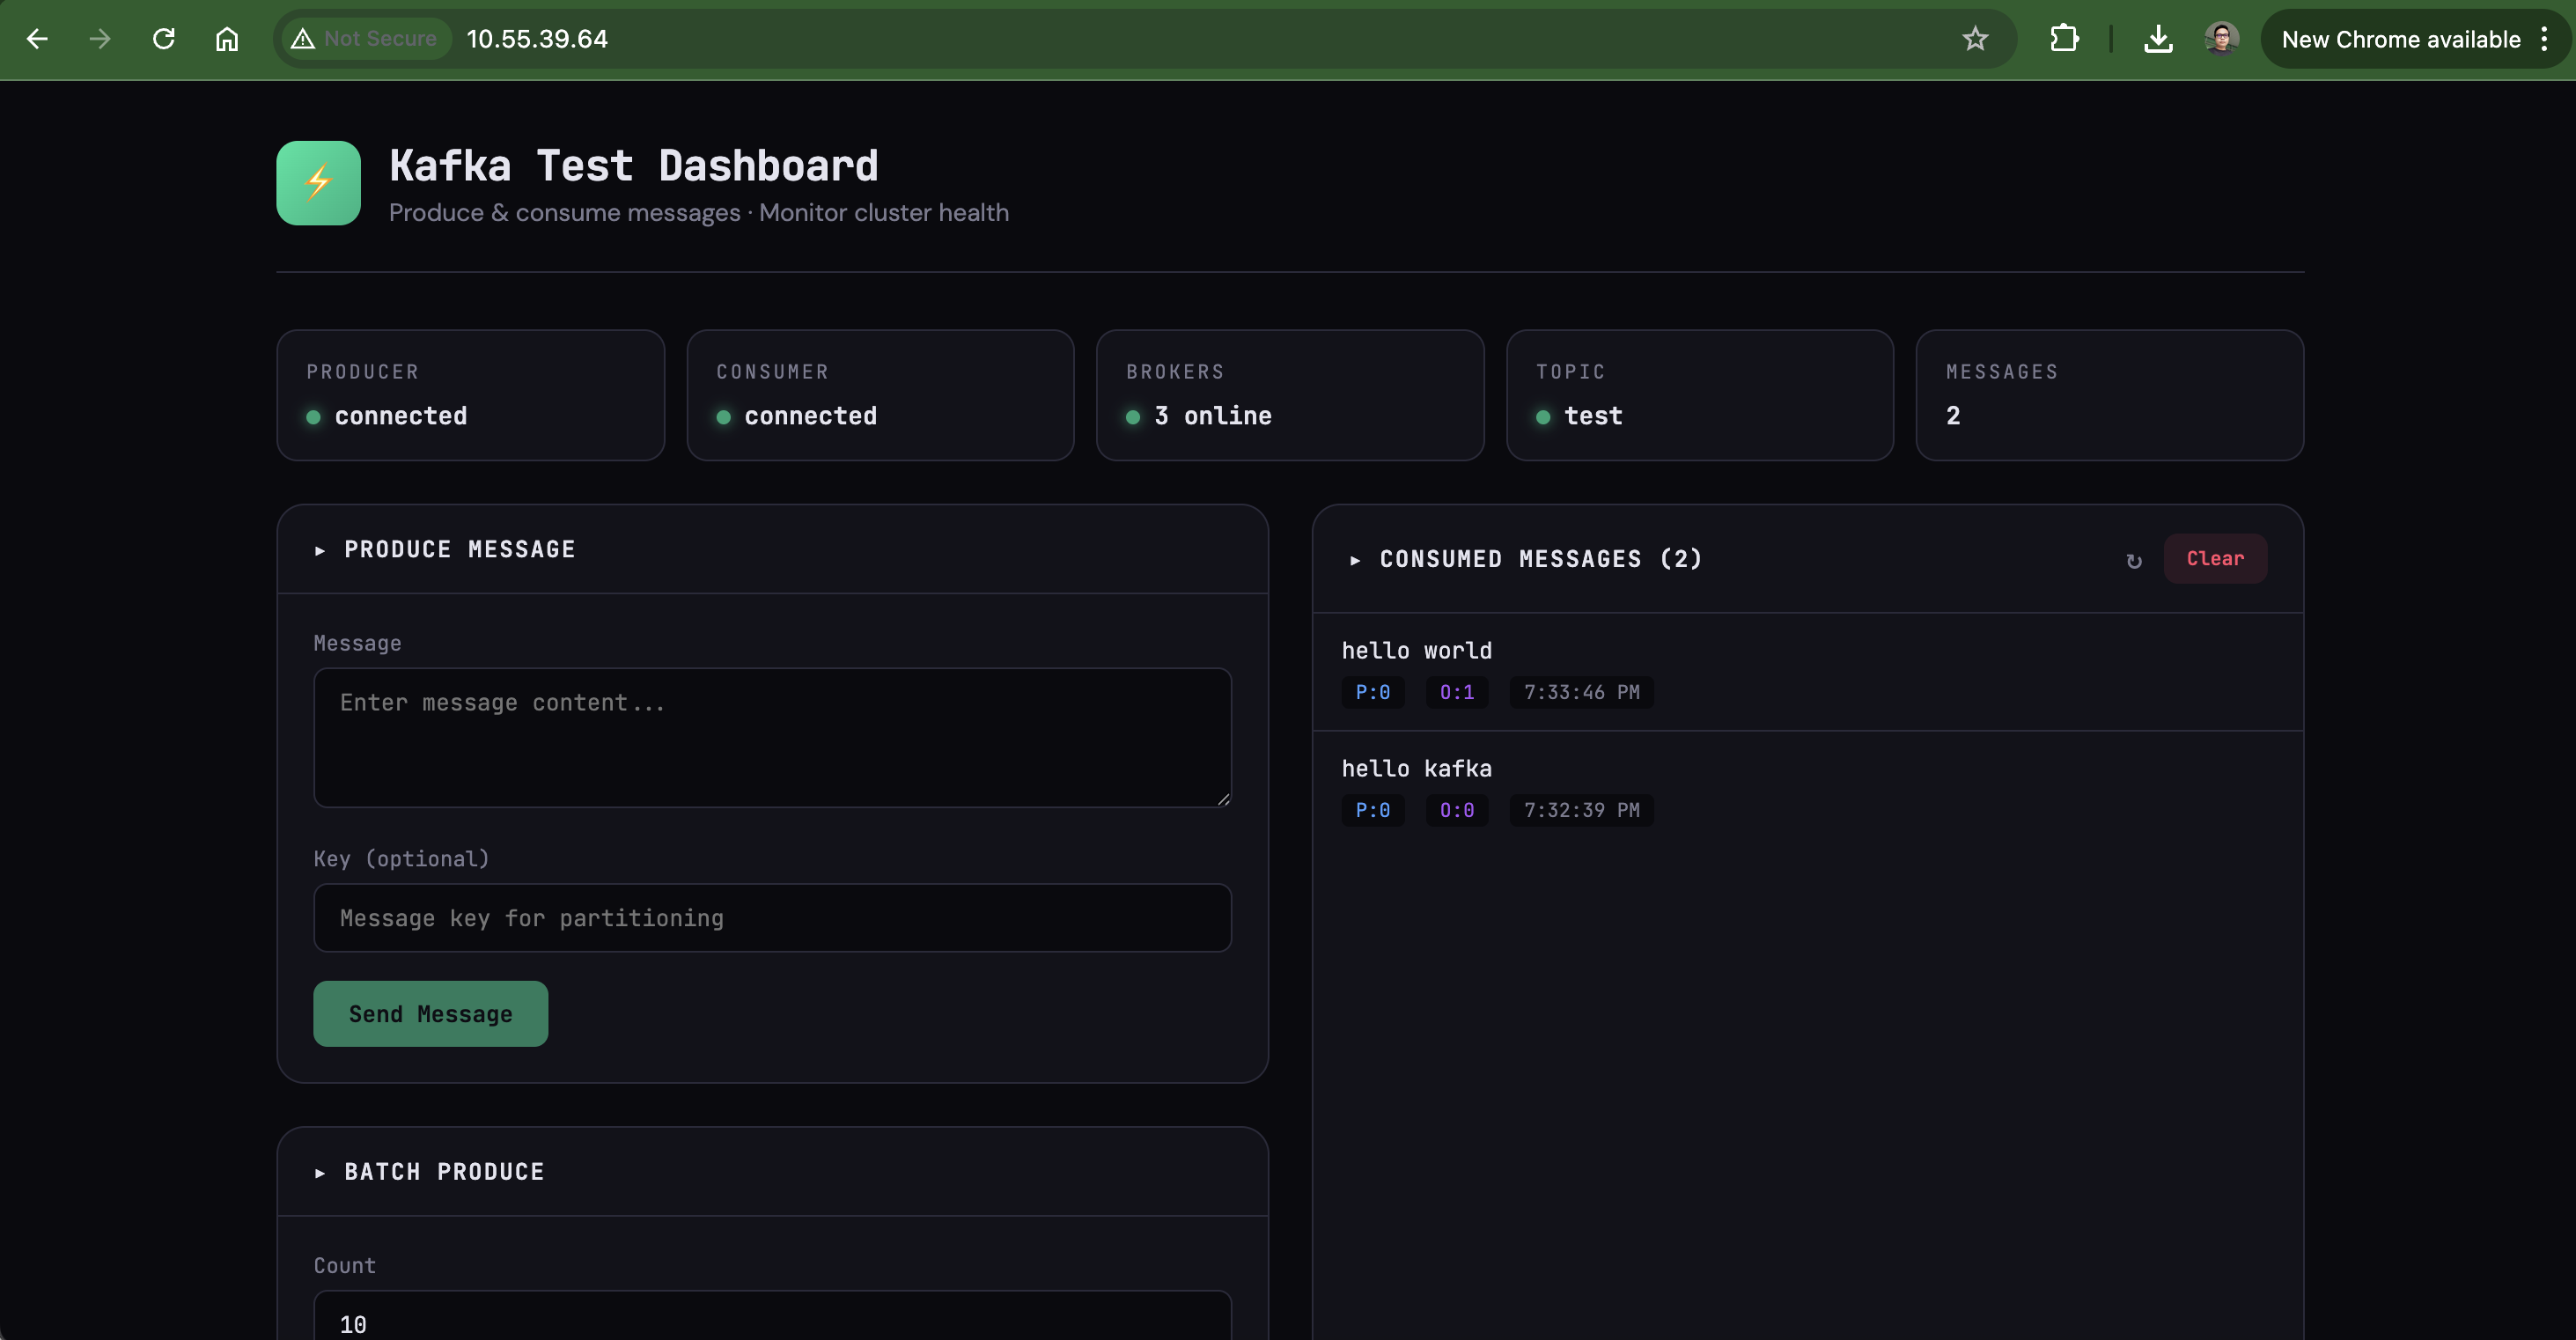
ทดสอบใช้งานผ่านหน้า GUI โดยเข้าไปที่ http://10.55.39.64