Harbor เป็น container registry ที่ได้รับความนิยมมากในปัจจุบัน เนื่องจากมีความสามารถที่ช่วยให้เก็บ container image ไว้ภายในองค์กรแล้วยังมีความสามารถอื่นๆ เช่น การทำ proxy ไปยัง container registry ภายนอกเช่น docker hub เพื่อลดจำนวน request ไม่ให้ติดปัญหา request limit ของ docker hub การทำ replication ระหว่าง Harbor ด้วยกันกรณี DC/DR use case และ integrate กับ container scanning เช่น Trivy, Clair และ Notary สำหรับการทำ image signed เพื่อป้องกันการแก้ไขเปลี่ยนแปลง image
ในการติดตั้ง Harbor ต้องการ Docker และ Docker Compose ขั้นตอนการ install docker ขึ้นอยู่กับ OS โดยตัวอย่างนี้ติดตั้งบน Linux Rocky
#!/bin/bash# Docker Installation Script for Rocky Linux# 1. Update system packagessudo dnf update -y# 2. Install required packagessudo dnf install -y dnf-utils device-mapper-persistent-data lvm2# 3. Add Docker's official repositorysudo dnf config-manager --add-repo https://download.docker.com/linux/centos/docker-ce.repo# 4. Install Docker Enginesudo dnf install -y docker-ce docker-ce-cli containerd.io docker-buildx-plugin docker-compose-plugin# 5. Start and enable Docker servicesudo systemctl start dockersudo systemctl enable docker# 6. Add current user to docker group (to run docker without sudo)sudo groupadd dockersudo usermod -aG docker $USERsudo newgrp docker# 7. Verify Docker installationsudo docker --versionsudo docker run hello-world# 8. Check Docker service statussudo systemctl status docker# 9. Optional: Install Docker Compose (if not using plugin version)# sudo curl -L "https://github.com/docker/compose/releases/latest/download/docker-compose-$(uname -s)-$(uname -m)" -o /usr/local/bin/docker-compose# sudo chmod +x /usr/local/bin/docker-composeecho "Docker installation completed!"echo "Please log out and log back in for group changes to take effect."echo "Then you can run 'docker ps' without sudo."
กรณีที่ enable firewall จะต้องทำการ allow service docker ด้วย
# Open Docker ports if firewall is enabledsudo firewall-cmd --permanent --add-service=dockersudo firewall-cmd --reload
ทำการ download harbor installation binary และสร้างไฟล์ที่เกี่ยวข้อง
[nutanix@harbor harbor]$ HARBOR_VERSION=$(curl -s https://api.github.com/repos/goharbor/harbor/releases/latest | grep 'tag_name' | cut -d\" -f4)[nutanix@harbor harbor]$ echo $HARBOR_VERSIONv2.13.1[nutanix@harbor harbor]$ wget "https://github.com/goharbor/harbor/releases/download/${HARBOR_VERSION}/harbor-offline-installer-${HARBOR_VERSION}.tgz"[nutanix@harbor harbor]$ tar xvf harbor-offline-installer-${HARBOR_VERSION}.tgz[nutanix@harbor harbor]$ cd harbor[nutanix@harbor harbor]$ cp harbor.yml.tmpl harbor.yml[nutanix@harbor harbor]$ mkdir certs[nutanix@harbor harbor]$ mkdir data[nutanix@harbor harbor]$ mkdir generate-cert
ทำการ generate certificate สำหรับ Harbor ตัวอย่างนี้จะตั้ง host name เป็น harbor.local โดยเป็น self-signed certificate
# Generate CA Key
[nutanix@harbor harbor]$ cd generate-cert

# 1. Generate CA (Root Authority)
[nutanix@harbor generate-cert]$ openssl genrsa -out ca.key 4096

[nutanix@harbor generate-cert]$  openssl req -x509 -new -nodes -sha512 -days 3650 \
-subj "/C=TH/ST=BKK/L=BKK/O=ntnxlab/OU=demo/CN=ntnxlab-Internal-CA Root CA" \
-key ca.key -out ca.crt

# 2. Generate Server Key
[nutanix@harbor generate-cert]$  openssl genrsa -out harbor.local.key 2048

# 3. Generate CSR (Certificate Signing Request)
# Use the actual address you will type into your browser/CLI as the CN
[nutanix@harbor generate-cert]$  openssl req -sha512 -new \
-subj "/C=TH/ST=BKK/L=BKK/O=ntnxlab/OU=demo/CN=ntnxlab.local" \
-key harbor.local.key -out harbor.local.csr

# 4. Create v3.ext (Crucial fix: CA:FALSE and proper SAN)
[nutanix@harbor generate-cert]$  cat > v3.ext <<-EOF
authorityKeyIdentifier=keyid,issuer
basicConstraints=CA:FALSE
keyUsage = digitalSignature, nonRepudiation, keyEncipherment, dataEncipherment
extendedKeyUsage = serverAuth
subjectAltName = @alt_names

[alt_names]
DNS.1=ntnxlab.local
DNS.2=*.ntnxlab.local
DNS.3=harbor.ntnxlab.local
IP.1=10.38.252.79  # REPLACE with your actual Harbor VM IP
EOF

# 5. Generate Server Certificate (Signed by the CA)
[nutanix@harbor generate-cert]$  openssl x509 -req -sha512 -days 3650 \
-extfile v3.ext \
-CA ca.crt -CAkey ca.key -CAcreateserial \
-in harbor.local.csr \
-out harbor.local.crt

# verify new CA, expect correct subject output
[nutanix@harbor generate-cert]$  openssl x509 -in ca.crt -nameopt sep_multiline -subject -noout

# verify new CA, Should return OK
[nutanix@harbor generate-cert]$ openssl verify -CAfile ca.crt harbor.local.crt

# verify new CA, Should show your DNS and IP
[nutanix@harbor generate-cert]$ openssl x509 -in harbor.local.crt -text -noout | grep -A 1 "Subject Alternative Name"

To make your Kubernetes nodes or Docker clients trust this certificate,
you must copy the ca.crt (not the harbor.local.crt) to the OS trust store:
RHEL/CentOS: Copy to /etc/pki/ca-trust/source/anchors/ and run update-ca-trust.
Ubuntu/Debian: Copy to /usr/local/share/ca-certificates/ and run update-ca-certificates.

Docker specific: Docker also requires the certs in
/etc/docker/certs.d/harbor.ntnxlab.local/ca.crt

# Optional - Convert the certificate to PEM format for docker
[nutanix@harbor generate-cert]$ openssl x509 -inform PEM -in harbor.local.crt -out harbor.local.cert

#copy harbor.local.crt and harbor.local.key for harbor server
[nutanix@harbor generate-cert]$ cp harbor.local.crt ../certs
[nutanix@harbor generate-cert]$ cp harbor.local.key ../certs
แก้ไขไฟล์ harbor.yml โดยมีค่าที่จำเป็นต้องแก้ดังนี้
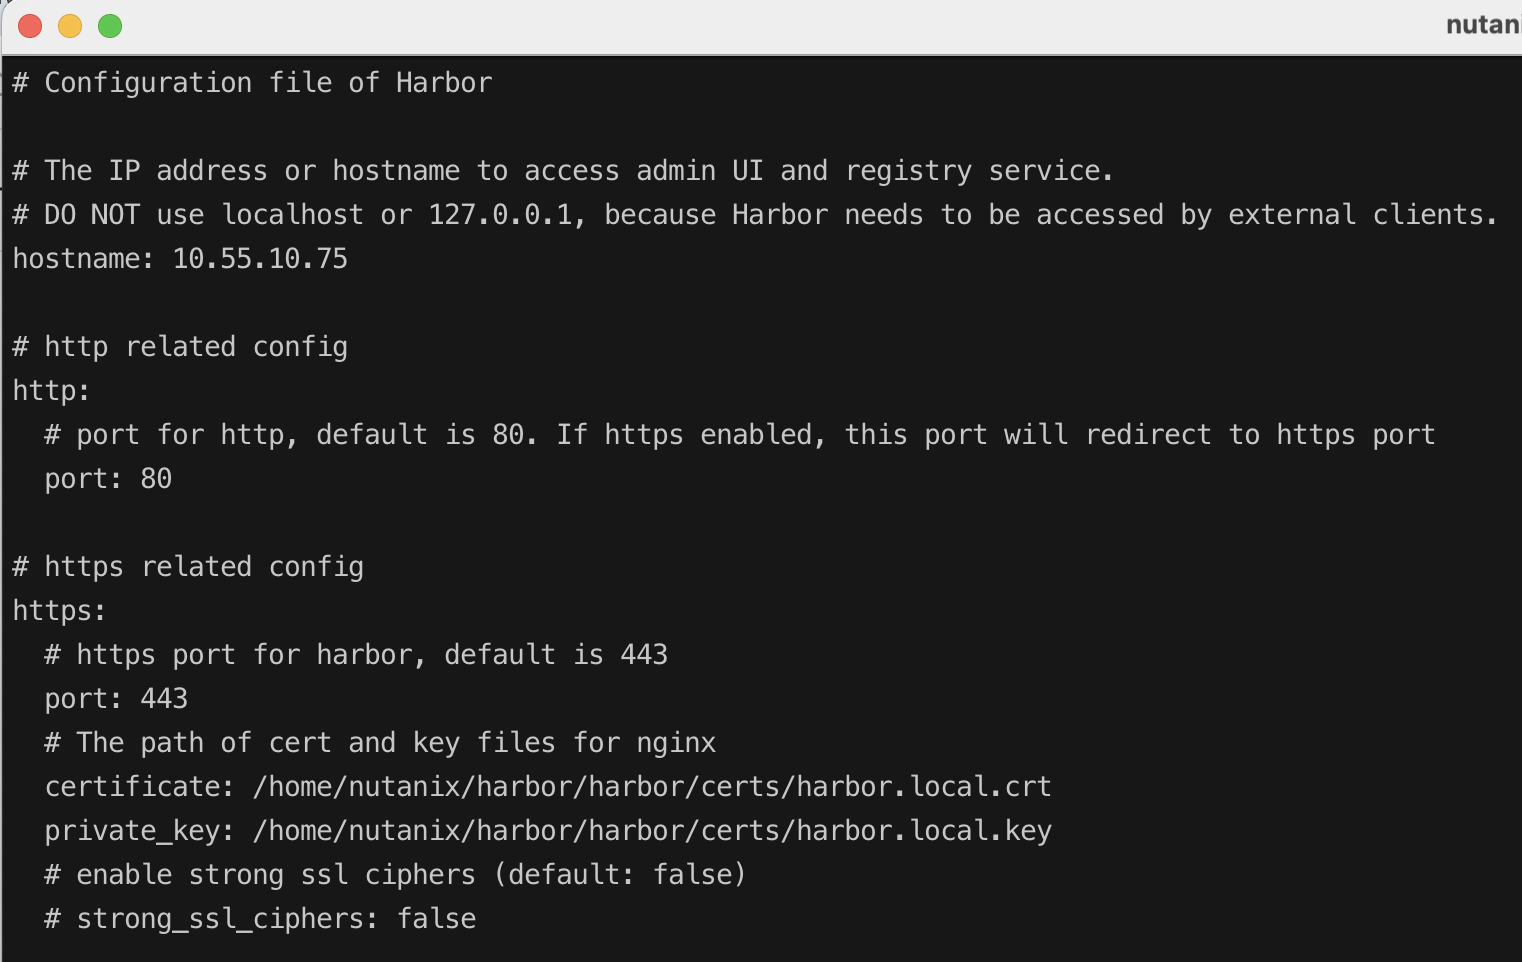
hostname:certificate:private_keys:data_volume:
hostname เป็น domain name ที่ map ไว้ที่ DNS server แต่ถ้าไม่มี DNS server สามารถใช้ IP แทนได้ดังตัวอย่างนี้
Certificate และ private_keys ได้จากขึ้นตอนสร้าง certificate ข้างต้น
data_volume คือข้อมูลระบบและ docker image ที่จัดเก็บใน harbor จำเป็นในการ backup กรณีระบบมีปัญหา และต้องการ recover

run install command เพื่อติดตั้ง harbor ทั้งนี้สามารถติดตั้ง components อื่นๆ ร่วมด้วยโดยใช้ options –with-trivy –with-notary –with-clair –with-chartmuseum
trivy และ clair สำหรับ vulnerability scanner และ notary สำหรับ container signing และ chartmuseum เพื่อให้ harbor สามารถเก็บ helm chart ได้ ตัวอย่างนี้จะติดตั้งเฉพาะ harbor
[nutanix@harbor harbor]$ sudo ./install.sh
หลังจากติดตั้งเสร็จ ทดสอบ login
[nutanix@harbor harbor]$ docker login 10.55.10.75Username: adminPassword:WARNING! Your credentials are stored unencrypted in '/home/nutanix/.docker/config.json'.Configure a credential helper to remove this warning. Seehttps://docs.docker.com/go/credential-store/Login Succeeded
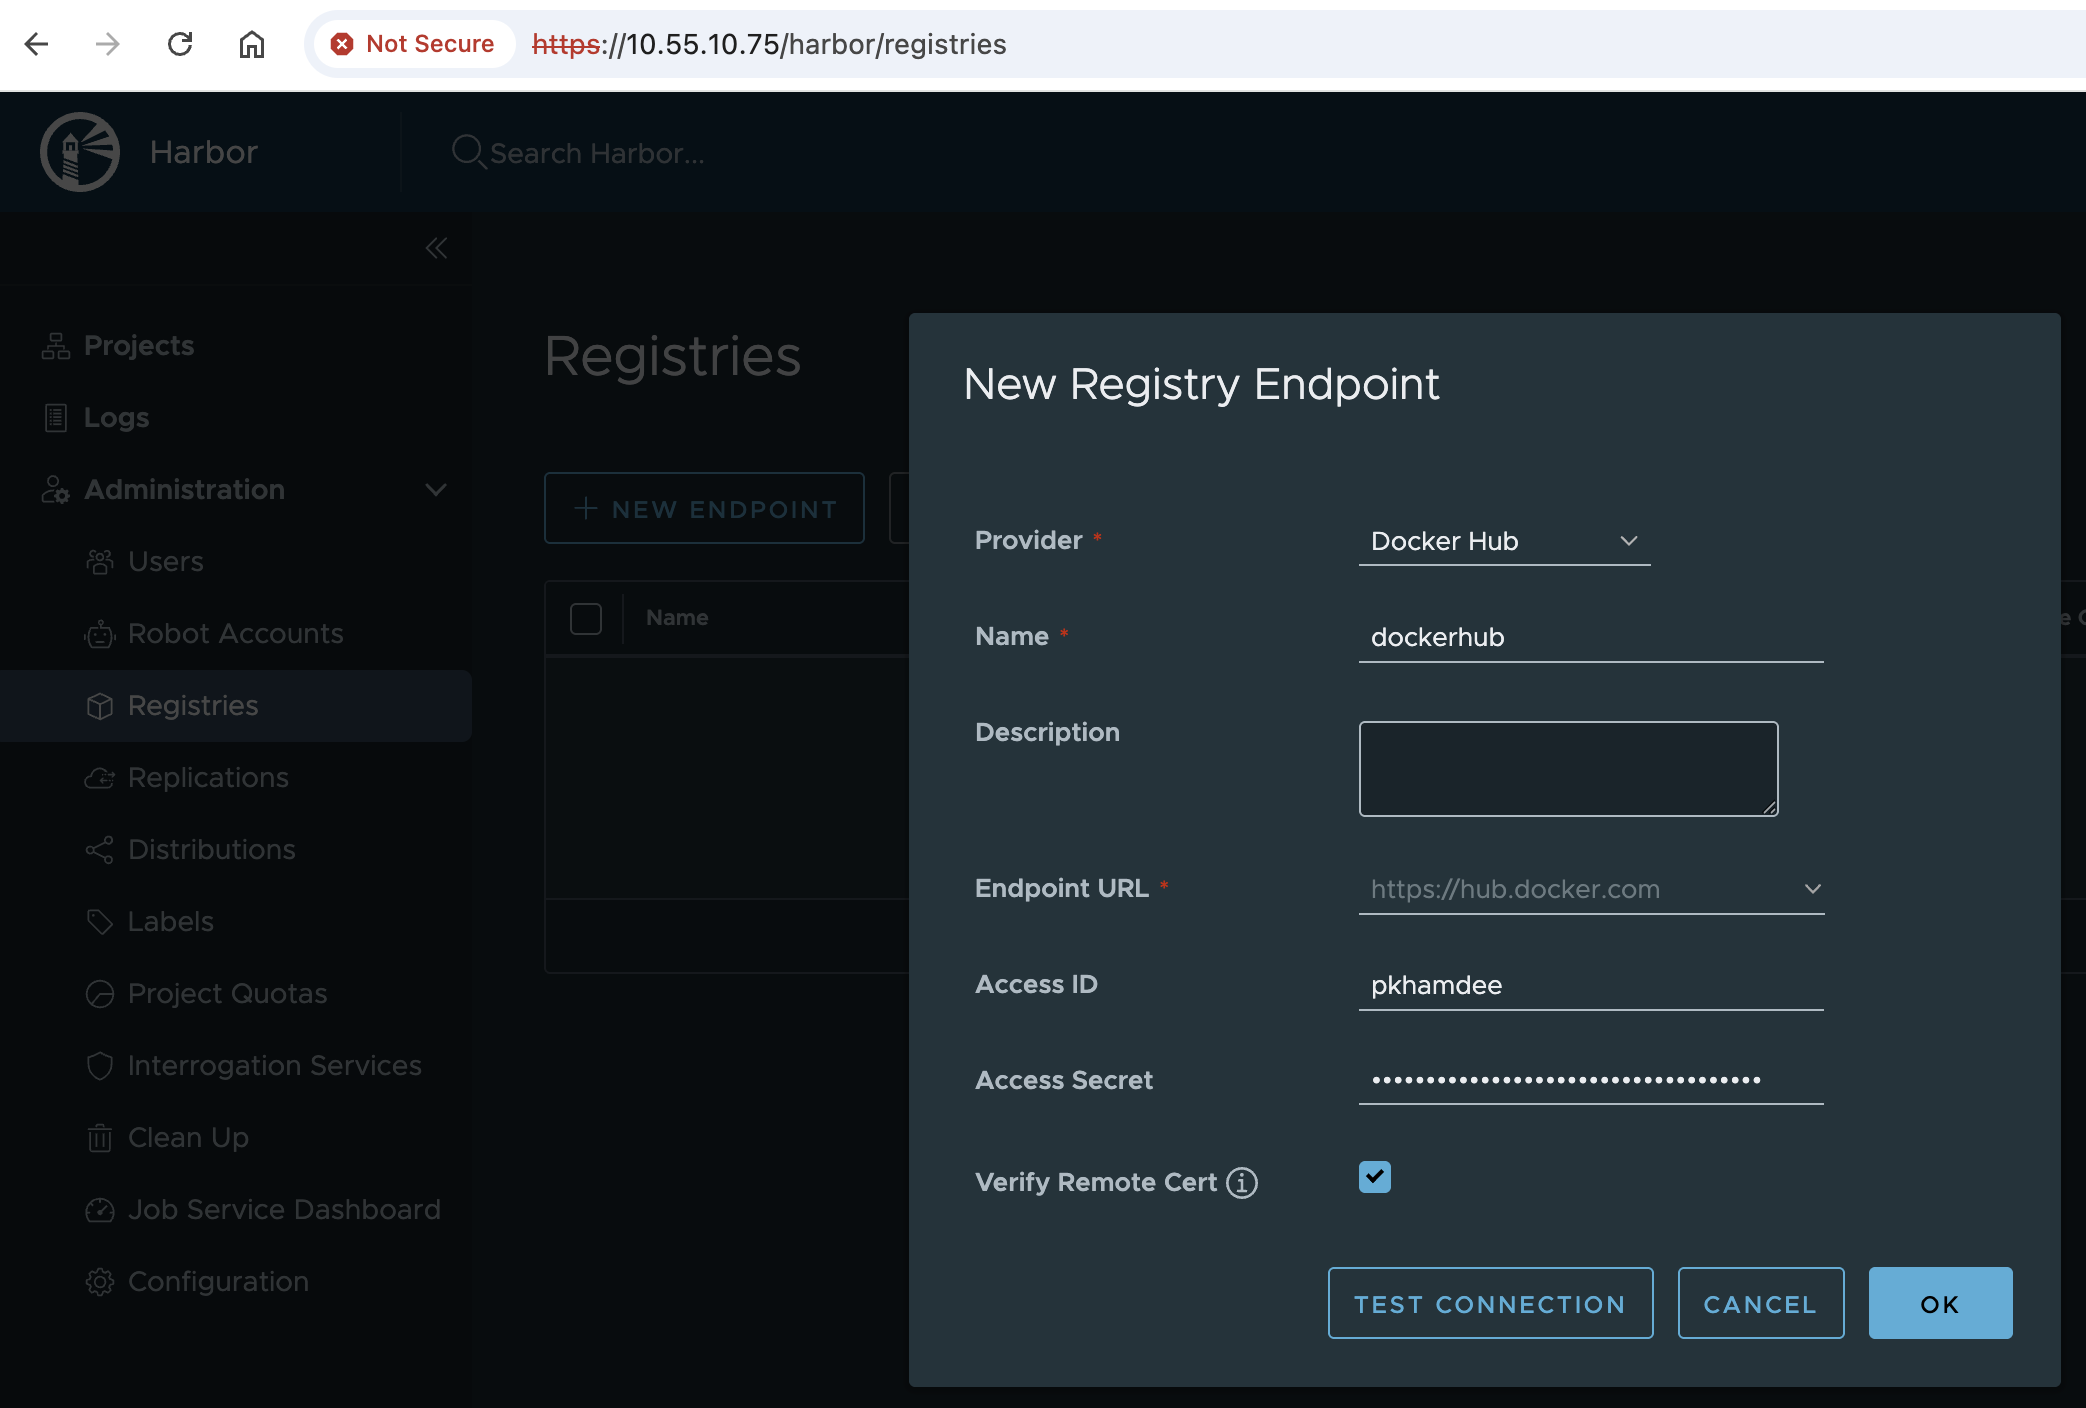
กรณีที่ต้องการทำ registry proxy จะต้องไปสร้าง enpoint ที่ต้องการ connect ก่อน โดยเข้าไปที่เมนู Registries และ click +NEW ENDPOINT

กรณีนี้เลือก Docker Hub จากนั้นกรอกข้อมูล Access ID และ Access Secret เพื่อ connect ไปยัง Docker hub โดยต้องไปสร้าง access token ที่ Docker Hub ก่อน สามารถทำทดสอบการเชื่อมต่อโดย click TEST CONNECTION กด OK เพื่อเพิ่ม Endpoint
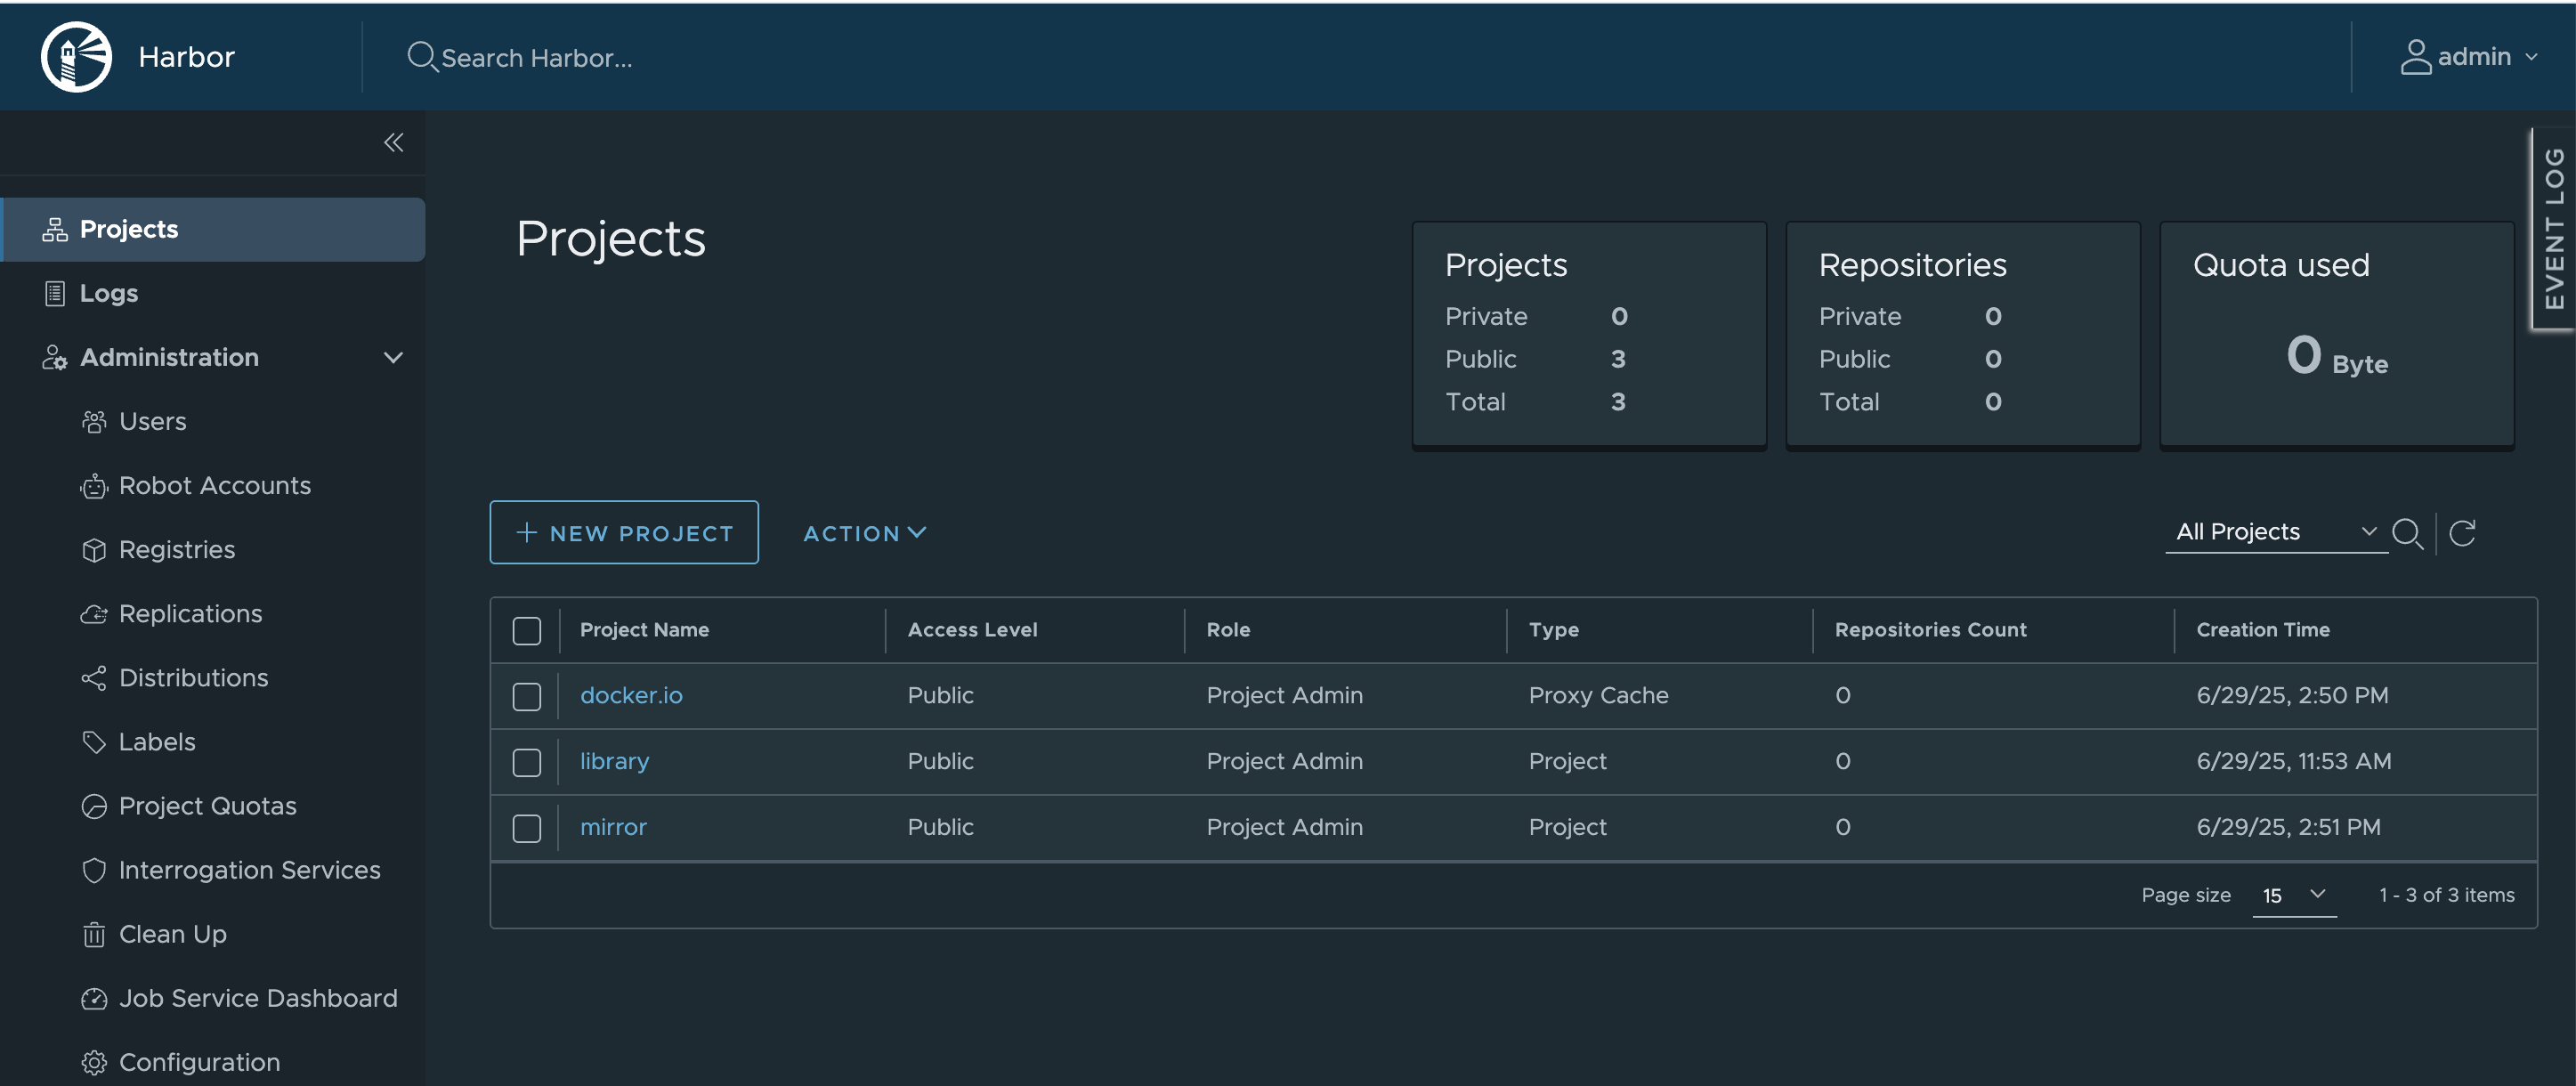
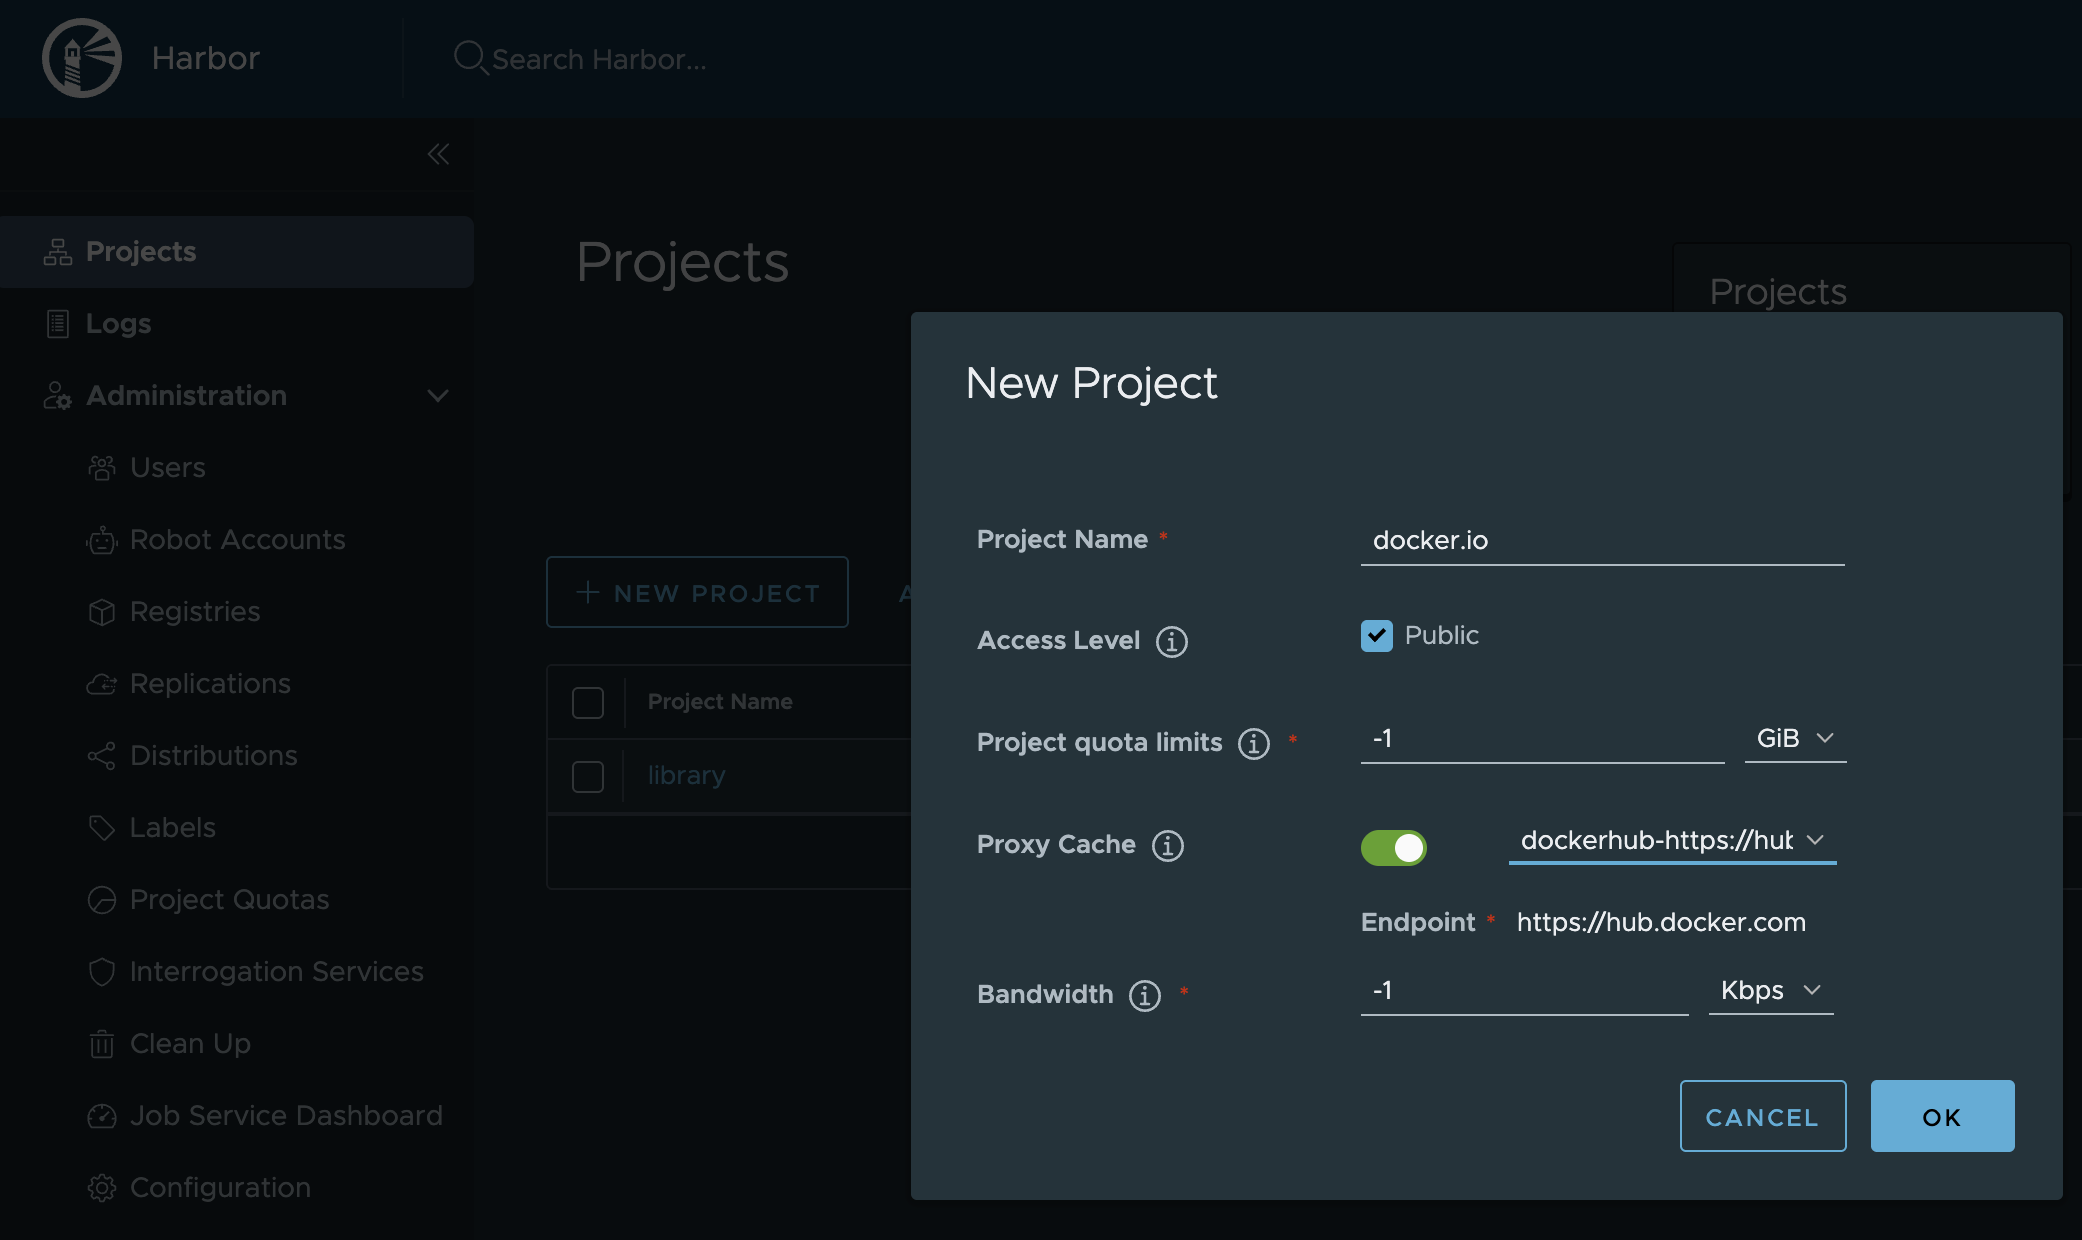
สร้าง Projects โดยเข้าไปที่เมนู Projects และ click + NEW PROJECT
กรอกข้อมูล Project name เลือก Access Level เลือก Proxy Cache และเลือก endpoint ที่สร้างในขั้นต้น และ click OK เพื่อสร้าง Project
สร้าง Projects อื่นๆ ตัวอย่างนี้สร้าง Project mirror สำหรับติดตั้ง NKP

กรอกข้อมูล Project
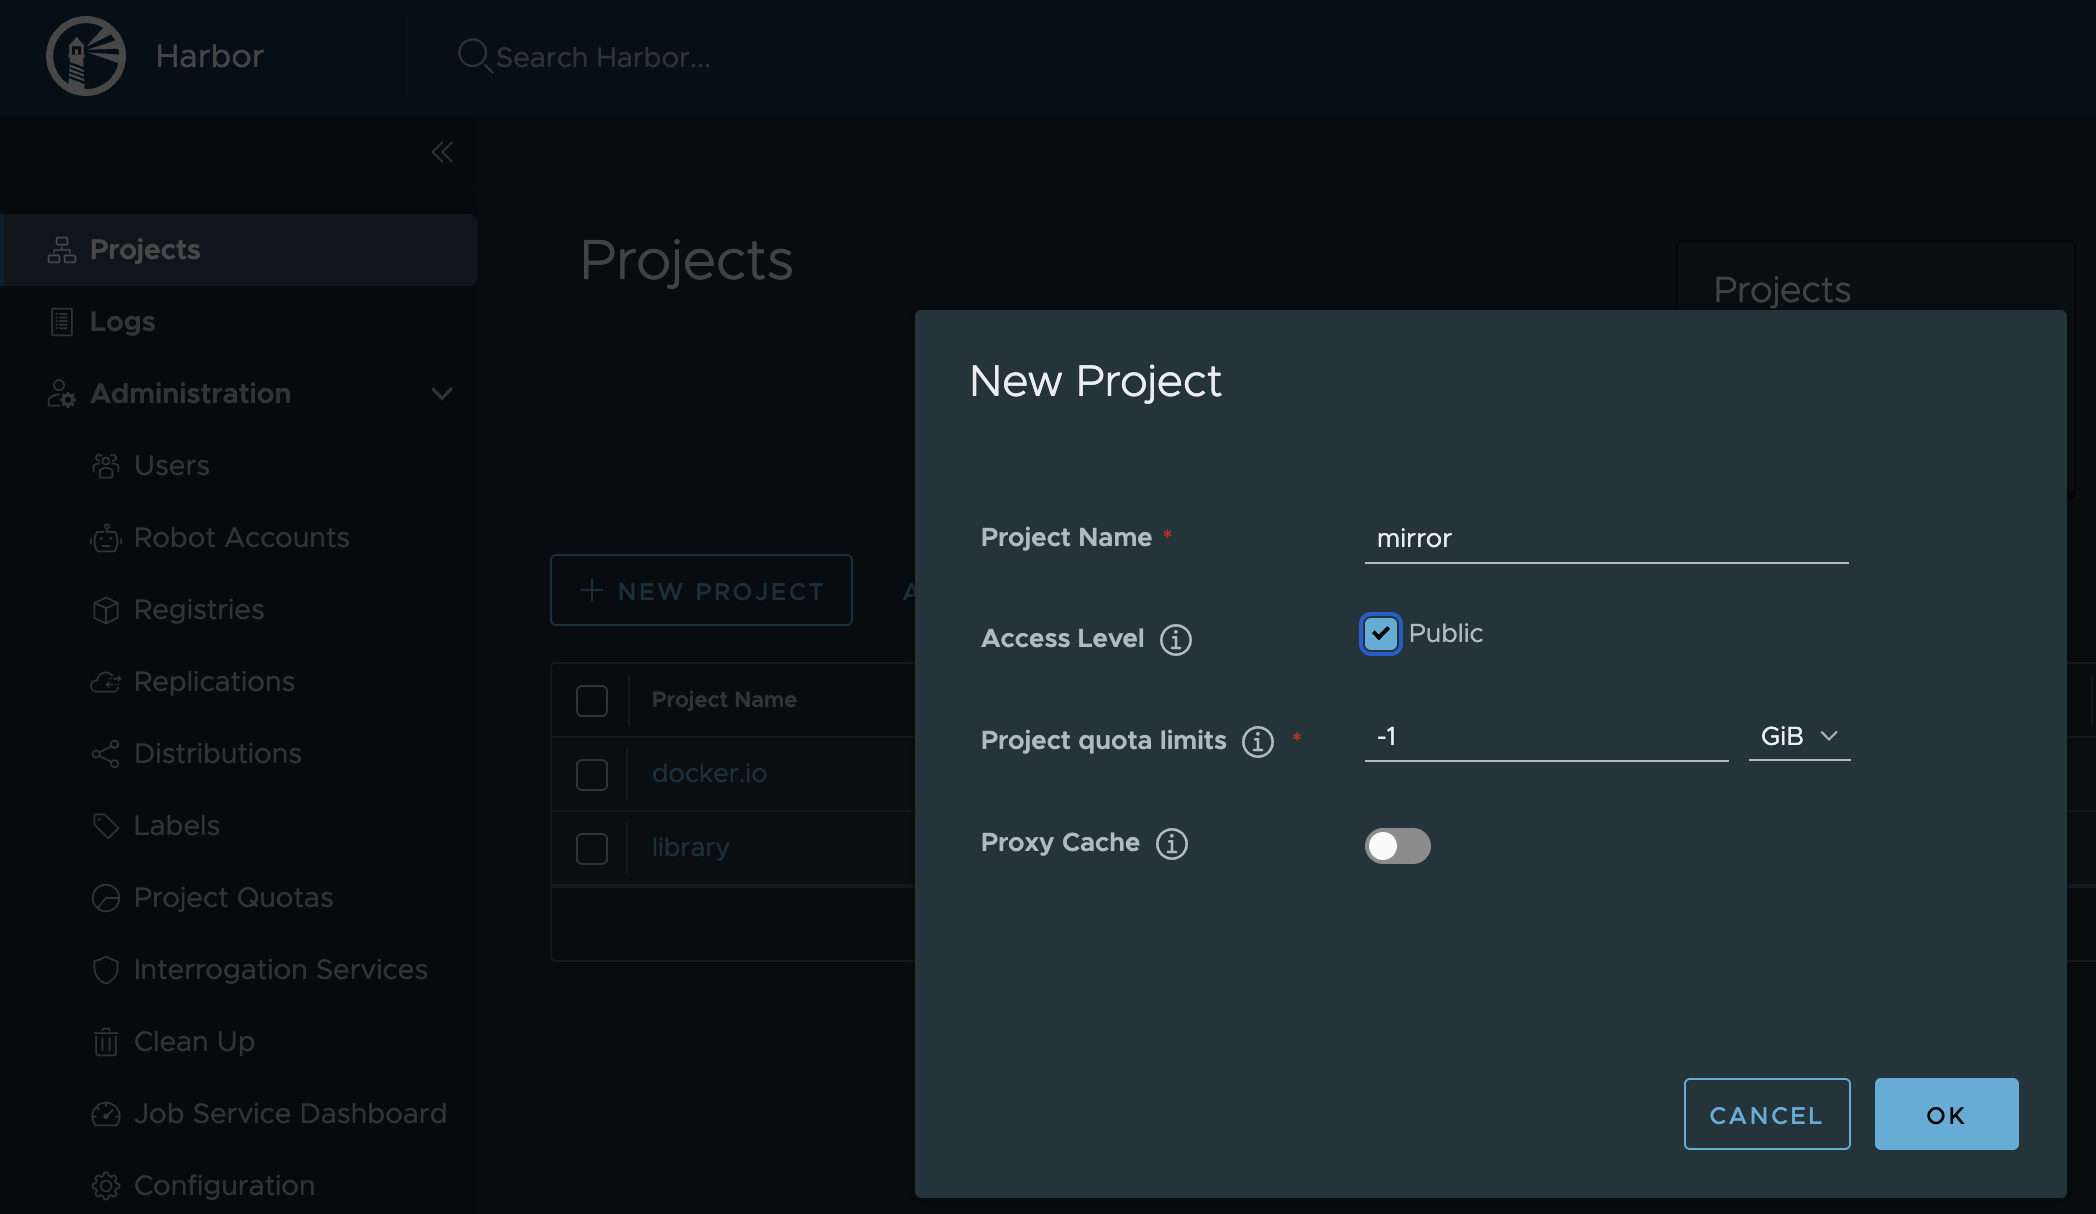
Project ที่สร้างขึ้น